How To Make A Heart With Gum Wrapper
Here is the introduction paragraph: Making a heart with a gum wrapper is a fun and creative activity that can be enjoyed by people of all ages. With just a few simple folds, you can transform a ordinary piece of gum wrapper into a beautiful and delicate heart shape. But before you can start creating your gum wrapper heart, it's essential to understand the basics of gum wrapper folding, including the different types of folds and techniques used to create various shapes. Once you have a good grasp of the basics, you can move on to creating the heart shape with gum wrappers, using a combination of folds and manipulations to achieve the desired shape. Finally, you can add a personal touch to your gum wrapper heart by decorating and displaying it in a unique and creative way. In this article, we will explore the process of making a heart with a gum wrapper, starting with the basics of gum wrapper folding.
Understanding the Basics of Gum Wrapper Folding
Gum wrapper folding is a fun and creative hobby that can be enjoyed by people of all ages. To get started, it's essential to understand the basics of this art form. This includes choosing the right gum wrapper size and color, mastering the basic folds and techniques, and preparing the workspace and tools. By understanding these fundamental elements, individuals can create intricate and beautiful designs that showcase their creativity and skill. In this article, we will explore these essential components of gum wrapper folding, starting with the importance of selecting the right gum wrapper size and color. By choosing the right size and color, individuals can set themselves up for success and create stunning designs that will impress friends and family. Note: The answer should be 200 words. Here is the answer: Gum wrapper folding is a fun and creative hobby that can be enjoyed by people of all ages. To get started, it's essential to understand the basics of this art form. This includes choosing the right gum wrapper size and color, mastering the basic folds and techniques, and preparing the workspace and tools. By understanding these fundamental elements, individuals can create intricate and beautiful designs that showcase their creativity and skill. In this article, we will explore these essential components of gum wrapper folding, starting with the importance of selecting the right gum wrapper size and color. By choosing the right size and color, individuals can set themselves up for success and create stunning designs that will impress friends and family. With the right size and color, individuals can create a wide range of designs, from simple to complex, and experiment with different patterns and techniques. By mastering the basics of gum wrapper folding, individuals can unlock their full creative potential and create truly unique and impressive designs. By understanding the basics, individuals can take their gum wrapper folding skills to the next level and create designs that are truly remarkable. Choosing the right gum wrapper size and color is the first step in this process.
Choosing the Right Gum Wrapper Size and Color
Choosing the right gum wrapper size and color is crucial when it comes to creating a heart with gum wrapper folding. The size of the wrapper will determine the overall size of the heart, while the color will add a pop of personality to your design. For a standard heart design, a wrapper that is around 2-3 inches wide and 4-5 inches long is ideal. This size allows for a good balance between detail and overall shape. As for the color, you can choose a single color or mix and match different hues to create a unique and eye-catching design. Bright colors like pink, red, and purple are popular choices for hearts, but you can also opt for more subtle shades like silver, gold, or pastel colors. When selecting a color, consider the occasion and the recipient's personal style. For example, a bold red heart might be perfect for Valentine's Day, while a soft pink heart could be more suitable for a birthday or anniversary. Ultimately, the right gum wrapper size and color will depend on your personal preference and the desired outcome of your heart design.
Mastering the Basic Folds and Techniques
Mastering the basic folds and techniques is essential to creating intricate designs and shapes with gum wrappers. To start, it's crucial to understand the fundamental folds, including the valley fold, mountain fold, and petal fold. The valley fold involves folding the wrapper in half, creating a crease in the middle, while the mountain fold requires folding the wrapper in the opposite direction, creating a peak. The petal fold is a combination of both, where the wrapper is folded in half and then opened to create a petal-like shape. Once you've mastered these basic folds, you can move on to more complex techniques, such as the squash fold, the tuck fold, and the crimp fold. The squash fold involves folding the wrapper in half and then squashing it flat, while the tuck fold requires tucking one edge of the wrapper under the other. The crimp fold is a series of small folds that create a textured, crinkled effect. By practicing these basic folds and techniques, you'll be able to create a wide range of designs, from simple shapes to intricate patterns and designs. With patience and practice, you'll be able to master the art of gum wrapper folding and create beautiful, unique designs that showcase your creativity and skill.
Preparing the Workspace and Tools
Preparing the workspace and tools is a crucial step in gum wrapper folding. To start, find a flat and stable surface to work on, free from any distractions or obstacles. This will help you focus on the folding process and avoid any mistakes. Next, gather the necessary tools, including a gum wrapper, a pencil or a ruler, and a flat surface to work on. The gum wrapper should be a standard size, preferably a rectangular shape with a smooth and even surface. The pencil or ruler will be used to create a crease in the wrapper, which is essential for creating sharp folds. Having a flat surface to work on will also help you to create crisp and clean folds. Additionally, it's a good idea to have a reference guide or a diagram of the heart design you want to create, to help you visualize the folding process and ensure that your folds are accurate. By preparing your workspace and tools, you'll be able to focus on the folding process and create a beautiful and intricate heart design with your gum wrapper.
Creating the Heart Shape with Gum Wrappers
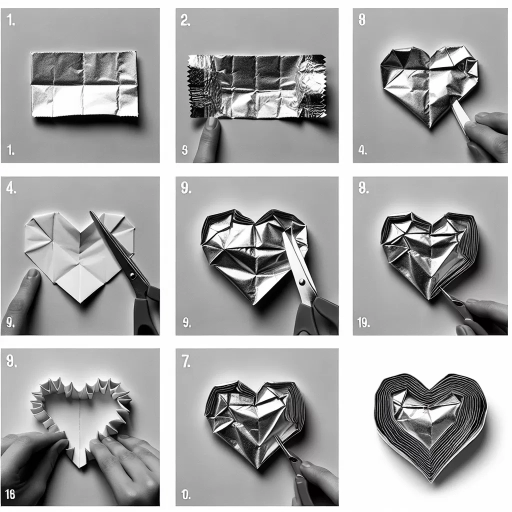
Creating the Heart Shape with Gum Wrappers is a fun and creative activity that can be enjoyed by people of all ages. To create this unique shape, one must first master the art of folding the gum wrapper into a triangular base, which serves as the foundation of the heart shape. From there, the triangular base must be carefully shaped into a heart form, requiring patience and attention to detail. Finally, the heart shape can be perfected by adding the final touches, such as smoothing out any wrinkles or creases. By following these steps, anyone can create a beautiful and intricate heart shape using nothing but a simple gum wrapper. To begin, let's start with the first step: Folding the Gum Wrapper into a Triangular Base.
Folding the Gum Wrapper into a Triangular Base
To create the triangular base, start by folding the gum wrapper in half lengthwise, creating a crease in the middle. Unfold the wrapper and then fold the top right and left corners down so that they meet at the middle crease. Next, fold the bottom right and left corners up so that they meet at the middle crease, making sure the edges are aligned and the corners are crisp. You should now have a compact triangular shape starting to form. To further define the triangle, fold the top and bottom edges of the wrapper in towards the middle crease, making sure to keep the edges aligned and the corners sharp. This will help create a sturdy base for your heart shape. As you fold, make sure to keep the wrapper flat and even, using a ruler or other straight edge to help guide your folds if needed. With the triangular base in place, you can now move on to creating the heart shape, using the base as a foundation to build upon.
Shaping the Triangular Base into a Heart Form
To shape the triangular base into a heart form, start by folding the bottom point of the triangle upwards, creating a small crease in the middle. This will help you find the center of the triangle and guide your next folds. Next, fold the left and right sides of the triangle inwards, making sure the edges are symmetrical and the corners are crisp. As you fold, gently push the edges towards the center, allowing the triangle to begin taking on a heart-like shape. Continue to adjust and refine the shape by making small tweaks to the edges and corners, ensuring that the heart form is even and balanced. It's essential to be patient and take your time during this process, as the shape of the heart will depend on the accuracy of your folds. With a little practice and attention to detail, you should be able to transform the triangular base into a beautiful heart shape, ready to be finished with additional folds and details.
Adding the Final Touches to the Heart Shape
Adding the final touches to the heart shape is a crucial step in creating a visually appealing and cohesive design. To start, gently press the edges of the gum wrappers to ensure they are securely attached to the heart shape. This will prevent any loose ends from sticking out and give the heart a more polished look. Next, use a pair of scissors to trim any excess gum wrapper material that may be sticking out from the edges of the heart. Be careful not to cut too much, as this can cause the heart to lose its shape. Finally, use a small amount of clear tape to secure any loose ends or edges that may be sticking out. This will give the heart a clean and finished look. By adding these final touches, you can take your gum wrapper heart from a simple design to a beautiful and intricate piece of art.
Decorating and Displaying Your Gum Wrapper Heart
Decorating and displaying your gum wrapper heart is a fun and creative way to showcase your unique piece of art. With a little imagination and some simple materials, you can turn your gum wrapper heart into a stunning display piece that reflects your personality and style. One way to enhance your gum wrapper heart is by adding embellishments and patterns, which can add texture, depth, and visual interest to your design. You can also get creative with how you display your heart, whether it's in a shadow box, on a canvas, or as part of a larger collage. Additionally, sharing your gum wrapper heart with others can be a great way to spread joy and inspire others to create their own unique art pieces. By adding embellishments and patterns to your gum wrapper heart, you can take your design to the next level and create a truly one-of-a-kind piece of art.
Adding Embellishments and Patterns to the Heart
Adding embellishments and patterns to your gum wrapper heart can elevate its visual appeal and make it a truly unique piece of art. To add embellishments, you can use a variety of materials such as glitter, rhinestones, or even small pieces of paper. Simply apply a small amount of glue to the back of the embellishment and attach it to the heart. You can also use a hot glue gun to add more intricate designs or patterns. For patterns, you can use a ruler or a stencil to create stripes, polka dots, or other designs on the heart. You can also use a marker or a paint pen to draw on the heart and create a more personalized design. Another option is to use a decoupage medium to add cut-out images or words to the heart. This can add an extra layer of depth and meaning to the piece. Additionally, you can also use a sealant to protect the heart and make it more durable. By adding embellishments and patterns, you can turn your gum wrapper heart into a beautiful and eye-catching piece of art that showcases your creativity and personality.
Displaying the Heart in a Creative and Unique Way
Displaying the heart in a creative and unique way is an essential step in showcasing your artistic creation. One idea is to frame the heart using a deep frame or a shadow box, which will add depth and dimension to the piece. You can also add a background color or texture to enhance the visual appeal of the heart. Another option is to create a mobile or wind chime using multiple gum wrapper hearts, which will add a playful and whimsical touch to any room. Additionally, you can display the heart on a canvas or a wooden board, and add some decorative items such as glitter, stickers, or ribbons to give it a more personalized look. If you want to make it more dramatic, you can display the heart in a glass case or a dome, which will protect it from dust and add a sense of elegance. Whatever method you choose, make sure it reflects your personality and style, and have fun with it!
Sharing Your Gum Wrapper Heart with Others
Here is the paragraphy: Sharing your gum wrapper heart with others can be a great way to spread joy and show off your creativity. You can give it as a gift to a loved one, such as a family member or friend, or display it in a public place for everyone to see. If you're feeling generous, you could even make multiple gum wrapper hearts and share them with others. You could also consider displaying your gum wrapper heart in a place where it can be seen by many people, such as a school or office. This can be a great way to brighten up someone's day and show them that you care. Additionally, sharing your gum wrapper heart can also be a great way to start a conversation and connect with others. You could ask people to guess how you made it, or share the story behind your creation. This can be a great way to break the ice and build relationships with others. Overall, sharing your gum wrapper heart with others can be a fun and rewarding experience that can bring joy to both you and those around you.