How To Draw A Frog Easy
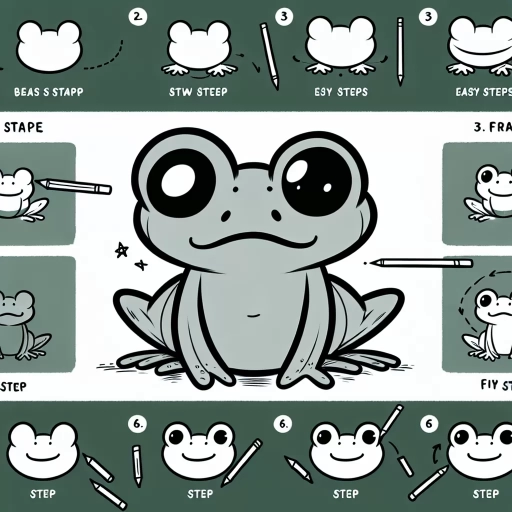
Drawing a frog can be a fun and creative activity, but it can also be intimidating if you're new to drawing. However, with some simple steps and techniques, you can learn to draw a frog easily. To get started, it's essential to understand the basic anatomy of a frog, including its body shape, limb structure, and facial features. Once you have a good grasp of the frog's anatomy, you can begin sketching its body and limbs, paying attention to proportions and details. Finally, you can add texture and details to your frog drawing, such as eyes, nostrils, and skin patterns. In this article, we'll break down the process of drawing a frog into three easy-to-follow steps. First, we'll explore the basic anatomy of a frog, including its body shape and limb structure, to help you get a better understanding of what makes a frog look like a frog.
Understanding the Basic Frog Anatomy
Frogs are fascinating creatures that have been on our planet for over 300 million years. To truly appreciate these amphibians, it's essential to understand their basic anatomy. By recognizing the key body parts, proportions, and distinctive features of a frog's face, you'll gain a deeper appreciation for their unique characteristics. In this article, we'll explore the fundamental aspects of frog anatomy, starting with the identification of key body parts, such as the head, torso, limbs, and organs. We'll also examine the proportions of a frog's body, including the relationship between their limbs and torso. Additionally, we'll take a closer look at the distinctive features of a frog's face, including their eyes, nose, and mouth. By understanding these basic components, you'll be able to better recognize and appreciate the diversity of frog species. So, let's begin by identifying the key body parts of a frog.
Identifying the Key Body Parts of a Frog
The key body parts of a frog include the head, eyes, nostrils, mouth, and ears. The head is rounded and slightly flattened, with the eyes positioned on top and the nostrils located on the end of the snout. The mouth is a horizontal slit that is usually closed, and the ears are internal, with no visible external ear structure. The body is divided into the thorax, abdomen, and limbs. The thorax contains the heart and lungs, while the abdomen houses the digestive organs. The limbs are divided into the forelimbs and hindlimbs, with the forelimbs being shorter and more slender than the hindlimbs. The forelimbs have four fingers, while the hindlimbs have five toes. The skin is smooth and moist, with a layer of mucus that helps to keep it hydrated. The frog's body is also covered in tiny bumps and ridges, which help to reduce friction and improve movement. Understanding the key body parts of a frog is essential for drawing a realistic and accurate representation of this amphibian.
Recognizing the Proportions of a Frog's Body
Recognizing the proportions of a frog's body is crucial in drawing a realistic and accurate representation. A frog's body is typically divided into three main parts: the head, body, and legs. The head is usually about one-third the size of the body, with the eyes positioned on the top of the head, and the mouth and nostrils on the front. The body is roughly oval in shape, with the chest area being slightly wider than the abdomen. The legs are long and slender, with the hind legs being significantly larger and more muscular than the front legs. The proportions of a frog's body can vary depending on the species, but generally, the body is about 1.5 to 2 times the length of the head. By understanding and accurately depicting these proportions, you can create a more realistic and detailed drawing of a frog.
Noticing the Distinctive Features of a Frog's Face
The distinctive features of a frog's face are quite unique and play a crucial role in its overall appearance. One of the most noticeable features is the frog's eyes, which are typically large and round, with vertical pupils that can be golden, copper, or even silver in color. The eyes are positioned on the top of the frog's head, allowing it to have a wide field of vision and detect potential predators or prey. Another distinctive feature is the frog's nose, which is small and rounded, and is often slightly upturned, giving the frog a somewhat endearing expression. The mouth is wide and curved, with a distinctive lip that is often thicker and more prominent than the rest of the face. The frog's face is also characterized by a series of bumps and ridges, particularly around the eyes and nose, which can vary in size and shape depending on the species. Overall, the frog's face is a fascinating and complex structure that is full of interesting details and features that are worth noticing and studying.
Sketching the Frog's Body and Limbs
Sketching a frog's body and limbs requires attention to detail and a gentle touch. To create a realistic and engaging drawing, it's essential to break down the process into manageable steps. First, start by drawing the oval-shaped body and tail, which provides the foundation for the entire drawing. Next, focus on sketching the front and hind legs, taking care to capture their unique proportions and anatomy. Finally, add the webbed feet and toes, which are a distinctive feature of frogs. By following these steps, you'll be able to create a detailed and accurate drawing of a frog's body and limbs. In this article, we'll explore each of these steps in more detail, starting with the basics of drawing the oval-shaped body and tail.
Drawing the Oval-Shaped Body and Tail
To draw the oval-shaped body and tail of a frog, start by sketching a large oval for the body, making sure it is tall rather than wide. The oval should be positioned in the center of your paper, with the top end slightly tilted towards the left side. Next, draw a smaller oval for the head, connected to the top of the body by a neck. The head oval should be positioned at a slight angle, with the nose end pointing towards the right side. For the tail, draw a long, curved line extending from the back of the body, tapering to a point at the end. The tail should be rounded at the base and flat at the tip. Make sure the tail is in proportion to the body, with the length being roughly one and a half times the height of the body. Pay attention to the overall shape and proportions of the body and tail, as these will help bring your frog drawing to life.
Sketching the Front and Hind Legs
Sketching the front and hind legs of a frog requires attention to detail and a gentle touch. Start by sketching the front legs, which are typically shorter and more slender than the hind legs. Begin with the upper arm, which is roughly the same width as the body, and then taper down to the forearm, which is slightly narrower. The front legs are also more angled, with the elbows pointing towards the body. Next, sketch the hands, which are small and delicate, with four fingers and a thumb. The fingers are webbed, so be sure to include the thin membranes that connect them. Moving on to the hind legs, start with the thigh, which is thicker and more muscular than the front legs. The hind legs are also longer, with a more pronounced knee joint. The calf is narrower than the thigh, and the foot is larger and more rounded than the front foot. The toes are also longer and more webbed than the front toes. As you sketch the legs, pay attention to the way they are positioned in relation to the body. The front legs are typically tucked in close to the body, while the hind legs are more splayed out to the sides. This will help you capture the frog's distinctive posture and movement. By carefully sketching the front and hind legs, you can add depth and dimension to your drawing and bring your frog to life.
Adding the Webbed Feet and Toes
To add the webbed feet and toes, start by sketching the overall shape of the feet, which should be slightly rounded and oval in shape. The hind legs should have larger feet than the front legs, with the toes facing slightly outward. Next, draw the individual toes, making sure to include the webbing between them. The webbing should be thicker and more prominent on the hind legs, with a thinner, more delicate webbing on the front legs. Be sure to also include the small, rounded pads on the underside of the toes, which provide traction and help the frog grip surfaces. As you add the webbed feet and toes, pay attention to the overall proportions and placement, ensuring that they are in balance with the rest of the body and limbs. By carefully sketching the webbed feet and toes, you can add a touch of realism and authenticity to your frog drawing.
Adding Details and Texture to the Frog
To bring a frog sculpture to life, it's essential to focus on adding details and texture. This can be achieved by paying attention to the eyes, nostrils, and mouth, which are crucial features that convey the frog's emotions and personality. Additionally, adding texture to the skin and webbed feet can create a more realistic and engaging appearance. Furthermore, enhancing the frog's facial expression can help to capture its unique character. By incorporating these details, you can transform a simple sculpture into a vibrant and lifelike representation of a frog. In this article, we will explore how to add these details, starting with the creation of the eyes, nostrils, and mouth, which are the foundation of the frog's expressive face.
Creating the Eyes, Nostrils, and Mouth
To create the eyes, nostrils, and mouth of your frog, start by drawing two small circles for the eyes, making sure to leave a small gap between them. The eyes should be positioned on either side of the head, about one-third of the way down from the top. Add a small dot in the center of each circle to create the pupils. For the nostrils, draw two small oval shapes on either side of the head, just below the eyes. The nostrils should be slightly tilted and facing downwards. To draw the mouth, start by drawing a small curved line below the nostrils, making sure it's centered between the two oval shapes. Add a small bump at the top of the curved line to create the upper lip. Finally, add a small line below the curved line to create the lower lip. Make sure the mouth is slightly curved downwards to give your frog a friendly and approachable expression. By adding these details, you'll be able to bring your frog to life and give it a unique personality.
Adding Texture to the Skin and Webbed Feet
Adding texture to the skin and webbed feet of your frog drawing can bring it to life and make it look more realistic. To add texture to the skin, start by drawing short, curved lines that follow the contours of the frog's body. These lines should be close together and vary in length to create a sense of depth and dimension. You can also add some longer, more prominent lines to suggest the frog's muscles and tendons. For the webbed feet, draw a series of connected, curved lines that resemble a network of veins. These lines should be thicker and more prominent than the lines on the skin, and should be spaced evenly apart to create a sense of symmetry. You can also add some texture to the webbing by drawing short, curved lines that follow the shape of the foot. To add some extra detail to the feet, you can draw a series of small, rounded bumps along the edges of the webbing, which will give the impression of tiny toes. By adding texture to the skin and webbed feet, you can create a more realistic and engaging frog drawing that will capture the viewer's attention.
Enhancing the Frog's Facial Expression
The facial expression of a frog can be enhanced by adding subtle details and textures. To create a more realistic and engaging face, start by defining the shape of the eyes, which are typically large and round. Add a slight curve to the upper eyelid to give the frog a more expressive look. Next, draw a small, rounded nose and a curved mouth that is slightly upturned, giving the frog a friendly and approachable appearance. To add texture, use short, curved lines to suggest the frog's skin, which is often bumpy and irregular. You can also add a few wrinkles around the eyes and mouth to give the frog a more aged and wise look. Finally, use a range of shading techniques to create depth and dimension on the frog's face, with darker shading around the eyes and mouth to create a sense of depth and dimension. By adding these subtle details and textures, you can create a frog with a unique and engaging facial expression that brings your drawing to life.