How To Draw Anime Hair
Understanding the Fundamentals of Anime Hair Drawing
The Anatomy of Anime Hair
Anime hair, unlike realistic hair, tends to emphasize style over realism. The flowing, exaggerated styles characteristic of this genre are designs in their own right, with many anime hairstyles representing character traits. Understanding the basic shapes and approaches to drawing anime hair is vital. The overall "spiky" nature of the hair, the locks' design and length, and the accentuation of the hair's flow are all integral elements of drawing anime hair.
The Importance of Varying Styles and Textures
Whether it's flared and jagged, long and flowing, or short and spiky, anime hair can be as diverse as the characters it adorns. Learning how to draw different hair styles and textures can help you diversify your anime characters and contribute to their unique personalities. It is also crucial to understand how different hair styles can be rendered with different line weights, angles, and shading techniques.
Guidelines and Proportions in Anime Hair Drawing
To draw anime hair accurately, it is important to keep in mind the head's proportions as a foundation. The hair should fit perfectly onto the head, following the skull curvature and the hairline, emphasizing the forehead's shape. Apart from that, understanding the hair parting point is also critical, as this usually determines how the hair will flow and give the anime character a distinctive look.
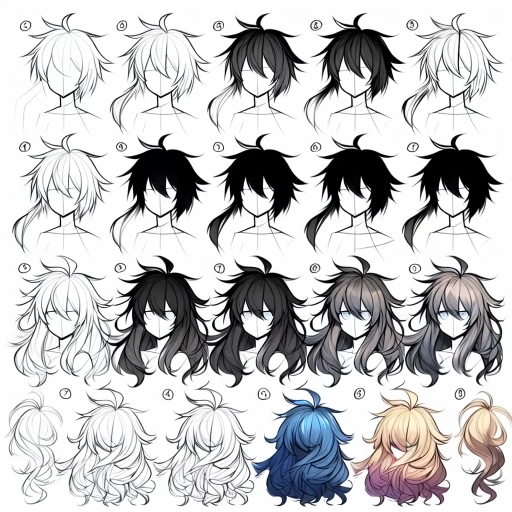
The Step-by-Step Process of Drawing Anime Hair
Starting with Basic Shapes
The first step in drawing anime hair is to lay down the basic shapes. These usually include a rounded shape for the skull and simple lines to indicate the hair's overall flow. This step creates a foundation for the hair and ensures that the subsequent details will be proportionate and accurately placed. The basic shapes serve as guidelines that support and streamline the creative process.
Adding Details to the Hair
The excitement of drawing anime hair truly begins when you start adding details. It’s in this step where you enhance the hair’s spiky texture, create volume by adding layers, and give life through highlights and shadows. Depending on the anime hair style, you can also add other distinctive elements such as hair accessories, bows or ribbons – these are minor yet effective ways of making your characters compelling and unique.
Finalizing with Shading and Texture
Once the hair's basic shapes and details are established, the last step involves shading and texturizing the hair. This step is key to making the hair appear realistic and three-dimensional on a two-dimensional medium. Understanding where to place shadows, midtones, and highlights can make a significant difference in your end result and give your anime hairstyles a genuine sense of volume and depth.
Common Challenges and Tips in Drawing Anime Hair
Avoiding Flat and Uniform Hair
A common challenge in drawing anime hair is that it often ends up looking flat or too uniform. To avoid this, it's important to keep in mind the hair's volume and movement. Varying the lengths and directions of the hair spikes, adding layers of hair locks, and correctly shading can all contribute to creating depth and volume in your anime hairstyles.
Getting the Hairline Right
Drawing a convincing hairline that suits the anime character's face can often be tricky. To tackle this, it's crucial to grasp the basic shape and positioning of the anime hairline, which often sits quite high on the forehead. It's also important to consider the character's age, gender, and personality, as different hairlines can indicate different character features.
Maintaining Consistency in Various Angles
One of the challenges in drawing anime hair is maintaining the hairstyle's consistency when the character is viewed from different angles. Understanding the hair's three-dimensional form can help artists maintain this consistency. It's also useful to sketch out small thumbnails of the character's head from multiple angles, ensuring that the hairstyle remains coherent from all viewpoints.