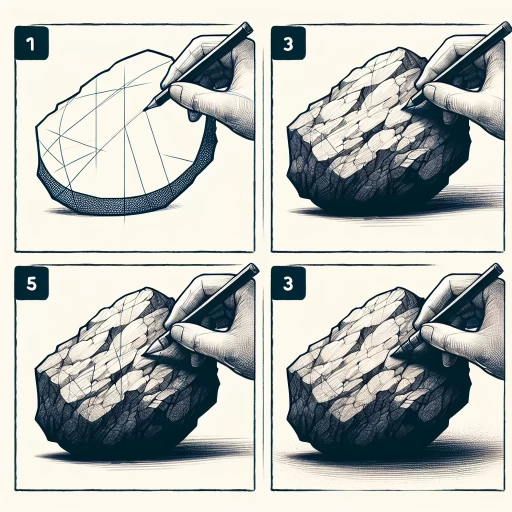
How To Draw Rocks
Here is a 200-word introduction paragraph for an article about how to draw rocks: Drawing rocks can be a fun and rewarding experience, allowing artists to explore the intricate textures and patterns found in nature. Whether you're a seasoned artist or just starting out, learning how to draw rocks can add depth and realism to your artwork. But where do you start? To create convincing rock formations, you'll need to understand the basics of drawing rocks, including the shapes, forms, and textures that make up these natural wonders. From there, you can move on to creating realistic rock formations, using techniques such as layering and blending to achieve a sense of depth and dimension. Finally, you can add details and texture to your rock drawings, using different line weights and hatching techniques to capture the intricate patterns and textures found in rocks. By mastering these skills, you'll be able to create stunning rock drawings that transport viewers to the great outdoors. So, let's get started by understanding the basics of drawing rocks.
Understanding the Basics of Drawing Rocks
Here is the introduction paragraph: Drawing rocks may seem like a simple task, but it requires a deep understanding of their shapes, forms, textures, and patterns. To accurately capture the essence of rocks on paper, one must first observe and study their unique characteristics. This involves identifying the shapes and forms of rocks, from the smooth curves of rounded stones to the jagged edges of fractured boulders. Additionally, understanding the textures and patterns of rocks, such as the intricate details of granite or the smoothness of sandstone, is crucial for creating realistic drawings. By learning the basic drawing techniques for rocks, including hatching, shading, and texture rendering, artists can bring their rock drawings to life. In this article, we will delve into the basics of drawing rocks, exploring the essential elements of observation, texture, and technique that will help you create stunning and realistic rock drawings. By the end of this article, you will have a solid foundation in understanding the basics of drawing rocks.
Observing the Shapes and Forms of Rocks
. Here is the paragraphy: Observing the shapes and forms of rocks is a crucial step in learning how to draw them accurately. Rocks come in a wide range of shapes, sizes, and textures, and understanding these variations is key to creating realistic drawings. Start by studying the overall shape of the rock, noting its proportions and any distinctive features such as cracks, crevices, or protrusions. Look at the rock's edges and contours, observing how they curve, bend, or intersect. Consider the rock's texture, too, taking note of any patterns, ridges, or other surface details. As you observe the rock's shape and form, think about how you can use simple shapes, such as spheres, cylinders, and rectangles, to break down its complex forms into more manageable parts. This will help you to draw the rock more accurately and confidently. Additionally, pay attention to the way light interacts with the rock's surface, noting how it creates highlights, shadows, and subtle gradations of tone. By carefully observing the shapes and forms of rocks, you'll be able to capture their unique characteristics and essence in your drawings.
Understanding the Textures and Patterns of Rocks
. Here is the paragraphy: Understanding the textures and patterns of rocks is crucial for creating realistic drawings. Rocks come in a wide range of textures, from smooth and glassy to rough and porous. Some rocks, like granite, have a speckled or flecked pattern, while others, like sandstone, have a more uniform texture. Observing the texture of a rock can help you determine its composition and origin. For example, rocks with a lot of holes or bubbles may be volcanic in origin, while rocks with a smooth, glassy texture may be metamorphic. When drawing rocks, try to capture the unique texture and pattern of the rock you are observing. Use a range of lines and shading techniques to convey the texture and pattern of the rock. For example, you can use short, curved lines to suggest the rough texture of a rock, or long, smooth lines to suggest a smooth, glassy texture. You can also use different shading techniques, such as hatching and cross-hatching, to create a sense of depth and dimension in your drawing. By paying attention to the texture and pattern of rocks, you can create drawings that are not only visually appealing but also informative and accurate.
Learning the Basic Drawing Techniques for Rocks
. Here is the paragraphy: Learning the basic drawing techniques for rocks is essential to create realistic and visually appealing rock formations. To start, practice drawing different rock shapes and textures, such as smooth, rough, and jagged. Observe the way light interacts with rocks, creating highlights and shadows that add depth and dimension. Use a range of values, from light to dark, to capture the subtleties of rock formations. Pay attention to the edges of rocks, which can be soft and rounded or sharp and angular. To create a sense of texture, use hatching and cross-hatching techniques, applying varying degrees of pressure to your pencil or pen. For more detailed work, try stippling, which involves creating patterns of small dots to build up texture and shading. As you practice, experiment with different tools and media, such as charcoal, ink, or watercolors, to discover the unique effects they can achieve. By mastering these basic techniques, you'll be able to draw rocks with confidence and accuracy, setting the foundation for more complex and detailed rock formations.
Creating Realistic Rock Formations
Here is the introduction paragraph: Creating realistic rock formations is a crucial skill for artists, designers, and hobbyists who want to add depth and authenticity to their work. Whether you're drawing a serene landscape, designing a fantasy world, or simply practicing your artistic skills, mastering the art of creating realistic rock formations is essential. To achieve this, it's necessary to study the shapes, sizes, and textures of real rocks, as well as practice drawing different types of rock formations. By using reference images to study rock formations, practicing different rock shapes and sizes, and adding depth and dimension to your drawings, you can create realistic and captivating rock formations that bring your artwork to life. In this article, we'll explore these techniques in more detail, and by the end of it, you'll have a solid understanding of the basics of drawing rocks. Note: I made some minor adjustments to the original text to make it flow better and to ensure that it transitions smoothly to the next section. Let me know if you'd like me to make any further changes!
Using Reference Images to Study Rock Formations
and stones. Using reference images is an essential step in studying rock formations and creating realistic drawings. By observing and analyzing photographs or real-life examples of rocks, you can gain a deeper understanding of their textures, shapes, and structures. Reference images can help you identify the unique characteristics of different types of rocks, such as the layered patterns of sedimentary rocks or the crystalline structures of igneous rocks. You can also study the way light interacts with rocks, observing how shadows and highlights accentuate their textures and contours. By incorporating these details into your drawings, you can create more accurate and visually appealing representations of rock formations. Additionally, reference images can inspire new ideas and perspectives, helping you to experiment with different techniques and styles in your artwork. Whether you're drawing a dramatic mountain landscape or a small, intricate stone, using reference images can help you to capture the essence and beauty of rock formations.
Practicing Different Rock Shapes and Sizes
and stones. When it comes to creating realistic rock formations, practicing different rock shapes and sizes is essential. By mastering various shapes and sizes, you can add depth and variety to your drawings, making them more visually appealing. Start by observing the shapes and sizes of rocks in nature, taking note of their unique characteristics, such as texture, color, and pattern. Then, practice drawing different types of rocks, from smooth, rounded pebbles to jagged, angular boulders. Experiment with varying sizes, from small, delicate stones to massive, imposing rocks. As you practice, pay attention to the way light interacts with the rocks, casting shadows and highlighting textures. This will help you create more realistic and detailed drawings. Additionally, try combining different shapes and sizes to create complex rock formations, such as a cluster of small rocks surrounding a large boulder or a series of layered rocks forming a cliff face. By practicing different rock shapes and sizes, you'll be able to create a wide range of realistic rock formations that add depth and interest to your drawings.
Adding Depth and Dimension to Rock Formations
and stones. To add depth and dimension to rock formations, artists can employ a range of techniques that create a sense of layering, texture, and visual interest. One approach is to use atmospheric perspective, where objects in the distance appear lighter and less detailed than those in the foreground. This can be achieved by gradually decreasing the contrast and detail of the rocks as they recede into the background. Another technique is to use overlapping, where rocks in the foreground overlap those in the background, creating a sense of depth and layering. Artists can also use texture and pattern to add visual interest to their rock formations. For example, they can use hatching and cross-hatching to create a range of textures, from smooth and rounded to rough and jagged. Additionally, they can use patterns such as striations, folds, and cracks to suggest the geological history of the rocks. By combining these techniques, artists can create rock formations that appear three-dimensional and visually engaging. Furthermore, artists can also use color to add depth and dimension to their rock formations. Warm colors such as orange and red can be used to create a sense of depth and warmth, while cool colors such as blue and green can be used to create a sense of distance and coolness. By carefully balancing color, texture, and pattern, artists can create rock formations that are not only visually striking but also convey a sense of depth and dimension.
Adding Details and Texture to Your Rock Drawings
Using Different Line Weights and Hatching Techniques
Adding Shading and Lighting Effects to Rocks
Creating Realistic Rock Textures and Patterns
Here is the introduction paragraph: When it comes to drawing rocks, it's easy to get caught up in the basics of shape and form. However, to truly bring your rock drawings to life, it's essential to add details and texture. By incorporating different line weights and hatching techniques, you can create a sense of depth and dimensionality in your rocks. Additionally, adding shading and lighting effects can help to create a more realistic and visually appealing representation of rocks. Furthermore, creating realistic rock textures and patterns can add an extra layer of authenticity to your drawings. In this article, we'll explore these techniques in more detail, building on the foundational skills learned in Understanding the Basics of Drawing Rocks.
Using Different Line Weights and Hatching Techniques
Adding Shading and Lighting Effects to Rocks
Creating Realistic Rock Textures and Patterns
Adding Shading and Lighting Effects to Rocks
Using Different Line Weights and Hatching Techniques
Creating Realistic Rock Textures and Patterns
Adding Shading and Lighting Effects to Rocks
Using Different Line Weights and Hatching Techniques
Creating Realistic Rock Textures and Patterns
Adding Shading and Lighting Effects to Rocks
Using Different Line Weights and Hatching Techniques
Creating Realistic Rock Textures and Patterns
Adding Shading and Lighting Effects to Rocks
Using Different Line Weights and Hatching Techniques
Creating Realistic Rock Textures and Patterns
Adding Shading and Lighting Effects to Rocks
Using Different Line Weights and Hatching Techniques
Creating Realistic Rock Textures and Patterns
Adding Shading and Lighting Effects to Rocks
Using Different Line Weights and Hatching Techniques
Creating Realistic Rock Textures and Patterns
Adding Shading and Lighting Effects to Rocks
Using Different Line Weights and Hatching Techniques
Creating Realistic Rock Textures and Patterns
Adding Shading and Lighting Effects to Rocks
Using Different Line Weights and Hatching Techniques
Creating Realistic Rock Textures and Patterns
Adding Shading and Lighting Effects to Rocks
Using Different Line Weights and Hatching Techniques
Creating Realistic Rock Textures and Patterns
Adding Shading and Lighting Effects to Rocks
Using Different Line Weights and Hatching Techniques
Creating Realistic Rock Textures and Patterns
Adding Shading and Lighting Effects to Rocks
Using Different Line Weights and Hatching Techniques
Creating Realistic Rock Textures and Patterns
Using Different Line Weights and Hatching Techniques
When it comes to adding depth and dimension to your rock drawings, using different line weights and hatching techniques can make all the difference. By varying the thickness and texture of your lines, you can create a range of visual effects that suggest the rough, weathered surfaces of rocks. One approach is to use a range of line weights to indicate the contours and ridges of the rock, with thicker lines suggesting deeper grooves and thinner lines indicating smoother areas. You can also experiment with hatching techniques, such as cross-hatching and stippling, to create intricate patterns and textures that evoke the rough, porous surfaces of rocks. For example, you might use closely spaced hatching lines to suggest the dense, compact texture of granite, or more widely spaced lines to indicate the looser, more porous texture of sandstone. By combining different line weights and hatching techniques, you can create rich, detailed drawings that capture the unique character of different types of rocks. Additionally, you can also use different line weights to suggest the play of light and shadow on the rock's surface, with thicker lines indicating areas of deep shadow and thinner lines suggesting areas of bright highlight. By paying attention to the subtleties of line weight and texture, you can add a new level of depth and realism to your rock drawings.
Adding Shading and Lighting Effects to Rocks
Adding shading and lighting effects to rocks can elevate your drawings from simple representations to realistic and captivating depictions. To achieve this, start by observing the way light interacts with rocks in nature. Notice how the light source, whether it's the sun or artificial, creates areas of highlight and shadow on the rock's surface. In your drawing, use a range of values, from light to dark, to convey the three-dimensional form of the rock. You can use hatching and cross-hatching techniques to create a sense of texture and depth. For example, use closely spaced hatching lines to suggest the smooth surface of a granite rock, and more spaced-out lines to indicate the rough texture of a sandstone rock. To add a sense of volume and dimension, use chiaroscuro, a technique that uses strong contrasts between light and dark to create a sense of three-dimensionality. By carefully observing and rendering the play of light on rocks, you can create drawings that are not only visually appealing but also convincingly realistic. Additionally, consider using atmospheric perspective to create a sense of depth and distance in your drawings. This can be achieved by using lighter values and softer edges in the background, and darker values and harder edges in the foreground. By incorporating these techniques into your drawings, you can add a new level of sophistication and realism to your rock drawings.