How To Draw Poppies
 There's an undeniable charm and remarkable elegance in poppies that make them a popular subject in art and photography. These vibrant red flowers, symbols of remembrance, and peace, offer an exquisite means to bring color and life into your artwork. This comprehensive guide endeavors to lead you through the exciting process of how to draw poppies in a simple, yet refined way. The course of action is divided into three easy-to-follow sections: 'Preparing Your Materials', 'Understanding Poppies' Anatomy', and 'Sketching the Basic Form'. Each section precisely details the steps to bring your poppies to life, starting from selections of proper drawing tools, studying the poppies' unique physical characteristics, and eventually, sketching the basic outline. Our first objective, 'Preparing Your Materials', imparts essential knowledge about choosing the right set of tools, which lays the groundwork for the drawing process. So, ready your pencils, colors, and let's embark on this promising journey together.
Step 1: Preparing Your Materials
Effective preparation is the vital first step towards producing top notch art, a process that requires not just expertise, but also the right materials. Knowing how to choose the perfect tools goes a long way in determining the outcome of your artistic endeavor. This involves a keen focus on the three pertinent stages of materials selection; picking the right pencil, selecting suitable paper, and gathering appropriate reference images. The pencil is your primary tool of trade and choosing the right one will have a significant impact on your work. This boils down to understanding the various types of pencils and what they offer. Moving on to the second step, we focus on choosing suitable paper. Not just any paper will do - each paper type has unique characteristics that can significantly impact the final artwork. Lastly, we’ll look at how to gather good quality reference images. These can serve as a great source of inspiration and provide a roadmap for your art. Let's delve deeper into the first step of material preparation - choosing the right pencil.
1.1 Choosing the Right Pencils
Choosing the right pencils forms the foundation of any artwork and is an essential part in learning how to draw poppies or any other subject. The type and hardness of the pencils you choose largely determine the range of tones and details you can achieve in your drawing. Initially, it may seem that there's a myriad of different pencil types available in the market, but the right selection mainly boils down to understanding two aspects: the graphite grading scale and the intended use. The graphite grading scale consists of a series from 9H to 9B, with H standing for Hard and B for Black. Hard pencils (like the 9H) give lighter marks and are perfect for creating fine lines and details, while Black pencils (such as 9B) ones produce darker, heavier marks which are great for shading and rendering darker areas. For a balanced drawing of a poppy, a combination of H and B pencils would be ideal. You could start with a 2H or HB for initial sketching and outlining, as they provide enough darkness for visibility but light enough for easy erasure of mistakes. 2B and 4B pencils are excellent for creating medium to dark shades, giving your poppy depth and dimension, while a 6B or 8B can be used for emphasizing the darkest areas or adding final touches. However, the selection doesn't end there. Another key factor to deliberate on is the style you want to achieve. For instance, if you plan on creating a highly detailed, realistic poppy, mechanical pencils with fine leads work best. On the other hand, traditional wooden pencils are suitable for loose, expressive styles, and the characteristic of being able to expose a greater surface area of lead may lend itself favourable to shading and texturing techniques. Some artists even prefer using charcoal or colored pencils to bring a lifelike vibrancy to their poppies. Another note to keep in mind when selecting pencils is to pay attention to their quality. Always opt for artist-grade pencils which have higher quality leads that offer better flexibility, range, and consistency in their marks. High-quality pencil marks are also more stable, reducing the likelihood of smudging or fading over time. In conclusion, the choice of pencil can greatly influence the final result of your artwork. Therefore, understanding your style, the subject matter and the characteristics of different pencils are key to making an informed choice. In the case of poppies, the blend of detail, vibrancy, and depth offered by a selective mix of H, B, and possibly colored pencils, ensures your poppies rise off the paper with realism and beauty.
1.2 Selecting a Suitable Paper
1.2 Selecting a Suitable Paper Selecting an appropriate paper is a crucial aspect when you prepare to draw any form of artwork, including poppies, and it has a profound impact on the overall outcome of your sketches. When choosing a paper, there are a few factors to consider. First, consider the weight of the paper. This refers to the thickness or heaviness of the paper. Lightweight papers, like regular bond paper, are prone to tearing or wrinkling, especially when doing more intensive drawing techniques or when using heavier drawing mediums. Heavier papers, like drawing or bristol papers, can better absorb pigments and handle repeated erasing without tearing. They are ideal for serious drawings that you intend to keep. Secondly, the texture of the paper is significant. Drawing papers usually come in three textures: smooth, medium, and rough. Smooth surfaces offer refined details, crisp lines, and are typically used for precision drawing such as pen and ink or marker drawings. Medium textures offer a good balance of detail ability and pigment hold, making them suitable for graphite or colored pencils drawings. Rough textures offer the most resistance, allowing artists to create bold lines and to accumulate lots of vibrant colors. Next, consider the color of the paper. White is the most commonly used color due to its versatility and ability to make your colors pop. Light-colored or mid-toned papers allow for the use of white or light colored pencils to create highlights and can add a unique look to your artwork. Lastly, the size of the paper matters. Small sheets may limit your work while larger sizes offer more room for details. However, remember to choose the size that fits best with your level of detailing and the scale of your poppy drawing. In the context of drawing poppies, since it is a form of delicate flower, it is advisable to opt for medium weight paper, with a smooth to medium texture. It's best to use white paper as it will make the poppy's vibrant red hue stand out compellingly. For beginners, A4 size paper would be suitable, while more experienced artists may prefer larger rulings. In conclusion, choosing the right paper for your poppy drawing is a subtle yet significant element that can elevate your artwork, by enhancing the fineness of the poppies. Always remember, the quality and type of paper you choose directly impact the final visual appeal of your drawing.
1.3 Gathering Reference Images
of Step 1: Preparing Your Materials emphasizes the importance of gathering reference images before pencil meets paper. Reference images serve as invaluable guides when attempting any form of realistic or semi-realistic drawing. On the quest of drawing poppies, these images will act as the blueprint for shape, size, texture, color palette, and even minute nuances that make each poppy unique. In this technologically advanced era, acquiring high-quality images of poppies is never more than a few clicks away. Starting your search from online image repositories such as Google Images, Shutterstock, Adobe Stock amongst others, can furnish you with a diverse range of poppy visuals. When curating these images, it is essential to opt for different angles and perspectives - an aerial view, side profile, or even a close-up can provide varied insights into the poppy anatomy. Including pictures of poppies in different blooming stages can further enrich your reference library. However, the richness of a picture extends beyond the mere physical aspects of your subject. A good reference image can also influence the mood and ambiance of your artwork. For instance, a vibrant, sunlit poppy field might inspire a more cheerful, lively drawing, while a single rain-kissed poppy might propel you towards a more melancholic, poignant sketch. Therefore, gather images that not only represent the physical traits of a poppy but those that resonate with the emotional undertone you wish your artwork to possess. While the internet is a treasure trove of visual data, do not limit your reference collection to digital sources alone. Field drawings or 'Plein Air' drawings, a method where artists sketch their surroundings in real-time, can provide an intimate understanding of your subject. If accessible, take a trip to your local garden or countryside and experience the poppies in their natural habitat. Capture them in their raw, unfiltered beauty, taking heed of the surrounding elements, light conditions, and the interaction of the poppy with its environment. Make soft, loose sketches, or snap pictures of your own - these original references can give your final artwork a unique, personal touch. In summary, a well-gathered collection of reference images forms the backbone of any successful drawing endeavor. In the case of poppies, the references not only acquaint you with their physical attributes but also help you to grasp the poppy’s spirit- its grace, elegance, and resilience. Remember, the more diverse and comprehensive your reference images, the higher the chances of your artwork capturing the true essence of the poppy, while resonating with your distinctive artistic style.
Step 2: Understanding Poppies' Anatomy
Understanding the anatomy of poppies is a fascinating journey into the intricate details of these beautiful blooms. The information is broken down into three diverse subsections - studying the shape and structure, observing the color and texture, and noticing the petals' movement. By delving into these various aspects, we can gain a deep appreciation of the poppy's biology, aesthetic appeal, and unique characteristics. Firstly, we turn to the shape and structure of a poppy bloom. Poppies have a distinctive morphological framework that distinguishes them from other flowers. This understanding can give us insights into how this flower grows and how it interacts with its environment. Next, we explore the captivating colors and intriguing textures of poppy blooms. This element of its anatomy reveals the poppy's visual allure and hands us a close look at the natural design. The third and final section highlights the movement of poppy petals, a compelling factor that contributes greatly to its overall visual effect. As we transition into further subsections, let us first delve into a comprehensive understanding of the poppy's shape and structure, shedding light on its intricate construction and significances.
2.1 Studying the Shape and Structure
Drawing poppies effectively and accurately requires an intimate understanding of the poppies' anatomy, specifically, a deep study of their shape and structure. This focus will bring us to a deeper appreciation of the exquisite beauty found in their subtle yet complex morphology. In understanding poppies' anatomy, we begin the journey by looking at its classic structure, working our way from the bud, stem, leaves down to its roots. Poppies typically have singular, spherical buds perched atop long, thin, swaying stems. These buds open to reveal the flower in all its splendour, showcasing four to six delicate, often overlapping petals with a signature crease down the middle. It's this creasing that gives the impression of frailty and movement. Looking closer at poppies, we notice that the petals encapsulate a round, top-like seed pod, replete with stamens. The uniform distribution of stamens, their extended length and the sheer multitude draw the eye and give the flower an additional textural dimension. The seed pod's distinct patterning, together with its contrasting colour to the petals, further enhances the visual complexity of the poppy. Below the flower, the poppy possesses toothed leaves spreading asymmetrically along the stem. This asymmetry creates movement and dynamic lines that add to the overall visual appeal and depth of the subject. It's also worth noting that each part of the poppy - from the petals, stems, leaves to roots - plays a significant role in how light and shadows react on the surface, influencing how the final drawing looks. Studying the shape and structure of poppies in this detailed manner aids in achieving veracity in your drawing. As such, not only does it equip you with the necessary knowledge to draw a lifelike rendition of the flower but it also makes you appreciate nature’s sophistication. This process of understanding the poppy's anatomy, its inherent beauty visible through the intricate intertwining of shapes, lines and spaces, brings us to realize that drawing a poppy isn't merely reproducing an image. Instead, it's about capturing the essence of life that pulsates subtly yet vibrantly within each poppy. Garnering knowledge and understanding the delicate nuances in the structure of the poppy gives you the artistic leverage to manipulate and play with your depiction of the flower. This knowledge becomes the bedrock from which your creativity springs forth, enabling you to illustrate the poppy in a manner that authentically encapsulates its essence while also leaving room for your unique artistic interpretation.
2.2 Observing the Color and Texture
2.2 Observing the Color and Texture When you aim to accurately depict any part of nature, whether it's a flower, an animal, or an inanimate object, having an intimate comprehension of its physical characteristics is crucial. The same rule applies when you embark on understanding poppies' anatomy, before the enticing task of drawing them. Paying close familiarity to the color and texture specifically, helps to ensure that your drawing is as close to reality as possible and that it possesses a certain authenticity that can set it apart. Poppies are globally recognized and extraordinarily appreciated for their vivid hues, including bright and luxurious shades of red, pink, orange, yellow, white, and even black, depending on the variety. When drawing a poppy, these colors should not simply be seen as solid shades but as different tones that blend and shift subtly across each petal to give depth and vivacity. Mimicking these color gradations in your drawing is no easy feat, but it's a challenge that you can handle with careful observation, practice, and the correct choice of color medium. Poppies are also noteworthy for their texture. Each poppy petal feels soft and silky, having an almost paper-thin quality and a delicate translucency that can be artistically challenging to convey. Its texture has a natural glossiness, allowing light to bounce off its surface, creating beautiful, luminous effects. As such, when studying the texture of poppies, one cannot ignore the lighting. Observing how the light plays on the petal, where it creates areas of highlight, mid-tone, and shadow, will imbue your poppy drawing with a much more believable three-dimensional quality. In the same vein, the center of the poppy flower, which includes the stigmas and stamens, has different textures too. The stigmas have a thick, rough texture, whereas the stamens are delicate and soft. Capturing these subtle differences can add another depth to your art, making it more realistic and detailed. As a budding artist striving to hone your drawing skills, spending sufficient time observing your subject meticulously can only lead to improvement. Understanding the color and texture of poppies is a prime case in point, preparing you for smoother progress on the road to creating a successful and captivating representation of this remarkable flower.
2.3 Noticing the Petals' Movement
In understanding how to draw a poppy, paying keen attention to observing and understanding its anatomy is fundamental. An integral part of this process is notably the Petals' Movement, denoted as 2.3 in the step-by-step guide. Petals are the coloured components of a flower that collectively form its corolla. By carefully observing a poppy's petals, you are inching closer to recreating it artistically. However, this observation isn't confined to the static structure of the petals. An artist must notice and understand the movement and contouring of a flower's petals to make the portrayal lifelike and vivid. The movement of petals is versatile - it depends on external factors like wind, rain, and the stage of bloom. As an observer, you'll see the petals of a poppy move from a closed, protective wrap to an open and inviting form as the flower completely blooms. This delicate transition happening in stages: bud, opening, and full bloom, offers artists a chance to convey their work from different perspectives. The curves, overlaps, the inward curls or outward flares - each movement of the petal carves a distinct essence into the artwork. Poppies characteristically have four to six petals, and these petals' movement can offer dramatic visual elements to drawings. When sketching, consider how light conditions affect the petal's look - notice how the petals can look translucent when back-lit by the sun; this effect can add depth to your drawings. As the petals unfurl, their delicate paper-like texture appears to ripple and flutter gently in the breeze. Capture these delicate folds, creases, undulations, and curling edges as they echo the rhythmic dance of nature in your drawing. Artists should also take note of how the petals overlap each other and their positioning at various stages of bloom. The petals of a poppy tend to overlap towards the base near the flower's center, forming a natural, layering effect. This brings an illusion of depth and creates an interesting interplay of light and shadow. The subtle shifts in the petals' positions can differentiate a morning's fresh bloom from the weary end-of-day look, therefore adding a narrative to your artwork. In summary, effectively capturing the dynamic petal movement requires an artist to be patient, observant, and appreciative of the flower's delicate nature. It tests an artist's skills at portraying lifelike movement, depth, and texture in their work. Getting this critical element of the poppy's anatomy right by paying close attention to how the petals move in different environmental conditions and phases of bloom will continuously enhance the quality of your artwork. This way, your drawn poppies don't just replicate their physical attributes, but also echo their lifelike beauty and fluid movement.
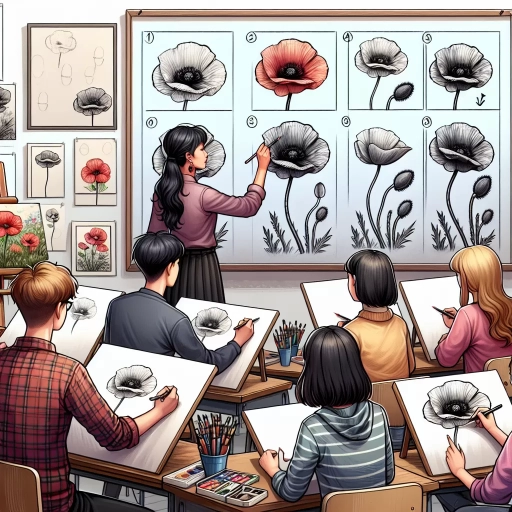
Step 3: Sketching the Basic Form
of the article emphasizes the importance of sketching the basic form in the drawing process. Drawing is not just about replicating exactly what you see; it's about understanding the underlying structure and shape. This allows you to create drawings that are not only accurate but also convey the depth and volume of your subject. In drawing a poppy, for instance, breaking down the process into three simple steps – drawing the center, sketching the petals' outline, and adding the stem and leaves – enables you to capture its delicate beauty. This approach simplifies the task, making it feasible even for beginners. The first step focuses on drawing the center of the poppy, which sets the tone for the entire piece. The center acts as the anchor point that guides the placement and proportion of the remaining elements in the drawing. The article proceeds to delve into the specifics of this essential step, underscoring the techniques and tricks that can be utilized to accurately capture the poppy's unique intricacy.
3.1 Drawing the Center of the Poppy
of a beautiful poppy drawing is starting with a precise center sketch. The center of the poppy, gamely observable as the black core, is mainly what provides each bloom its distinctive charm and individuality. This stage is crucial in establishing the rest of your drawing. This uniqueness is achieved by smartly using simple strokes and lines to create a rough circular shape. Initially, while sketching the center, it's vital to locate the precise middle of your drawing paper. This location is where you'll draw a small circle to represent the core. Note that you shouldn't strive to make the circle flawless or too smooth; nature is not about perfection. Instead, it’s about the splendor of authenticity. The circle should vary slightly in roundness to mimic the natural, organic form of a poppy's central hub, which is generally not perfectly elliptical. Its diameter should be around 1/10th of the complete poppy head. The next stage involves adding texture to the center of the poppy. This core is dense with texture and contains several small seed-like details. So, you could use your pencil to sketch numerous small dots within the circle. These small seed-like structures must be evenly spread throughout the circle but should also follow the flow you want for the texture. Avoid clustering the dots to ensure an aesthetic, well-distributed look. To enhance realism and depth in your piece, shade and smudge some of these small dots or seed-like structures. This shading will represent the natural shadows seen in the poppy, reflecting its 3D nature on a 2D surface. The parts of the poppy further away from the light source tend to be the darkest while those nearer to the light the lightest. Try to visualize a light source and use it as a reference to recreate this effect. Lastly, sketching the basic form of the petals, which emerge from this center, is the final step of drawing the center of the poppy. It's critical to remember that the layout and direction of these seed-like structures suggest the position and flow of the petals. Therefore, understanding this correlation will help create a realistic depiction of a poppy. In summary, creating a splendid, captivating poppy drawing starts with accurately drafting the center. Allowing space for imperfections, adding texture, and applying appropriate shadows and shadings will create a more realistic, engaging poppy core. Understanding how the center affects petal placement can also significantly enhance the believability of your final drawing. Remember, art is about expressing your interpretation of the world in a visually appealing manner - so don't be scared to inject a bit of your personal style into it.
3.2 Sketching the Petals' Outline
In step 3.2, the process invites you to focus on sketching the petals' outline of the poppy flower. Poppies have an elegant yet complex structure, and capturing this accurately can significantly enhance the flower representation's realism. This step is a crucial part of the sketching the basic form, where the entire flower begins to take shape. The poppy's petals are often organically misshapen and fold over one another, creating a sort of visual dance that is intrinsically beautiful and captivating. Start by acknowledging that each petal will have a slightly different shape and size, providing an individual character to your poppy. Do not aim for perfection, as the poppy's inherent beauty lies in its imperfections. First, delineate the outlines lightly with a pencil, capturing the general shape while focusing on the overlapping sections. Then, draw the first petal in the front, ensuring it is larger and covers a portion of the other petals given its perspective advantage. Observation is key at this phase – pay attention to the petal's curves and edges, as well as the creases and folds typically visible in a poppy petal. These intricacies add depth and authenticity to your sketch. Follow this up by sketching the behind petals, being conscious to taper them slightly more to underline the perceived distance. Remember to represent the soft curvature of the petals, enhancing their delicate and gentle nature. Once the basic outlines are in place, refine your sketch by incorporating more details such as the veins and texture of the petals. Attention to such minute features adds an extra layer of realism and complexity to your poppy sketch. Ensure you maintain a light hand to preserve the softness and fluidity of the petal's outline. Avoid sharp, hard lines as they can make the flower appear rigid and unnatural. After finishing the sketching, step back and review your work, adjusting the proportions if necessary and fixing any evident inconsistencies or rough edges. This stage is about bringing out the natural and unique form of a poppy, so do not overburden the sketch with heavy lines and stringent perfection. The aim is to bring forth the simple elegance and radiant vibrancy of this beautiful flower. Therefore, in Step 3.2 of sketching the petals' outline, it's crucial to let the petals express themselves. The petals are not just parts of the flower, but the visual embodiment of the poppy's essence. They give your drawing life and animate your ability to capture not just a poppy, but the essence of nature itself in your sketch. This step allows you to hone your observational skills and capture what's unique about each flower, engraving a personal touch to your artwork. You've planted the seed in the previous steps, and now it's time for your poppy to bloom with each petal you draw. Through this step, you're not just sketching you're growing a garden on your paper.
3.3 Adding the Stem and Leaves
Step 3.3 in the process of drawing a poppy is adding the stem and leaves to your sketched basic form. This step is crucial as a poppy's stem, with its accompanying leaves, provides the natural aesthetic appeal that distinguishes it from other flowers and adds a touch of realism to your sketch. Start this step by sketching a line flowing naturally from the base of your poppy's bulb. This line should be slightly curved, signifying the natural bend that poppy stems typically have. It shouldn't be starkly straight or wildly bent; rather, it should strike a balance between the two extremes. This is because poppy stems, while flexible, aren't weak, and they bear the weight of the flower bulb efficiently. Next, you should add leaves to your stem. Poppy leaves aren't very large; they're long and slender with jagged edges. This implies that they are quite different from the common perception of a traditional leaf shape. An essential aspect of sketching these leaves is that they should be attached randomly to the stem in terms of position and direction. In nature, leaves grow where there's ample space and where they can access the most sunlight. Ensuring this randomness in your drawing brings the much-needed feel of natural authenticity to your poppy. Once you're through with the leaves, take a few moments to evaluate your stem and leaves sketch. Check if your stem isn't too stiff or if your leaves don't seem out of place. Make the required adjustments to ensure your drawing is as close to how poppy stems and leaves look in real life. This step is crucial as attaining the correct structure and form of the poppy is significant and adds to the authenticity of the sketch. It is essential that every part of the flower plays its part in contributing to the overall image, and the stem and leaves are no exceptions. To sum up, while drawing the stem and leaves might appear as a mere step in the process of drawing a poppy, they're of great importance. The stem and leaves don't just support the flower bulb, but they also add to the poppy's overall appeal. Therefore, it's essential that you sketch these parts of the poppy with care, ensuring that they lend a touch of realism to your drawing. Keep in mind that poppies are wildflowers, which brings a certain freedom to their growth patterns and should be reflected in your drawing. Remember, the key to creating a realistic and engaging poppy sketch lies in maintaining naturalness in every step, and adding the stem and leaves is no exception.