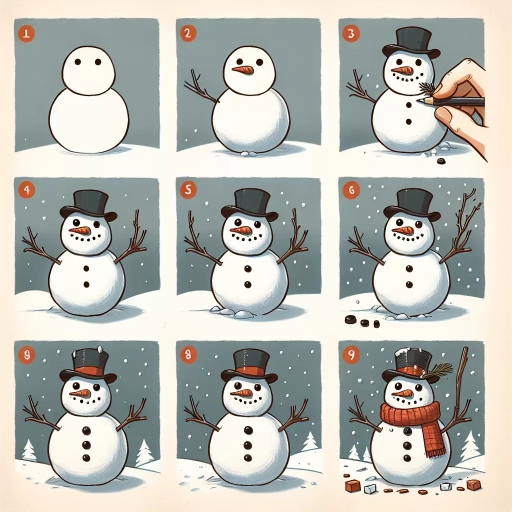
How To Draw Snowman
Drawing a snowman is a fun and creative activity that can be enjoyed by people of all ages. Whether you're a seasoned artist or a beginner, learning how to draw a snowman can be a great way to express your creativity and get into the holiday spirit. In this article, we'll take you through the steps to create a beautiful and festive snowman drawing. To get started, it's essential to understand the basics of drawing a snowman, including the shapes and proportions that make up its body. Once you have a solid foundation, you can move on to sketching the snowman's body and facial features, adding details such as buttons, a carrot nose, and coal eyes. Finally, you can add the finishing touches to your drawing, including a hat, scarf, and any other accessories you like. By following these steps, you'll be well on your way to creating a snowman drawing that's sure to delight. So, let's start by understanding the basics of drawing a snowman.
Understanding the Basics of Drawing a Snowman
Drawing a snowman can be a fun and creative activity, but it requires some basic understanding of its anatomy and structure. To get started, it's essential to familiarize yourself with the different parts of a snowman, including the base, middle, and head, as well as the various features such as the eyes, nose, and mouth. Additionally, having the right drawing tools and materials can make a significant difference in the quality of your artwork. A set of graphite pencils, a sharpener, and a sketchbook can help you achieve the desired level of detail and texture. Furthermore, setting up your drawing space to be comfortable and efficient can also impact your productivity and overall drawing experience. By considering these factors, you can set yourself up for success and create a snowman drawing that you can be proud of. Let's start by taking a closer look at the anatomy of a snowman.
Familiarizing Yourself with Snowman Anatomy
Familiarizing yourself with snowman anatomy is a crucial step in drawing a realistic and visually appealing snowman. A snowman typically consists of three main body parts: the base, middle, and head. The base is the largest and widest part of the snowman, usually made up of the largest snowball. The middle section is slightly smaller than the base and is often made up of a medium-sized snowball. The head is the smallest and most detailed part of the snowman, typically made up of the smallest snowball. In addition to the body parts, a snowman also has several key features, including coal eyes, a carrot nose, and a mouth, which can be made from a variety of materials such as coal, sticks, or even a scarf. Understanding the basic anatomy of a snowman will help you to draw a more accurate and detailed snowman, and will also allow you to add your own personal touches and creative flair to your drawing. By familiarizing yourself with the different parts of a snowman, you can create a drawing that is both visually appealing and true to life.
Choosing the Right Drawing Tools and Materials
Choosing the right drawing tools and materials is essential to create a beautiful and detailed snowman drawing. To start, you'll need a pencil, preferably a graphite pencil (#2), which is versatile and suitable for creating a range of lines and shading. A sharpener is also necessary to keep your pencil sharp and ready to use. For added details and textures, consider using a set of colored pencils or markers, such as Prismacolor or Faber-Castell. These tools will allow you to add depth and dimension to your snowman's features, such as the coal eyes and carrot nose. Additionally, a blending stump or tortillon can be used to smooth out shading and create soft, rounded edges. For a more precise and delicate touch, a fine-tip pen, like a Micron or Sakura, can be used to add details such as eyelashes or a mouth. Finally, choose a high-quality paper that is smooth and durable, such as Bristol board or watercolor paper, to ensure that your drawing remains intact and looks its best. By selecting the right tools and materials, you'll be well on your way to creating a charming and festive snowman drawing.
Setting Up Your Drawing Space for Comfort and Efficiency
Setting up your drawing space for comfort and efficiency is crucial to produce high-quality artwork, including drawing a snowman. To start, choose a quiet and comfortable spot with good lighting, preferably natural light, to minimize eye strain. Ensure your workspace is at a comfortable height, allowing you to sit or stand without straining your back or neck. Invest in a good quality drawing chair, table, or desk that provides adequate support and storage for your art supplies. Organize your drawing tools, such as pencils, erasers, and markers, in a designated area, making it easy to access and switch between them. Consider using a drawing board or a lap desk to keep your paper at a comfortable drawing angle. Additionally, keep a trash can and a pencil sharpener nearby to maintain a clutter-free workspace. By setting up your drawing space with comfort and efficiency in mind, you'll be able to focus on creating a wonderful snowman drawing without distractions or discomfort.
Sketching the Snowman's Body and Facial Features
Sketching a snowman's body and facial features is a fun and creative activity that can be enjoyed by people of all ages. To bring your snowman to life, you'll want to start by drawing the base, middle, and head sections of the body, which will provide the foundation for your snowman's overall shape and structure. Once you have the body sketched out, you can move on to adding facial features, including the eyes, nose, and mouth, which will give your snowman its personality and character. Finally, you can add a hat and scarf to complete your snowman's look and add some extra personality. In this article, we'll take a closer look at each of these steps, starting with the basics of drawing the base, middle, and head sections of the snowman.
Drawing the Base, Middle, and Head Sections of the Snowman
To draw the base, middle, and head sections of the snowman, start by sketching three large circles, each one smaller than the last, to represent the base, middle, and head of the snowman. The base circle should be the largest, with the middle circle about two-thirds the size of the base, and the head circle about one-third the size of the middle circle. Make sure to leave some space between each circle to create a sense of depth and dimension. The base circle should be slightly flattened at the bottom to give the snowman a stable foundation. The middle and head circles should be more rounded and smooth. Use a gentle, flowing motion to draw the circles, making sure they are smooth and even. Don't worry too much about making the circles perfect – a little bit of imperfection can add character to your snowman. Once you have the three circles drawn, you can start to add some basic details, such as a slight indentation at the top of the head circle to indicate the snowman's face, and a few gentle curves to suggest the shape of the body. Remember to keep your lines light and gentle, as you can always add more details and definition later. By starting with these simple circles, you'll be able to build a solid foundation for your snowman and create a charming and festive winter wonderland character.
Adding Facial Features, Including the Eyes, Nose, and Mouth
When adding facial features to your snowman, start with the eyes. Draw two small circles for the eyes, making sure to leave some space between them. You can also add some personality to your snowman by making the eyes different sizes or shapes. Next, draw a small triangle for the nose, making sure it's centered between the eyes. For the mouth, you can draw a small curved line that turns upwards at the ends to create a smile. You can also add some details such as eyebrows or a carrot nose to make your snowman more unique. To add some depth to your snowman's face, you can also add some shading to the eyes and mouth. Use a pencil to lightly shade in the areas, making sure not to press too hard so you don't create any harsh lines. By adding these facial features, you can bring your snowman to life and make it look more friendly and inviting.
Creating a Hat and Scarf to Add Personality to Your Snowman
When it comes to adding personality to your snowman, a hat and scarf can make all the difference. To create a hat, start by drawing a simple shape, such as a rectangle or a triangle, to serve as the base of the hat. You can then add details such as a brim, a band, or a pom-pom on top. For a more rustic look, you can draw a hat with a curved brim and a floppy top, while a more modern look can be achieved with a sleek, flat hat. When it comes to the scarf, you can draw a simple loop around the snowman's neck, or add some texture and pattern to give it a more dynamic look. Consider adding some subtle folds or creases to the scarf to give it a more realistic appearance. You can also experiment with different patterns, such as stripes or polka dots, to add some visual interest to your snowman's outfit. By adding a hat and scarf to your snowman, you can give it a unique personality and make it stand out from the crowd.
Adding Details and Final Touches to Your Snowman Drawing
Here is the introduction paragraph: Now that you have the basic shape of your snowman drawn, it's time to add some personality and character to your winter wonderland scene. In this article, we'll explore the final details that will bring your snowman to life. We'll discuss how to add coal or rock details for the eyes, nose, and mouth, draw arms and add hands to your snowman, and even add a background or environment to enhance your snowman scene. By the end of this article, you'll have a complete and charming snowman drawing that's sure to delight. Let's start by adding some facial features to your snowman with coal or rock details for the eyes, nose, and mouth.
Adding Coal or Rock Details for the Eyes, Nose, and Mouth
To add coal or rock details for the eyes, nose, and mouth, start by selecting a few small rocks or pieces of coal that are roughly the same size. You can use a single piece for the nose and two for the eyes, or get creative and use multiple pieces to create a more expressive face. Gently press the rocks or coal into the snow, making sure they're securely in place. For the eyes, you can use a small stick or twig to create pupils, or simply leave them as is for a more rustic look. For the nose, you can use a single piece of coal or rock, or create a more defined nose by using two smaller pieces side by side. For the mouth, you can use a small, curved piece of coal or rock to create a smile, or a straight piece to create a more serious expression. Experiment with different shapes and sizes to find the look that works best for your snowman. As you add these details, be mindful of the overall balance and proportion of your snowman's face, making sure the features are evenly spaced and in harmony with one another. With these final touches, your snowman will come to life, taking on a personality all its own.
Drawing Arms and Adding Hands to Your Snowman
Drawing arms and adding hands to your snowman is a crucial step in bringing your winter wonderland character to life. To start, draw two long, thin rectangles on either side of the body, making sure they are evenly spaced and about one-third of the way down from the top of the body. These will serve as the snowman's arms. Next, add two small oval shapes to the end of each arm, making sure they are slightly tilted and facing downwards. These will be the snowman's hands. You can also add some fingers to the hands by drawing three small lines extending from the oval shape. To add some personality to your snowman, you can also draw a broom or a carrot nose in one of the hands. For a more detailed look, you can add some texture to the arms and hands by drawing short, curved lines that resemble the texture of snow. Finally, make sure the arms and hands are in proportion to the rest of the body, and adjust as needed to achieve a balanced look.
Adding a Background or Environment to Enhance Your Snowman Scene
Adding a background or environment to your snowman scene can elevate the overall visual appeal and create a more immersive experience for the viewer. Consider adding a winter wonderland setting, complete with snow-covered trees, rolling hills, and a clear blue sky. You can also include additional details such as snowflakes gently falling from the sky, a frozen pond or lake in the distance, or even a few animal friends, like penguins or rabbits, playing in the snow. To create a sense of depth and dimension, use varying shades of blue and gray to suggest a distant horizon, and add some warm colors, like orange or yellow, to create a cozy atmosphere. Don't forget to balance your composition by placing your snowman in a way that creates visual interest and leads the viewer's eye through the scene. By adding a background or environment, you can transform your simple snowman drawing into a captivating winter scene that invites the viewer to step into the magic of the season.