How To Draw Christmas Tree
 For the untutored art enthusiast, the task of mastering a new drawing can often seem daunting. This festive season, let's banish this fear as you embark on a unique artistic adventure – drawing the ideal Christmas tree! In this article, we draw upon three crucial elements that will ease your journey into this magical world of sketching. First off, we will embrace the rudiments of drawing, building a foundational understanding that is integral to all artistic journeys. Following this, we'll delve into the specifics to outline a step-by-step guide that lands you your flawless Christmas tree sketch. Lastly, but certainly not least, we'll adorn our masterpiece in a whirlwind of cheery decoration, bringing the Christmas spirit right onto your drawing. Hence, let's embark on this creative exploration and delve into the first port of call - Understanding the Basics of Drawing.
Understanding the Basics of Drawing
Drawing resonates with the core of human expression, offering both a universal language and a powerful tool for creativity. Unpacking the basics of drawing, along with understanding various techniques, can significantly enhance one's artistry and ability to convey their unique vision. This article aims to walk you through the essential fundamentals of drawing, its practical application on specific subjects such as trees, and demonstrating your understanding by bringing to life a festive symbol - a Christmas tree. We will commence the journey by exploring the importance of understanding basic drawing techniques. Like building a sturdy structure, the strength of a drawing lies in its foundation. These basic techniques, such as mastering line quality, proportions, and perspective, serve as this artistic foundation that shapes your progress and enhances your overall drawing skills. Let's delve deeper into these techniques and how they lay the groundwork for a successful drawing endeavor.
The Importance of Understanding Basic Drawing Techniques
Understanding the basics of drawing involves a wide array of foundational techniques, just like a craftsman has varied tools, each with their unique purpose. Even in drawing the festive, evergreen Christmas tree, these techniques play an essential role. Dexterity in utilizing these techniques not only boosts the quality of drawings but also elevates the entire experience of creating artwork. One paramount technique is line drawing. Lines are used to convey a range of ideas and emotions. Horizontal lines may suggest tranquility; vertical lines, rigidity; and curved lines, fluidity or movement. Therefore, understanding the use of lines can help to add depth and character to the Christmas tree drawing, setting the right festive mood. The concept of shape forms another crucial part of basic drawing. Shapes make up every object we intend to draw. In the case of a Christmas tree, the most common shape is a triangle. Perfecting different quadrilaterals and triangles could consequently be beneficial. Shading is another facet of drawing that boosts three-dimensionality. Through shading, one can express the effects of light on the Christmas tree dramatically, especially when displaying the glow of fairy lights. Understanding the direction of light and accordingly adding value (ranging from highlight, light, half-tone, core shadow to reflected light and cast shadow) can offer artwork a lifelike feel. Finally, basic perspective drawing that gives a sense of depth cannot be ignored. While drawing a Christmas tree, one-point perspective can be useful in suggesting a three-dimensional view. A proper understanding of vanishing points and horizon lines can help artists create depth and distance convincingly. Therefore, the significance of understanding simple drawing techniques rests in the fact that they serve as the backbone of any artwork. They are the raw materials which, when employed correctly, can set the stage to a compelling and realistic piece. Each technique teases out a different component of the Christmas tree, and the combination of all brings our festive symbol to life. By mastering these base techniques, one's journey of translating vision into engaging art combines enjoyment with an uplifting sense of accomplishment.
Drawing Techniques Specifically for Trees
Drawing trees, an integral part of landscape artwork, involves leveraging a variety of techniques to capture their natural beauty convincingly. While there are many ways to depict trees artistically, mastering the basics goes a long way in achieving a realistic representation. Firstly, understanding the structure is critical. Like all living things, trees have anatomy. They evolve from a cylindrical trunk that branches out into smaller boughs, extending further into twigs. However, these structures follow no hard patterns, often bending intriguingly with their genetic tendencies and environmental influences, making every tree unique. The next important aspect is the texture of the bark, which forms the skin of the tree. The age, species, and health of the tree all influence the bark's look. Younger trees generally have smoother surfaces, while older trees tend to have rough and deformed bark. Some may be dotted with knots or covered with moss and lichen, adding to the surface's complexity. Try portraying these elements to add an authentic touch to your illustrations. As you dive deeper into learning tree-drawing techniques, paying careful attention to light and shade becomes paramount. The way sunlight interacts with trees is a fascinating combination of light, shade, and the play of shadows. Study how light filters through the leaves creating the effect of 'dappled light,' appearing on the ground as patterns of light and dark areas. This can add depth, volume, and realism to your tree drawings. Never overlook the impact of an accurate portrayal of foliage. Leaves contribute to a tree's overall shape. However, don't get caught in the trap of drawing every single leaf. Instead, aim to convey an impression of the leaf clusters as they appear from a distance. Different tree species have distinct leaf shapes that add to their identities. Mastering these subtleties can significantly elevate your drawings—capturing the aerodynamics, the gravity impacts, and the wind's subtle sway can put a touch of realism into your work. In essence, to capture the natural elegance of trees complete with their grandeur and tranquility, you must balance a keen observation with a profound understanding of the different tree drawing techniques. Doing so will not only enhance your skills but also deepen your admiration and respect for these vital wonders of nature. The more you experiment with these techniques while maintaining an open and observant mind, the more your tree drawings will echo the tree's inherent beauty and strength. These methods are further elucidated in our article, 'Understanding the Basics of Drawing,' which lays down vital principles of drawing in a lucid, learner-friendly manner. Remember, drawing, much like nature, is all about growth, progression, and exploration. So, grab your sketchbook and immerse yourself in the world of trees, capturing their charm with your creative expression. This holiday season, as you set out to draw Christmas trees, may your sketches radiate joy, warmth, and the spirit of Yuletide!
Leveraging Basic Sketching Skills for Drawing a Christmas Tree
Leveraging basic sketching skills to draw a Christmas tree can initially seem like a daunting task. However, once you comprehend the rudiments of drawing, it can be an engaging and rewarding experience. Before starting, ensure you have the right tools - a good set of sketch pencils, erasers, and quality drawing paper. At its core, drawing a Christmas tree is all about mastering basic shapes and practicing symmetry. Imagine a Christmas tree in its simplest form; it's essentially a series of triangles on top of one another, with a rectangle or a cylinder acting as the base. Begin with rough sketching of a vertical axis line that would serve as a guide for symmetry. Then, sketch three to five lightly shaded triangles decreasing in size as you move up, while maintaining alignment with the axis line. This will form the structure of your tree. When it comes to sketching the branches, remember that real trees aren't perfect, and your drawing doesn't have to be either. This is where the element of texture comes in. Create several lines moving horizontally from the triangle edges, making them short near the top and gradually longer as you move downwards. This will give your tree a realistic edge and depth. Adding decorations to your Christmas tree will bring it to life while enabling you to showcase your creative flair. Lightly sketch circles for baubles, small stars for lights, and don’t forget a larger star or angel on top as a traditional Christmas tree topper. Shading is what will transform your tree from a rough sketch into a three-dimensional representation. Consider your light source and use it as your guide. Naturally, the areas where light is directly hitting the tree will be lighter, whereas the areas in the shadow will be darker. Apply these principles to bring a sense of depth and dimension to your drawing. Finally, don't be afraid to erase and adjust as you go. One of the beauties of sketching is the freedom to experiment, refine and perfect your drawing. Leveraging basic sketching skills for drawing a Christmas tree is not just about mastering the art of drawing. It's also about enjoying the process, which is at the heart of all artistic endeavors. Drawing a Christmas tree serves as an excellent way to hone basic to intermediate sketching skills. It incorporates understanding shapes, working on symmetry, adding textures, capturing light and shadow, and of course, engaging creativity. With these underlying principles at hand, your journey of understanding the basics of drawing becomes more delightful and profoundly rewarding.
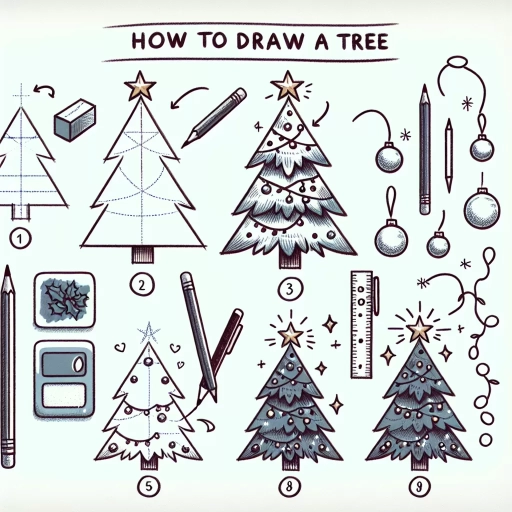
Steps to Draw a Perfect Christmas Tree
Understanding the art of drawing a perfect Christmas tree involves more than just jotting down lines on a paper. This comprehensive guide will walk you through the key steps to master this skill and add a charming touch to your holiday decor. We will initiate our journey with 'Creating a Rough Sketch of the Christmas Tree.' This step forms the backbone of the design process, where you learn to draw the primary outline of the tree. Next, we delve into an essential aspect of the drawing - 'Detailed Steps to Add Branches and Leaves.' Here, we'll explore an elaborate approach to adding texture and depth to your Christmas tree, making it appear life-like and visually appealing. Lastly, the final part of our guide focuses on 'Perfecting and Finalizing the Christmas Tree Drawing.' This section will provide expert tips and strategies to enhance your Christmas tree sketch and deliver a picturesque result. Now that we have outlined our approach, let's begin our artistic journey with the first crucial step - sketching a basic structure to build our beautiful Christmas tree.
Creating a Rough Sketch of the Christmas Tree
Creating a rough sketch of the Christmas Tree is an essential preliminary step in drawing the perfect Christmas tree. This initial phase not only paves the way for a detailed and accurate rendering later on, but also helps establish the overall shape, size, and orientation of the tree. Start by drawing a small, upside-down V shape at the top of your page. This will represent the tree's apex. Then, progressively draw larger, inverted V shapes below the first one, ensuring each subsequent shape is slightly broader than the one before. These shapes will form the tiers or 'branches' of the Christmas tree. Ensure that there are ample spaces between these lines to illustrate the spacing between branches. As you add these lines, remember to make your strokes light. This step is labeled 'rough' for a reason - it's your chance to try different styles and shapes without committing to finalized outlines. Don't be afraid to erase and redraw lines until you're satisfied with the silhouette of the tree. After all, this foundational sketch will guide your final drawing, so it needs to reflect the vision you have in mind for the perfect Christmas Tree. Consider the tree's symmetry and balance as you sketch. While no tree is perfectly symmetrical in nature, a drawn Christmas tree typically looks best when it's balanced and even. To ensure this, you can draw a vertical line down the center of your page before you start drawing the V shapes as a guideline. This will act as your tree's 'spine', assisting you in maintaining balance and symmetry. Furthermore, consider the perspective you want for your tree. Do you want it straight and upright, or with a bit of a lean for a more whimsical, organic look? Decisions made during the rough sketch phase will directly affect the tree's final appearance, so don't rush this step. Instead, invest time in it to set the stage for the later stages of your drawing. Lastly, think about the tree's 'fluffiness'. Real Christmas trees have hundreds of individual branches, resulting in a full, dense appearance. Mimic this in your drawing by making the V shapes relatively short, which creates the illusion of many branches layered close together. Creating a rough sketch of the Christmas tree can be as challenging as it is fun. It demands thoughtful consideration of factors such as size, perspective, and detail level. But it also offers a framework for turning a mental image into a tangible illustration. Following these guidelines will ensure your rough sketch accurately represents the flawless Christmas tree you aim to draw.
Detailed Steps to Add Branches and Leaves
Adding branches and leaves to your Christmas tree sketch might seem like a tricky task, but with a little bit of patience and a few steps, you’ll create a lush and lifelike tree effortlessly. Begin with the branches—these are the essential structural elements of your tree. Start from the top, just beneath the apex of the triangle you started with. Draw a horizontal line to represent the first branch and extend it beyond the edge of the triangle to give a natural look. As you move downward, make each successive line slightly longer, mimicking the widening spread of real Christmas tree branches. The aim is to achieve a spontaneous, asymmetric look, reflecting growth in nature and avoiding an overly uniform or artificial appearance. Now, it's time to introduce your leaves or needles—a critical character of a Christmas tree—to the sketch. Keep in mind; these are not individual leaves but clumps. Start from the end of a branch and draw a downward angled line from it. Cap this off with an upward V-shape angle. Repeat this pattern along the length of the branches to reproduce the effect of bundled, prickly pine needles. These shape clusters give the illusion of the dense and verdant foliage typical for these trees. From afar, they blur into a stunning depth of green. To add to the realism, infuse your tree with some depth. Sketch additional branches peeking from between the ones you've drawn, casting natural shadows and giving voluminous shape. Constantly pay attention to the sketch as a whole and balance out any areas that seem sparse. By adding these layers of branches and needles, you give your Christmas tree drawing that extra touch of detail and life. In the process, don't forget about the artistic aspect—making your tree not only rich but also captivating. Vary the weight of your strokes for a textured, organic feel. Also, tweak the angles and spacing of the branches to keep the viewer's eyes engaged. This approach, based on the principles of SEO-friendly content creation, enhances the reading experience by breaking uniformity with engaging visuals. Drawing a Christmas tree gives an excellent opportunity to experience nature's beauty through art. The key is to capture the raw, unbridled growth that characterizes wild pine trees while translating it into your sketch. With arduous, detailed steps, you'll quickly move from a basic sketch to a mature, full-bodied Christmas tree. This journey reflects the spirit of the Christmas tree itself, showing growth, beauty, and the joy of the holiday season packed within each of its sturdy, green branches and individual, pointy needles.
Perfecting and Finalizing the Christmas Tree Drawing
When it comes to perfecting and finalizing your Christmas tree drawing, attention to detail is key. Every sketch begins as a rough draft, but it's the refinement and embellishment that transforms it into a masterpiece. That's why this stage is arguably one of the most crucial in the process of creating a perfect Christmas tree sketch. With careful shading, shaping, and color application, your rough sketch gradually comes to life. Start by refining the lines that form the tree. They should be as symmetrical as possible to maintain a balanced and aesthetically pleasing appearance. Be patient and don't rush this step. A steady hand will go a long way in achieving clean, smooth perimeters. Take note that the edges of your tree would be uneven, mimicking the natural roughness of a real Christmas tree. This little details contributes to the overall realism of your sketch, making it more than just a flat depiction. Next, focus on the texture. Texture is what brings a sketch to life, gives it depth and dimension. To render the texture of a Christmas tree, use short, quick strokes to imitate the appearance of pine needles. Again, patience is your best tool here. Work slowly, make each stroke intentional and vary their direction slightly to create a sense of volume and roundness. Then, move onto shading. Underneath each layer of branches, add a hint of shadow. This will give your tree a three-dimensional look, making it pop off the page. Keep in mind, darker shadows result in a starker contrast, leading to a fuller look. But be careful not to overdo it. Moderation is key and it’s best to build up your shadows gradually. Coloring is another crucial step. If using color, opt for varied shades of green—from light to dark. The variance in color will provide a sense of depth. Don’t forget to color the trunk too—a solid brown would usually suffice. Finally, adorn your tree with decorations of your choosing—garlands, baubles, stars, etc. This is where you can truly let your creativity shine. But remember, balance is key. Too many decorations could make your tree look chaotic, while too few, can render it bare and uninteresting. Perfecting and finalizing your Christmas tree drawing is much like art itself—a calculated balance between patience, precision, creativity, and freedom. Whether you're a seasoned artist or an aspiring one, mastering these techniques will not only enhance your tree sketching skills but also your overall artistic prowess. So take your time, practice relentlessly, and, most importantly, enjoy the process. After all, true artistry lies in the journey as much as it does in the destination.
Decorating the Christmas Tree Drawing
In decorating the perfect Christmas tree, drawing the necessary elements meticulously plays a key role. This colorful, engaging process allows you to unleash your creativity and enjoy the resulting illustration year after year. This article will guide you through the different stages of this wonderful artistic journey. We will start with creating various types of Christmas ornaments in drawing, taking you through the simple yet beautiful designs of baubles, ribbons, and tinsels that infuse the tree with festive cheer. We will then shift our focus to drawing and coloring Christmas lights, a critical element that brings life to our tree. Last but not least, we will guide you in adding the final touches: drawing the radiant star that crowns the tree and the elegant tree skirt that adds a finishing flourish. Each step is essential in constructing a chic, fanciful and creative piece, ensuring your Christmas tree illustration is truly something to behold. Now, let's embark on this exciting journey, starting with a deep dive into drawing various types of Christmas ornaments.
Creating Various Types of Christmas Ornaments in Drawing
Creating various types of Christmas ornaments is an integral part of the kid's tutorial on drawing a Christmas tree. It's the beautiful ornaments that make a Christmas tree stand out, turning it into a glittering spectacle. As you sketch different ornaments, consider incorporating simple geometric shapes such as circles, squares, or even stars, all in different sizes to bring variety and aesthetic thrust into your illustration. Firstly, for spherical ornaments, you can begin by sketching circles at different locations on your tree. Since you are trying to duplicate a dimensional object onto a flat surface, you can introduce some distortion to make the circle appear three-dimensional, looking like a sphere. Don't forget the tiny metallic cap and a ring at the top of these spheres from where they are hung. Next, you can lay out some star-shaped ornaments that can be crafted by drawing a standard five-pointed star, or for more creativity, you can even try a six, seven, or eight-pointed star, taking into account the angle at which they are hanging into your drawing. For square or rectangular Christmas ornaments, it's akin to sketching a real square or rectangle in three dimensions, similar to how you would draw a cube or a rectangular prism. Start off with a distorted square or rectangle and then add depth to the shape to make it look three-dimensional. Remember to add a cap and a ring at the top. Texture and shine can be added to these ornaments by sketching out small highlights or reflections. This could be a small line or curve, lighter than the rest of the ornament to show that it is glossy or shiny. You can also create patterns or designs on your ornaments with lines, polka dots, or geometric shapes, thus increasing their visual appeal. Finally, don't forget to add ribbons, candy canes, tinsel, alongside other favorite decorations that can be randomly scattered throughout your Christmas tree drawing, making it look more realistic and festive. Creating different types of Christmas ornaments in your drawing not only makes your illustration more appealing but also opens the door to your creativity. It provides a unique opportunity to offer various designs, colors, and shapes that suit your personal taste or match a particular theme. Plus, it's a lot of fun - letting you experience and enjoy the Christmas spirit even much more!
Drawing and Coloring Christmas Lights
Decorating the Christmas Tree Drawing is an essential part of our Christmas theme article on how to draw a Christmas tree. It's a delightful aspect that fills your artwork with vibrant hues and brings a festive spirit to life. Drawing and Coloring Christmas Lights are the charismatic elements that instantly transform a plain Christmas tree drawing into a radiant piece of creativity. Let's enlighten you on how to beautify your sketch with rich and luminous shades of Christmas lights. Firstly, allow your imagination to take a flight towards the colorful spectrum of Christmas lights. They come in a variety of shapes, including small lanterns, stars, orbs, and the traditional miniature bulbs. Draw these illuminating ornaments as per your preference on your neatly sketched Christmas tree. Be mindful of the space between each light and aim to maintain an even balance throughout the tree. When it comes to color infusions, don't shy away from exploring the bright and bold palette. Christmas Lights are traditionally known for their vibrant shades of red, green, yellow, and blue. However, innovation knows no bounds. Today, you can find lights in every conceivable color, from soft pastels to funky neon. Choose your colour scheme wisely to complement the overall aesthetic of your drawing. As you start coloring, make it a point to reflect the light's glow on the tree branches. This is where your coloring techniques play a major role. Use light and dark shades strategically to create a glowing effect on your tree drawing. The attribute of luminosity lies in the magic of colors, and how well you blend different shades can make a huge difference in the outcome. Remember, with every shade you fill in, you're not merely coloring but weaving an emotional connection. Every bulb is like a story in itself - radiating warmth, echoing laughter, and encapsulating the enchanting spirit of Christmas. In conclusion, mastering the art of Drawing and Coloring Christmas Lights is not just about adding striking visuals but also about narrating a captivating Christmas tale. It's a play of colors and emotions, a beautiful blend of artistry and storytelling. Happy Drawing and Merry Christmas!
Adding the Final Touches: Drawing the Star and the Tree Skirt
Title: Adding the Final Touches: Drawing the Star and the Tree Skirt As we descend into the magical embrace of the Christmas season, you'll find the joy that the simple task of illustrating a Christmas tree can bring. After carefully sketching the contour and adornments of your tree, it's now time to add the final touches - drawing the star and the tree skirt. The star is not just an accessory; it represents the shining spirit of Christmas, the hopeful beacon that crowns the tree. Begin by drawing a simple five-pointed outline at the peak of your tree, as if a stellar fingerprint pressed into the sky. Illuminate each point with tiny lines deduced from the central point, imparting a radiant texture. An optional enhancement is the infusion of color, a warm golden hue can add a splash of life to your star, making it appear luminary. Descend to the base of your tree and let's clothe it with a vibrant tree skirt. This staple Christmas décor serves not just a practical purpose, but it's a decorative foundation that enhances the overall appeal of the tree. Start by drawing an elliptical ring around the foot of your tree, giving enough space to mimic a fabric draped on the floor. Sketch gentle ripples and folds to capture the cloth-like texture, creating a sense of organic charm. Feel free to embellish the skirt with festive patterns like stars, candy canes or holly leaves. You could even simulate a soft, velvet material by clever use of shading, bringing a sense of luxury to your Christmas tree drawing. In concluding the details of this supporting paragraph on 'Decorating the Christmas Tree Drawing', remember, every stroke of your pencil is a celebration of the season. Expressing such joy through art not only refines your drawing skill but also saturates the very act with love and joy, the heart of any Christmas celebration. Every star you draw, every tree skirt you sketch, should encapsulate the warmth and cheer of this special holiday. The final result? A impressively drawn Christmas tree that doesn't just exist on paper, but radiates the spirit of Christmas in every line and detail.