How To Draw Star
Drawing a star is a fundamental skill that can be used in various artistic and creative pursuits. Whether you're a seasoned artist or a beginner, learning how to draw a star can be a fun and rewarding experience. In this article, we'll take you through the process of drawing a star, from understanding the basics to enhancing and customizing your final product. To get started, it's essential to understand the basics of drawing a star, including the different types of stars and the basic shapes involved. We'll then provide a step-by-step guide on how to draw a star, covering the necessary lines, angles, and proportions. Finally, we'll explore ways to enhance and customize your star drawing, including adding textures, patterns, and colors. By the end of this article, you'll be equipped with the knowledge and skills to create stunning star drawings. So, let's begin by understanding the basics of drawing a star.
Understanding the Basics of Drawing a Star
Drawing a star may seem like a simple task, but it requires a good understanding of its basic components and structure. To create a visually appealing star, one must first define its shape and structure, which involves understanding the number of points, the shape of each point, and the overall symmetry of the star. Additionally, choosing the right tools and materials is crucial in bringing the star to life, as different mediums can produce varying effects and textures. Furthermore, understanding proportions and symmetry is essential in creating a balanced and harmonious star. By grasping these fundamental concepts, artists can unlock the secrets of drawing a star that shines bright. In this article, we will delve into the basics of drawing a star, starting with the foundation of its shape and structure.
Defining the Shape and Structure of a Star
The shape and structure of a star can be defined by its geometric properties and the way it is constructed. A star is typically a polygon with pointed vertices, and its shape can be classified into different types based on the number of points it has. The most common types of stars are the five-pointed star, the six-pointed star, and the seven-pointed star. The five-pointed star is the most iconic and widely recognized, with its five pointed vertices and symmetrical shape. The six-pointed star, also known as the Star of David, is a hexagram with six pointed vertices and is often used as a symbol in various cultures. The seven-pointed star, also known as the heptagram, is a polygon with seven pointed vertices and is often used in mystical and spiritual contexts. In terms of structure, a star can be constructed using various techniques, including the use of triangles, squares, and other polygons. The shape and structure of a star can also be defined by its proportions, with some stars having longer or shorter points than others. Understanding the shape and structure of a star is essential for drawing and creating accurate and visually appealing star designs.
Choosing the Right Tools and Materials
When it comes to drawing a star, having the right tools and materials can make all the difference in achieving a precise and visually appealing result. To start, you'll need a pencil with a sharp point, preferably a graphite pencil with a range of hardness levels (HB, 2B, 4B, 6B) to create varying line weights and shading. A ruler or straightedge is also essential for drawing straight lines and creating the star's points. For added precision, consider using a protractor or angle measurer to ensure accurate angles and proportions. Additionally, a eraser, such as a kneaded eraser or white vinegar eraser, is necessary for correcting mistakes and creating highlights. If you want to add color to your star, choose a set of colored pencils, markers, or paints that are lightfast and suitable for your chosen medium. Finally, select a paper that is smooth and durable, such as cartridge paper or watercolor paper, to prevent smudging and ensure a professional finish. By investing in these basic tools and materials, you'll be well-equipped to create a stunning star that shines with precision and beauty.
Understanding Proportions and Symmetry
Understanding proportions and symmetry is crucial when drawing a star, as it ensures that the shape is balanced and visually appealing. Proportions refer to the relationship between the size and scale of different parts of the star, while symmetry refers to the arrangement of these parts in a way that creates a sense of balance and harmony. To achieve symmetry, artists often use a technique called "reflection," where they divide the star into two identical halves that mirror each other. This can be done by drawing a line down the center of the star and using it as a guide to create identical shapes on either side. By paying attention to proportions and symmetry, artists can create a star that is not only visually appealing but also mathematically precise. For example, a five-pointed star can be divided into five identical triangles, each with its own set of proportions and symmetries. By understanding these relationships, artists can create a star that is both beautiful and harmonious. Additionally, understanding proportions and symmetry can also help artists to create variations of the star shape, such as a star with more or fewer points, or a star with different proportions and symmetries. By mastering these fundamental principles, artists can unlock a wide range of creative possibilities and produce stunning works of art.
Step-by-Step Guide to Drawing a Star
Drawing a star can be a fun and creative activity, but it can also be intimidating if you're not sure where to start. With a few simple steps, you can create a beautiful and symmetrical star that will impress anyone. In this article, we'll take you through a step-by-step guide on how to draw a star, covering the essential steps of creating the center point and initial lines, adding points and shaping the star, and refining the edges and adding details. By following these steps, you'll be able to create a stunning star that will add a touch of magic to any drawing or design. So, let's get started by creating the center point and initial lines, the foundation of a perfect star.
Creating the Center Point and Initial Lines
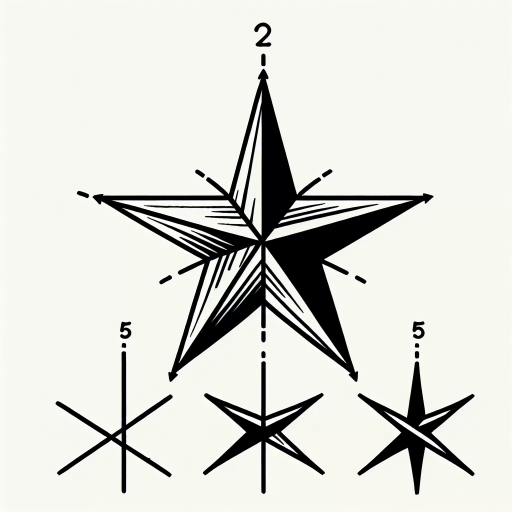
To create the center point and initial lines of your star, start by drawing a small dot in the center of your paper. This dot will serve as the central axis of your star. Next, draw a vertical line extending from the center point, making sure it is straight and even. This line will act as a guide for the rest of your star's points. Then, draw a horizontal line intersecting the vertical line at the center point, creating a cross shape. This cross will help you achieve symmetry and balance in your star. Finally, draw two diagonal lines extending from the center point, one at a 45-degree angle to the left and the other at a 45-degree angle to the right. These diagonal lines will help you create the star's points and ensure they are evenly spaced. By creating these initial lines, you will have a solid foundation for drawing a symmetrical and visually appealing star.
Adding Points and Shaping the Star
When adding points and shaping the star, it's essential to maintain symmetry and balance. Start by adding a point to the top of the star, making sure it's evenly spaced from the existing points. Use a ruler or a straightedge to draw a line from the top point to the bottom point, creating a diagonal line that will serve as a guide for adding the remaining points. Next, add points to the left and right sides of the star, making sure they're evenly spaced and symmetrical. Use the diagonal line as a reference to ensure the points are aligned properly. Continue adding points, working your way around the star, and use the diagonal line to guide you. As you add each point, use a gentle, flowing motion to connect the points, creating a smooth, curved line. Make sure to keep the lines smooth and even, avoiding any sharp or jagged edges. As you shape the star, pay attention to its overall shape and proportions, making adjustments as needed to maintain balance and symmetry. By following these steps, you'll be able to create a beautiful, well-proportioned star with evenly spaced points and a smooth, flowing shape.
Refining the Edges and Adding Details
Refining the edges and adding details is a crucial step in drawing a star. To refine the edges, carefully examine the outline of your star and make any necessary adjustments to ensure that the lines are smooth and even. Pay particular attention to the points of the star, making sure they are sharp and well-defined. If necessary, use a ruler or other straightedge to help you draw straight lines and achieve a more precise shape. Once you are satisfied with the outline, use a fine-tip pen or pencil to add details such as texture, pattern, or shading. You can also add additional features like a center circle or a burst of light emanating from the star. When adding details, be mindful of the overall balance and harmony of the drawing, making sure that the added elements enhance the star's shape and beauty rather than overwhelming it. By refining the edges and adding thoughtful details, you can transform a simple star shape into a stunning and eye-catching work of art.
Enhancing and Customizing Your Star Drawing
Here is the introduction paragraph: Enhancing and customizing your star drawing can elevate it from a simple doodle to a stunning work of art. By experimenting with different shapes and sizes, adding patterns, textures, and colors, and creating a background or scene for your star, you can add depth, dimension, and visual interest to your drawing. In this article, we will explore these techniques in more detail, starting with the basics of experimenting with different shapes and sizes to create a unique and eye-catching star.
Experimenting with Different Shapes and Sizes
Experimenting with different shapes and sizes is a great way to add some creativity and uniqueness to your star drawing. You can try drawing stars with different numbers of points, such as a five-pointed star, a six-pointed star, or even a star with seven or eight points. You can also experiment with different shapes, such as a star with rounded points or a star with sharp, angular points. Additionally, you can play around with the size of your star, drawing small, delicate stars or large, bold stars. You can also try combining different shapes and sizes to create a unique and interesting star design. For example, you could draw a large star with sharp points surrounded by smaller, rounded stars. The possibilities are endless, and experimenting with different shapes and sizes can help you create a star drawing that truly stands out.
Adding Patterns, Textures, and Colors
Adding patterns, textures, and colors to your star drawing can elevate it from a simple shape to a stunning work of art. To add patterns, consider using a variety of techniques such as hatching, cross-hatching, and stippling to create intricate designs within the star's shape. You can also experiment with different textures by adding rough, smooth, or bumpy elements to your star, giving it a more tactile feel. When it comes to colors, the possibilities are endless, and you can choose to use a single hue, a gradient, or a bold, multi-colored scheme to make your star truly pop. Consider using metallic or glitter pens to add a touch of luxury and shine to your star, or try layering different colors to create a sense of depth and dimension. By incorporating patterns, textures, and colors into your star drawing, you can add visual interest, create contrast, and make your artwork truly unique.
Creating a Background or Scene for Your Star
When creating a background or scene for your star, consider the overall mood and atmosphere you want to convey. A simple, minimalist background can help your star shine, while a more detailed and intricate scene can add depth and context. Think about the environment your star is in - is it in space, surrounded by other celestial bodies, or is it a lone star in a dark night sky? You can use a range of techniques to create your background, from soft, blended colors to bold, geometric shapes. Consider adding some subtle texture or pattern to give your background some visual interest. You could also experiment with different brushstrokes or layering techniques to achieve a unique, dreamy effect. Don't be afraid to get creative and try out new things - after all, the background is a chance to add an extra layer of personality and style to your star drawing.