How To Make A Boutonniere
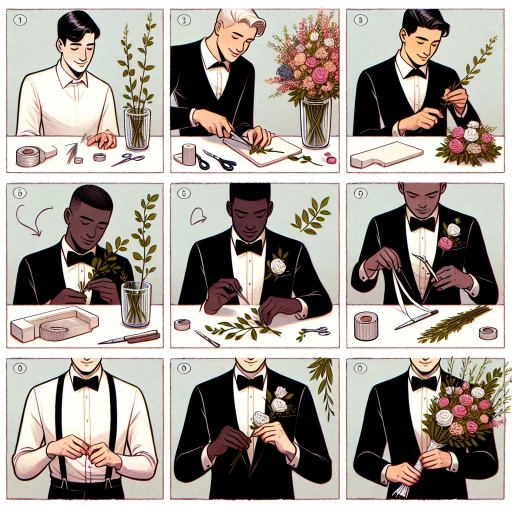
A boutonniere is a small floral arrangement that is traditionally worn on the lapel of a jacket, typically by the groom, best man, or other male members of a wedding party. Creating a beautiful and elegant boutonniere requires some skill and attention to detail, but with the right guidance, anyone can learn how to make one. To start, it's essential to choose the right flowers and materials that will complement the wedding colors and theme. This involves selecting flowers that are in season, have the right texture and color, and are suitable for a small arrangement. Once the flowers and materials are chosen, the next step is to prepare them for assembly, which includes trimming the stems, removing excess leaves, and shaping the flowers. Finally, the boutonniere is assembled and finished with a ribbon or pin, adding a touch of elegance and sophistication. By following these steps, you can create a stunning boutonniere that will add a personal touch to any special occasion. In this article, we will explore the first step in creating a boutonniere: choosing the right flowers and materials.
Choosing the Right Flowers and Materials
When it comes to creating beautiful and meaningful floral arrangements, choosing the right flowers and materials is crucial. The type of flowers, foliage, and materials used can greatly impact the overall aesthetic and message of the arrangement. To ensure that your floral creation is stunning and effective, it's essential to consider several key factors. First, you must consider the occasion and theme of the arrangement, as this will help guide your flower and material selection. Additionally, selecting fresh and high-quality flowers is vital to creating a visually appealing arrangement. Finally, gathering the right materials and tools is necessary to bring your vision to life. By taking the time to carefully consider these factors, you can create a truly exceptional floral arrangement that exceeds your expectations. With that in mind, let's start by exploring the importance of considering the occasion and theme.
Consider the Occasion and Theme
When it comes to creating a boutonniere, it's essential to consider the occasion and theme to ensure that the final product is fitting and meaningful. For instance, a wedding boutonniere might feature more traditional and elegant flowers such as roses or carnations, while a prom or homecoming boutonniere might incorporate brighter, more playful blooms like gerbera daisies or sunflowers. Similarly, a boutonniere for a formal event like a black-tie gala might include more sophisticated and exotic flowers like orchids or calla lilies. Additionally, the theme of the occasion can also influence the choice of flowers and materials, such as a rustic or vintage-themed wedding, which might feature more wildflowers or greenery like eucalyptus or ferns. By taking the occasion and theme into account, you can create a boutonniere that not only complements the wearer's attire but also reflects the tone and style of the event.
Select Fresh and High-Quality Flowers
When it comes to creating a beautiful and long-lasting boutonniere, selecting fresh and high-quality flowers is crucial. Fresh flowers not only look more vibrant and appealing, but they also have a longer vase life, ensuring that your boutonniere remains stunning throughout the event. To choose the best flowers, consider the season and opt for blooms that are in season, as they tend to be fresher and more readily available. Visit a local flower market or a reputable florist to select your flowers, and make sure to inspect each bloom carefully for any signs of wilting, bruising, or damage. Look for flowers with firm petals, a sweet fragrance, and a sturdy stem, as these are indicative of freshness and quality. Some popular flowers for boutonnieres include roses, carnations, and baby's breath, which are known for their timeless elegance and versatility. By selecting the freshest and highest-quality flowers, you'll be able to create a boutonniere that is not only visually stunning but also long-lasting and memorable.
Gather Essential Materials and Tools
To create a beautiful and long-lasting boutonniere, it's essential to gather the right materials and tools. Start by selecting a variety of flowers, foliage, and greenery that complement each other in terms of color, texture, and shape. Consider the occasion, the recipient's style, and the color scheme of the event when making your selection. In addition to flowers, you'll need some basic floral supplies, such as floral wire, floral tape, and a wire cutter. Floral wire is used to attach the stems of the flowers to the base of the boutonniere, while floral tape is used to secure the stems in place and add a decorative touch. A wire cutter is necessary for cutting the floral wire to the desired length. You may also want to add some decorative elements, such as ribbons, pins, or pearls, to give your boutonniere a personalized touch. Other tools you may need include a hot glue gun, scissors, and a floral stem wrap. A hot glue gun can be used to attach heavier decorative elements, while scissors are necessary for cutting the stems of the flowers and foliage. A floral stem wrap can be used to cover the stems of the flowers and add a decorative touch. By gathering all the necessary materials and tools, you'll be well on your way to creating a beautiful and professional-looking boutonniere.
Preparing the Flowers and Foliage
Preparing the flowers and foliage is a crucial step in creating beautiful and long-lasting arrangements. To ensure that your flowers and foliage look their best, it's essential to take the time to properly prepare them. This involves three key steps: trimming and cleaning the stems, removing excess leaves and debris, and hydrating the flowers and foliage. By following these steps, you can help to prevent damage, promote healthy growth, and create stunning arrangements that will last for days to come. First, it's essential to trim and clean the stems of your flowers and foliage to remove any damaged or diseased areas and to create a fresh cut that will help the stems absorb water more efficiently.
Trim and Clean the Stems
Trim and clean the stems of the flowers and foliage to ensure they absorb water properly and stay fresh. Cut the stems at an angle using a sharp knife or pruning shears, removing any leaves that will be below the waterline. This helps prevent bacterial growth and keeps the water fresh. Gently scrape the stems with a knife or a stem scraper to remove any dirt or debris, and then rinse them with cold running water. Pat the stems dry with a paper towel to remove excess moisture. For woody stems, like those of roses or carnations, you can also use a floral stem stripper to remove the lower leaves and any thorns. This helps the stems absorb water better and prevents them from sitting too deeply in the boutonniere. By trimming and cleaning the stems, you'll be able to create a beautiful and long-lasting boutonniere that will make a stunning impression.
Remove Excess Leaves and Debris
When preparing the flowers and foliage for a boutonniere, it's essential to remove excess leaves and debris to create a clean and polished look. Start by gently grasping the stem of the flower or foliage and working your way down to the base, carefully plucking off any excess leaves that will be below the ribbon or wrapping. This will not only prevent the leaves from showing but also help prevent moisture from accumulating and causing the stems to rot. Next, inspect the stems for any debris, such as dirt or twigs, and gently remove them with your fingers or a soft-bristled brush. For more delicate flowers, you can use a pair of tweezers to carefully remove any excess leaves or debris. It's also a good idea to trim the stems at an angle to help the flowers absorb water better and prevent them from sitting too deeply in the boutonniere. By removing excess leaves and debris, you'll be able to create a beautiful and long-lasting boutonniere that will complement any outfit.
Hydrate the Flowers and Foliage
Hydrating the flowers and foliage is a crucial step in preparing them for your boutonniere. This process helps to revive the stems and leaves, making them more pliable and easier to work with. To hydrate your flowers and foliage, start by trimming the stems at an angle using a sharp knife or pruning shears. This helps to increase the surface area for water uptake and prevents the stems from sitting too deeply in the water. Next, place the stems in a container filled with lukewarm water, making sure that the water level is below the base of the leaves to prevent bacterial growth. For flowers with woody stems, such as roses and carnations, you can also add a floral preservative to the water to help extend their vase life. Allow the flowers and foliage to hydrate for at least 30 minutes to an hour before starting to assemble your boutonniere. This will help to ensure that they are fresh and hydrated, resulting in a beautiful and long-lasting boutonniere.
Assembling and Finishing the Boutonniere
Assembling and finishing a boutonniere is a delicate process that requires attention to detail and a clear understanding of the components involved. To create a beautiful and long-lasting boutonniere, it's essential to follow a step-by-step approach. First, you need to create a base with greenery and filler flowers, which provides the foundation for the rest of the arrangement. Next, you'll add the main flowers and embellishments, carefully selecting and placing each element to achieve a balanced and visually appealing design. Finally, you'll secure the stems and finish with a ribbon or wrap, adding a professional touch to the boutonniere. By following these steps, you'll be able to create a stunning boutonniere that will complement any outfit. Let's start by creating a base with greenery and filler flowers, which is the first and most crucial step in the process.
Create a Base with Greenery and Filler Flowers
To create a base with greenery and filler flowers, start by selecting a few sprigs of lush greenery, such as eucalyptus or ferns, and a handful of small filler flowers, like baby's breath or queen anne's lace. Cut the stems of the greenery and flowers at an angle using sharp scissors or pruning shears, and remove any excess leaves that will be below the base of the boutonniere. Next, begin to build the base by placing a few sprigs of greenery in the center of the boutonniere, working your way around the center to create a circular shape. Add a few filler flowers to the greenery, tucking them in and around the stems to create a full and lush base. Continue to add more greenery and filler flowers, working your way around the boutonniere until you have a solid base that is about 2-3 inches in diameter. Make sure to leave a small space in the center of the base for the focal flower or main element of the boutonniere. As you work, gently shape and mold the greenery and flowers to create a natural, organic shape that will provide a beautiful foundation for the rest of the boutonniere.
Add the Main Flowers and Embellishments
To add the main flowers and embellishments to your boutonniere, start by selecting the focal flowers that will be the centerpiece of your design. These can be roses, carnations, or any other type of flower that complements the occasion and the attire of the person wearing the boutonniere. Gently remove any excess leaves from the stems of the flowers, leaving only a small portion at the base of the bloom. This will help prevent the leaves from showing and create a more streamlined appearance. Next, trim the stems of the flowers to the desired length, taking care not to cut too much of the stem, as this can cause the flower to become unstable. Once the stems are trimmed, begin to arrange the flowers in the boutonniere, working from the center outwards. You can use floral wire or a hot glue gun to secure the stems in place, making sure to leave enough room for the embellishments. Speaking of embellishments, now is the time to add any additional decorative elements, such as baby's breath, greenery, or ribbons, to enhance the overall appearance of the boutonniere. Simply weave the embellishments in and out of the flowers, using floral wire or a hot glue gun to secure them in place. As you work, make sure to step back and evaluate the boutonniere regularly, making any necessary adjustments to the placement of the flowers and embellishments. By taking your time and paying attention to detail, you can create a beautiful and elegant boutonniere that is sure to impress.
Secure the Stems and Finish with a Ribbon or Wrap
To secure the stems and finish with a ribbon or wrap, start by gently twisting the stems of the flowers and greenery together to create a cohesive base. This will help prevent the stems from coming apart and make it easier to work with. Next, cut a piece of floral wire or stem wrap to the desired length and wrap it around the base of the stems, overlapping the wire or wrap as you go to create a secure hold. Make sure to leave a small tail of wire or wrap at the end to use as a finishing touch. For a ribbon finish, cut a length of ribbon that matches the color and style of the boutonniere and tie a bow around the stems, securing it with a small dot of floral adhesive or a pin. Alternatively, you can use a floral wrap, such as a satin or burlap wrap, to add a decorative touch to the stems. Simply wrap the wrap around the stems, overlapping the edges as you go, and secure with a small pin or dot of adhesive. Finally, fluff out the flowers and greenery to create a natural, effortless look, and your boutonniere is complete.