How Do You Scan On An Iphone
Scanning documents on an iPhone is a convenient and efficient way to digitize important papers, receipts, and other documents. With the iPhone's advanced camera capabilities and intuitive apps, scanning documents has never been easier. In this article, we will explore three ways to scan documents on an iPhone: using the Notes app, third-party scanning apps, and the Files app. We will delve into the features and benefits of each method, including accessing the scan documents feature, scanning a document with the Files app, and organizing and managing scanned documents. By the end of this article, you will be able to choose the best method for your needs and start scanning documents like a pro. Let's start with the simplest method: using the Notes app.
Using the Notes App
The Notes app on your iPhone or iPad is a powerful tool that offers a range of features to help you stay organized and productive. One of the most useful features of the Notes app is its ability to scan documents using the camera. This feature allows you to quickly and easily digitize paper documents, such as receipts, invoices, and contracts, and save them to your device. In this article, we will explore how to use the Notes app to scan documents, including how to access the scan document feature, how to scan a document with the camera, and how to edit and save the scanned document. By the end of this article, you will be able to use the Notes app to scan documents with ease. To get started, let's take a look at how to access the scan document feature.
Accessing the Scan Document Feature
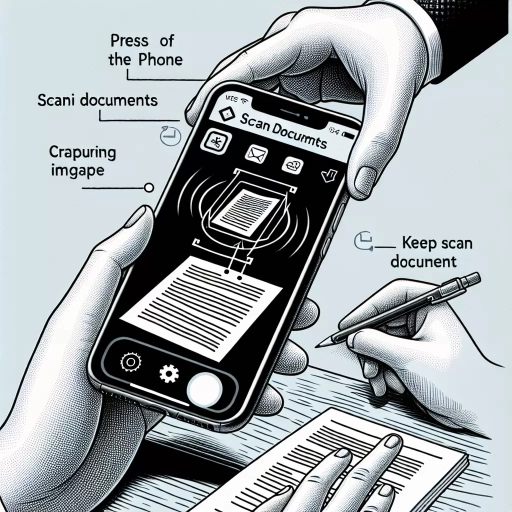
To access the scan document feature on your iPhone, open the Notes app and create a new note or open an existing one. Tap the "+" icon in the bottom right corner of the screen, then select "Scan Documents" from the menu. This will open the camera view, where you can position the document you want to scan in the frame. The camera will automatically detect the edges of the document and adjust the scan area accordingly. You can also manually adjust the scan area by dragging the corners of the frame to fit the document. Once you're satisfied with the scan area, tap the "Scan" button to capture the document. The Notes app will then process the scan and save it as a PDF file, which you can view, edit, and share as needed. You can also add multiple pages to a single scan by tapping the "+" icon in the bottom left corner of the screen and repeating the scanning process. The Notes app will automatically combine the scanned pages into a single PDF file.
Scanning a Document with the Camera
You can scan a document using the camera on your iPhone by opening the Notes app and creating a new note. Tap the "+" icon and select "Scan Documents" from the menu. The camera will open, and you can position the document in the viewfinder. The app will automatically detect the edges of the document and scan it. You can also manually adjust the scan area by dragging the corners to fit the document. Once the scan is complete, you can save it as a PDF or JPEG file and share it via email or other apps. Additionally, you can also use the "Scan Documents" feature in the Files app to scan documents and save them directly to your iPhone's storage.
Editing and Saving the Scanned Document
When you've finished scanning your document, you can edit and save it using the Notes app. To edit the scanned document, tap on the "Edit" button in the top right corner of the screen. This will allow you to crop, rotate, and adjust the brightness and contrast of the document. You can also add text, drawings, or signatures to the document using the markup tools. Once you've made your edits, tap "Done" to save the changes. To save the scanned document, tap the "Share" button in the top right corner of the screen. From here, you can choose to save the document to your Files app, send it via email or message, or upload it to a cloud storage service like iCloud or Google Drive. You can also choose to print the document or save it as a PDF. Additionally, you can also use the "Scan" feature in the Notes app to scan multiple pages and save them as a single document. This feature allows you to scan multiple pages and then save them as a single PDF document, making it easy to organize and share your scanned documents.
Using Third-Party Scanning Apps
Using third-party scanning apps can be a convenient and efficient way to digitize physical documents, photos, and other paper-based materials. With the numerous scanning apps available, users can easily find one that suits their needs and preferences. To get started with using a third-party scanning app, one must first download and install the app on their device. This process is usually straightforward and can be completed in a few minutes. Once the app is installed, users can configure it for scanning by adjusting settings such as resolution, file format, and storage location. After scanning, users can export and share the digitized document with others via email, cloud storage, or other sharing options. By following these simple steps, users can unlock the full potential of third-party scanning apps and streamline their document management workflow. To begin, let's take a closer look at the process of downloading and installing a scanning app.
Downloading and Installing a Scanning App
To download and install a scanning app on your iPhone, start by opening the App Store. You can find the App Store icon on your home screen, or you can ask Siri to open it for you. Once the App Store is open, tap on the "Search" tab at the bottom of the screen and type in "scanner" or "document scanner" in the search bar. This will bring up a list of popular scanning apps, such as CamScanner, Scanbot, and Genius Scan. Browse through the list and select the app that best suits your needs. Read the app's description, check its ratings and reviews, and look at the screenshots to get an idea of its features and user interface. Once you've chosen an app, tap the "Get" button next to it, and then tap "Install" to begin the download and installation process. You may be prompted to enter your Apple ID password or use Touch ID or Face ID to authenticate the download. Wait for the app to download and install, and then tap "Open" to launch it. You can now use the scanning app to scan documents, photos, and other items using your iPhone's camera. Many scanning apps also offer additional features, such as image editing, document organization, and sharing options, so be sure to explore the app's settings and features to get the most out of it.
Configuring the App for Scanning
Configuring the app for scanning is a straightforward process that requires a few simple steps. First, download and install a reputable scanning app from the App Store, such as Scanbot, Genius Scan, or CamScanner. Once installed, open the app and grant it access to your camera and photo library. Next, tap on the settings icon, usually represented by a gear or three horizontal lines, to access the app's settings menu. From here, you can customize various scanning options, such as the scan resolution, file format, and storage location. You may also be able to adjust the app's automatic edge detection, which helps to straighten and crop the scanned image. Additionally, some apps allow you to set up cloud storage integration, such as Google Drive or Dropbox, to automatically save your scanned documents. Finally, familiarize yourself with the app's scanning interface, which typically includes a camera viewfinder, flash toggle, and capture button. By configuring the app to your liking, you'll be able to quickly and easily scan documents, receipts, and other paper items using your iPhone.
Exporting and Sharing the Scanned Document
Exporting and sharing the scanned document is a straightforward process on an iPhone. Once you have scanned your document using the Notes app or a third-party scanning app, you can easily export and share it with others. To export the scanned document, you can tap the "Share" icon, which is usually represented by a box with an arrow coming out of it. This will open up a menu with various sharing options, including email, messages, and cloud storage services like Google Drive or Dropbox. You can also choose to save the scanned document to your iPhone's Files app, where you can access it later. Additionally, you can use the "Markup" feature to annotate the scanned document with text, drawings, or signatures before sharing it. This feature is particularly useful for adding comments or corrections to the document. Furthermore, if you need to share the scanned document with multiple people, you can use the "AirDrop" feature, which allows you to transfer files wirelessly between nearby Apple devices. Overall, exporting and sharing scanned documents on an iPhone is a convenient and efficient process that can be completed in just a few taps.
Using the Files App
Accessing the Scan Documents Feature
Scanning a Document with the Files App
Organizing and Managing Scanned Documents
The Files app on your iPhone or iPad is a powerful tool for managing and organizing your documents. With the Files app, you can access and manage all your files in one place, including documents, images, and videos. One of the most useful features of the Files app is the ability to scan documents using your device's camera. In this article, we will explore how to use the Files app to scan documents, including how to access the scan documents feature, how to scan a document with the Files app, and how to organize and manage your scanned documents. By the end of this article, you will be able to access the scan documents feature, scan a document with the Files app, and organize and manage your scanned documents.
Accessing the Scan Documents Feature
Scanning a Document with the Files App
Organizing and Managing Scanned Documents
To access the Scan Documents feature on an iPhone, follow these steps: 1. Open the Files app: You can find the Files app on your iPhone's home screen or in the App Library. 2. Tap on the "+" icon: Located in the top-right corner of the screen, this icon allows you to create a new document or scan a document. 3. Select "Scan Documents": From the menu that appears, choose "Scan Documents" to activate the camera and begin the scanning process. 4. Position the document: Place the document you want to scan in view of the camera, making sure it is flat and well-lit. 5. Take a photo: Tap the shutter button to capture a photo of the document. You can also use the volume buttons to take a photo. 6. Adjust the scan: If necessary, adjust the scan by dragging the corners to fit the document or tapping "Retake" to capture a new photo. 7. Save the scan: Once you're satisfied with the scan, tap "Save" to save it to the Files app. Alternatively, you can also access the Scan Documents feature from the Notes app. To do this: 1. Open the Notes app: Find the Notes app on your iPhone's home screen or in the App Library. 2. Create a new note: Tap the "+" icon to create a new note. 3. Tap the "+" icon again: In the bottom-right corner of the screen, tap the "+" icon to access the scanning feature. 4. Select "Scan Documents": Choose "Scan Documents" from the menu to activate the camera and begin the scanning process. By following these steps, you can easily access the Scan Documents feature on your iPhone and start scanning documents with ease.
Accessing the Scan Documents Feature
The Files app on your iPhone offers a convenient feature to scan documents, allowing you to digitize paper documents and save them as PDFs or images. To access this feature, open the Files app and navigate to the "Browse" tab. Tap on the "Locations" option and select "On My iPhone" or "iCloud Drive," depending on where you want to save your scanned documents. Next, tap on the "+" icon in the top-right corner and select "Scan Documents" from the menu. This will open the camera view, where you can position the document you want to scan and adjust the settings as needed. Once you've scanned the document, you can save it to your chosen location, where you can organize and manage it along with your other files. The Files app also allows you to edit and annotate your scanned documents, making it a powerful tool for managing your digital paperwork.
Scanning a Document with the Files App
The Files app on your iPhone offers a convenient feature to scan documents, allowing you to digitize paper documents and save them directly to your device. To access this feature, open the Files app and navigate to the "Browse" tab. Tap on the "Locations" option and select "On My iPhone" or "iCloud Drive," depending on where you want to save your scanned documents. Next, tap on the "Scan Documents" option, which is represented by a camera icon. This will open the camera view, where you can position the document you want to scan. The app will automatically detect the edges of the document and capture a photo. You can then adjust the scan by cropping, rotating, or adding filters as needed. Once you're satisfied with the scan, tap "Save" to store the document in your chosen location. You can also organize and manage your scanned documents by creating folders, adding tags, or sharing them with others via email or messaging apps. By using the Files app to scan documents, you can easily digitize and manage your paper documents, making it a convenient and efficient way to go paperless.