How To Draw A Forest
 Venturing into the vast scope of artistry, one may find oneself inclined towards capturing the breathtaking beauty of nature, particularly the lush and sprawling forests. This article aims to guide you, budding artists, through the mesmerizing journey of sketching a forest - a journey that wonderfully weaves both art and appreciation for nature. We'll unveil the curtain to the essentials of drawing a forest, unravelling the must-know elements you need to capture its true essence. Next, we provide a step-by-step guide, walking you through the process of creating your forest piece from a blank canvas to a detailed work of art. Lastly, we venture into the space of marrying realism and creativity when drawing a forest, helping you unlock a unique, harmonious blend of these elements for an imaginative yet tangible masterpiece. As we embark on this journey together, we start by building a strong foundation; understanding the essentials of drawing a forest.
Understanding the Essentials of Drawing a Forest
Understanding the essentials of drawing a forest can elevate one's appreciation for nature and refine one's artistic skills substantially. As a subject, forests offer a chance to explore a wealth of textures, shapes, and depth that can enrich your artistic repertoire remarkably. This article intends to provide insights to guide individuals through the intricate journey of forest sketching. Firstly, it delves into different types of forests to broaden your comprehension of their distinctive elements and character. For instance, the leafy canopy of deciduous woods contrasts starkly with the needle-like branches of coniferous forests. Secondly, it elaborates on identifying essential shapes in forest landscapes. Each tree, leaf, and branch, presumed complex, can be simplified to basic shapes. Finally, it emphasizes the importance of perspective and depth in forest drawings, essential for capturing the enchanting, immersive aura that forests exude. Enlightening yourself on these aspects propels you towards creating more realistic, compelling forest illustrations with ease. Now, let us embark on this journey by studying different types of forests and their unique characteristics.
Different types of forests
Forests are one of nature's most profound treasures, as they are brimming with dynamic colors, intricate patterns, and diverse species. Drawing a forest isn't as simple as it may seem, primarily because there are different types of forests, each with its unique characteristics. Understanding these can deeply enrich your drawing experience and yield more realistic outcomes. Firstly, there are tropical rainforests, located near the equator. These forests are teeming with diverse plant and animal species, much of which haven't even been discovered yet. The trees in these regions are tall, with broad leaves to maximize sunlight absorption in cloudy environments. A dense undergrowth called the 'jungle' fills space between the forest floor and the tree canopy. If you're drawing a tropical rainforest, focus on the vibrancy and lushness of vegetation. Secondly, temperate forests are found in areas with moderate rainfall and distinct seasons like North America, Europe, and Asia. The primary trees in these forests are deciduous, meaning they lose their leaves in the fall. They have a mixture of broad-leaf trees like oaks and maples and conifers like pines and firs. These forests have fewer species compared to tropical forests but still have a rich variety. To effectively draw these, imbue your artwork with season's colors, from lush greens of summer to the golden hues of autumn. Next, boreal forests, commonly known as taigas, populate the frigid parts of the globe, including Alaska, Canada, and Russia. They mostly comprise cold-adapted trees like spruces, pines, and larches. The fauna include animals suited to the cold climate like reindeer, moose, and bears. Drawings of boreal forests should reflect the cold, stark beauty of these rugged northern landscapes. Lastly, we have the dry forests, which include tropical dry forests and temperate rainforests. These forests experience long dry seasons and therefore have sparse vegetation. The trees, adapted to handle dry conditions, often have waxy leaves to prevent water loss. Drawing these forests involves a subtle palette of earth tones and plenty of open spaces. Understanding these different forest types can help you not only capture their physical characteristics but also imbue your drawings with a sense of place and mood. Whether it's vibrant tropical rainforests, placid temperate forests, stark boreal forests, or the resilient dry forests, each has a unique story to tell. SEO content creation combined with digital storytelling can help bring these forests to life in your drawings and engage your audience more effectively.
Identifying basic shapes in forest landscapes
Identifying basic shapes in forest landscapes is a crucial step in accurately representing a forest in your drawing. It all starts with a keen eye, observing the constant repetition of shapes that nature uses to form the dense tapestry of trees, bushes, and foliage. At the heart of every forest landscape are trees, which can be generally represented as various combinations of basic shapes. For instance, many trees can be portrayed as a cylinder for the trunk and a sphere or a cone for the foliage. This is just a simplified version, as trees can vary greatly depending on the species and perspective. In addition to trees, bushes and shrubs play a dominant role in a forest landscape. These can be visualized and drawn as clustered circles or ovals with varied sizes. The ground, covered by grass, fallen leaves, or rocks, can be seen as a wavy, irregular plane composed of many small basic shapes like rectangles, triangles, and sometimes circles for rocks. Furthermore, other forest elements such as fallen logs, boulders, streams can also be boiled down to cylinders, rectangles or ovals. However, the shapes we see are not static but are constantly affected by light and shadow, creating an array of complex forms. Paying attention to these lighting conditions can help define these shapes with more depth, realism, and visual interest. Remember, these shapes are just a starting point. As you gain more expertise and confidence, you will learn to manipulate these basic shapes to capture the intricacies and individual characteristics of different forest landscapes. You will also start noticing more subtleties, like the way branches form Y or V shapes, or how conifers often arrange their branches in a spiral pattern around the trunk. It's all about building observation skills and learning to see complex objects as simpler elements. It’s these fundamental shapes that will serve as the basic building blocks for your forest drawing, regardless of whether you’re working on a big canvas landscape or sketching on a small notepad. These skills will enable the rendering of a forest scene that is not just visually accurate, but can also effectively communicate the beauty, serenity, and complexity of nature through your art.
Importance of perspective and depth in forest drawings
Understanding the inherent beauty of forest landscapes becomes a more immersive experience when a drawing’s perspective and depth are thoughtfully rendered. Perspective, in terms of art, is the technique used to represent a three-dimensional world in a two-dimensional space. It provides an illusion of depth and distance, translating the far-reaching expanses of forests onto a flat canvas. In forest drawings, it’s essential to create a sense of depth to avoid the forest scene appearing flat or lacking dimension. Depth breathes life into the artwork and provides a nuanced representation of the forest. In the context of a drawing, it lends authenticity to the representation, making the artwork more interactive and engaging for viewers. For instance, distant trees are often depicted smaller and with less detail than nearer ones, which appears larger and more detailed. This manipulation of size and detail is one way to bring a 3D aspect to the drawing. Shadows and highlights also play a critical role, adding layers of subtlety and complexity to the scene. They enhance the deep-set nature of forests, emphasizing the contrast between the forest's densest parts and patches where sunlight manage to seep through. It is these intricate techniques of perspective and depth that allow viewers to feel as though they can step into the drawing, wander between the trees, and experience the forest’s quiet tranquility. The depth of field can shift a viewer's focus to specific elements such as a pond shimmering in the sunlight or a wildlife creature lurking in the shadows. These effects contribute immensely to the overall narrative of the drawing. In essence, understanding the importance of perspective and depth is crucial in capturing the forest's essence in a drawing. These techniques contribute not only to the visual appeal but also to the storytelling aspect of the artwork. Every element within the drawing—each tree, stone, or brook—acts as a narrative device that adds depth and perspective, making the forest come alive to the viewer.
Step-by-step Guide to Drawing a Forest
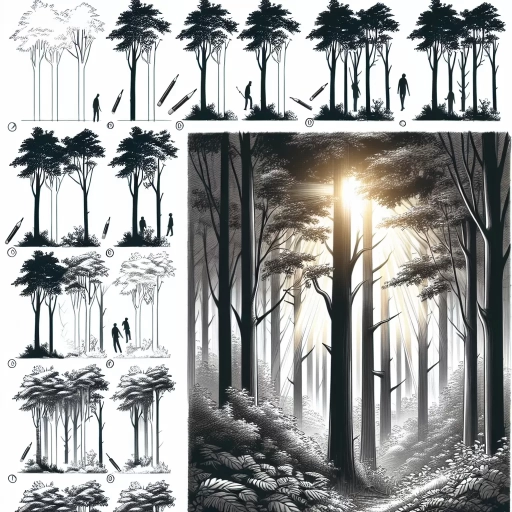
In the realm of nature art, capturing the captivating allure of a forest requires a precise methodology. A step-by-step guide to drawing a forest, from sketching the basic outline to adding intricate details and finalizing the masterpiece, is instrumental for both novice artists and seasoned drawers. The forest’s vast landscape, filled with an abundance of trees, foliage, and wildlife, offers an infinite scope for creativity. While the blank canvas might seem daunting at first, it’s essential to understand that every great artwork begins with a rudimentary outline. This forms the backbone of your forest, offering a skeletal framework to build upon. After laying out the basics, the second step calls for adding the details that make a forest landscape distinctive. It's more than just trees - it's the play of light and shadow, the foliage's texture, and the hidden inhabitants. This is where your forest truly comes to life. The final stage involves refining and polishing your drawing, ensuring every line and stroke of your sketch fulfills its purpose. This methodical process helps one transcend from a mere observer to an active participant, forging a deeper connection with nature. We commence this artistic journey with the first stage - sketching the basic outline.
Sketching the basic outline
Sketching a basic outline serves as the bedrock upon which your final drawing of a forest stands. This preliminary step is often overlooked but holds vast importance in creating a convincing and lifelike forest drawing. Similar to how an architect doesn't construct a building without a blueprint, an artist doesn't dive into drawing without first crafting an outline. Providing a skeletal framework, this step prevents you from losing sight of the overall picture, ensuring every tree, bush, and element fits harmoniously into the scene. Dedicate adequate time to observe your forest reference photos or real-life landscape closely. Notice the varying tree types, their unique shapes and patches arrangement. Is it a dense, tropical jungle or a wide-spaced coniferous forest? Are the trees uniformly distributed, or do some cluster together? Carry these observations into your outline. Starting with light, loose strokes, sketch the outer edge of your forest, providing a boundary for your composition. Draw guidelines, if helpful, to understand the forest's depth, the distribution of trees, and the perspective. Depending on your viewpoint, smaller trees at the back signify distance, while larger ones at the front imply closeness. Make a rough sketch of where each tree will reside in your drawing. These don’t need to be detailed, just shapes to denote their locations and forms. Also, consider spaces between the trees. These gaps are crucial as they contribute to the natural and realistic look of your forest. They also leave room for intricate details and interesting light effects that can enhance the drawing’s depth and dimension. Remember, this outline isn’t set in stone. Artistic creation often involves adjustments and iterations that lead you closer to your envisioned illustration. Treat this sketch as your experiment arena, feel free to adjust the tree positions, play around with perspective, or change entire elements if need be. In essence, sketching the basic outline gives you a launchpad, building a creative momentum that carries you gracefully toward the final, detailed rendering of your forest. It is the guiding light that illuminates your artistic journey, ensuring you stay on course while allowing room for spontaneous creative detours. Beyond it's utility in drawing, this step is a testament to the age-old wisdom, 'Well begun is half done.' An accurately sketched outline not only gives you a clear direction but also sets the tone for a seamless, enjoyable drawing experience, where each stroke brings the forest on your paper to life, one tree at a time.
Adding details to the forest landscape
In your journey to create a compelling forest landscape, adding intricate details is indispensable. The magic lies in these fine elements that provide your artwork with a three-dimensional and believable quality. When drawing a forest landscape, details mostly revolve around the types of trees, their leaves, the play between light and shadow, and the forest floor attributes such as stones, moss, and undergrowth. In sculpting your trees, take time to capture the uniqueness of each type. The leaves of a pine tree differ considerably from those of an oak or birch, each holding their own distinct shape and texture. Drawing them in clusters rather than as singular entities will gift your forest with a rich, lush aesthetic. However, we mustn't forget about the bark – often overlooked but vastly significant. The bark's color and texture contribute immensely to the overall ambiance of your drawing. For example, illustrating a darker bark will project an older and more mystical forest, while a lighter one will radiate a younger, freer spirit. Incorporating light and shadow also comes into play and has a twofold purpose. Not only does it add depth to your forest but it can also dictate the time and weather of your drawing. Wilfully manipulating these elements can dramatically alter your illustration's mood. Is the sun piercing through the canopy, casting long, dancing shadows on your forest floor? Or are the clouds overhead, blanketing the scene below in a soothing, muted light? Finally, immerse your viewer into your forest with a detailed undergrowth. The ground is more than just dirt. Examine the different types of moss coloring the forest floor, the scattered pebbles and stones, the gusty fallen leaves, and the concert of wildflowers bursting from the ground. Pay close attention to their shapes, sizes, and textures, as they fortify the true-to-life sense of your drawing. Detailing a forest landscape is like telling a story. Trees, light, shadow, and undergrowth each play a critical role in the narrative. By meticulously crafting each element, you welcome your audience into a realm where they can almost smell the earthiness of the forest, hear the rustling leaves, and feel the warmth of the sun filtered through the canopy. Remember, your forest not just about visuals - it’s about creating an experience that your audience can lose themselves in.
Finalizing and refining the drawing
Finalizing and refining your forest drawing is a transformative phase where your initial sketch turns into a masterpiece through crucial detailing and shading works. Much like perfecting an SEO strategy, this stage requires both patience and precision. Your forest, at this point, may appear quite generic but with the methodical strokes of your tool, be it a pencil or a paintbrush, you are going to breathe life into it. Start by accentuating the outlines of your trees, emphasizing on the uneven, rugged texture of the bark. The unique characteristic of each tree species is defined by the texture of their bark, with some being smooth and others being gnarly and deeply crevassed. This emphasis not only provides an enrichment of details but it also aids in differentiating one tree species from another, bringing in a variety of visually pleasing aesthetics. Next, focus on foliage. The canopy, comprising numerous leaves, lacks clarity if delineated in its entirety. Thus, it is wise to draw an impression of them. Depict some leaves around the edges and then merely fill in the blocks with different shades. Lighter shades depict the sunlight filtered through the leaves, where the dark shades will illustrate the heavier patches. After that, move on to the forest floor. Incorporate elements like dead leaves, pebbles, and small plants to give it a realistic touch. Remember, the forest floor is never smooth or even - incorporate tweaks and dents, mounds and hollows, to recreate authenticity. Lastly, pay attention to shading and light effects. The play of light is significant in a forest drawing. The areas where light reaches less will be darker. In contrast, the rim of the forest, where light filters through the leaves, will be lighter. Also, keep in mind the source of light to maintain the drawing’s consistency. Refinement is all about noticing and perfecting the minute details that collectively have a huge impact, quite similar to arranging the keyword in an SEO-friendly manner for better visibility. By focusing on each aspect of the drawing and refining it step by step, you will have a balanced and lifelike drawing of a forest that engages viewer interest, much like well-curated content that engages readers. Remember, practice is fundamental, and each stroke you make brings you one step closer to mastery in drawing and illustrating.
Promoting Realism and Creativity in Forest Drawing
Producing an engaging, informative article on promoting realism and creativity in forest drawing necessitates the careful crafting of three integral elements: incorporating textural details, understanding the role of light and shadow, and embracing individual style and creativity. Introducing textural details effectively breathes life into an artwork, enhancing its realistic feel while invoking the sensory experience of real-life woods. The mastery of light and shadow plays a pivotal role in forest drawing, instilling depth, perspective, and realism into the picture. Furthermore, creativity and individual style are essential in making the drawing unique and personal, serving as the artist's own signature. A combination of these components infuses realism while allowing space for creativity, making each forest illustration a captivating echo of reality. Let's delve deeper into these elements, starting with the first essential technique- the incorporation of textural details to evoke a realistic feel in forest drawings.
Incorporating textural details for a realistic feel
Incorporating textural details is instrumental in bringing about a realistic feel in forest drawings. As an artist, your primary objective is to breathe life into your art, making it mirror the beauty of the real world as closely as possible. Textural detailing is key in achieving this goal. It lends a multi-dimensional effect to the art, adding depth and character. When it comes to a forest drawing, nuances like the furrowed bark of trees, the delicate veining on leaves, or the dense and fluffy texture of moss, can dramatically enhance the overall realism of your representation. Start by observing real forests in detail, focusing on individual elements. You'll find that each tree species has a unique bark texture. Some might be smooth, others could be rough or flaky. Translating these subtleties onto your drawing will give it an authentic feel. Similarly, rendering the texture of leaves and foliage requires acute observation and creativity. Every leaf – its shape, its veins, its edges – tell a unique story. Capturing these in your drawing injects life into your forest. The sense of touch translated into visual artistry can generate a realistic depiction that your audience can 'feel' just by looking. It's also important to study and imitate the play of light on these textures. Light can magnify or soften these textural details and understanding this interplay can seriously level up your drawing. Moss, shrubs, and ground elements also play a vital role in enhancing realism. The softness of moss contrasted against the rough tree bark or the uneven forest floor riddled with fallen leaves and twigs create a rich, tactile experience that draws in the viewer. To incorporate these textural expressions, mastering various shading techniques are crucial. Fine-tuning your skills in stippling, hatching, cross-hatching, or blending can simulate different textures effectively. However, the golden rule of artistry rings true – balance is key. While detailed texture work can make your drawing come alive, overdoing it may result in visual noise that can distract from the main subjects or elements in your piece. In conclusion, the art of infusing your forest drawing with realistic textural details lies in observing the natural world closely, practiced execution of illustrative techniques, and applying them creatively and judiciously. By doing so, you can create forest drawings that truly reflect the majesty and intricacy of nature, promoting both realism and creativity in your work.
Understanding the role of light and shadow in forest drawings
Understanding the role of light and shadow in forest drawings is a fundamental aspect contributing to the realism and creativity in your artistry. The dynamic relationship between light and shadow greatly embellishes the balance and depth of the artwork, making it feel more alive and immersive. As an artist, your deliberate manipulation of light and shadow directs the viewer’s attention, establishing a narrative in your artwork. Lighting in forest drawings is not merely about illuminating the objects, but it is about setting the mood and atmosphere of the composition. The brightness or darkness in a drawing can instill a sense of time and weather, creating different emotional responses. For instance, a forest bathing in sunlight emits an aura of tranquility and freshness while a shadowy forest with patches of light can stir a sense of mystery or foreboding. Meanwhile, the artistry use of shadows brings the third dimension to the drawing, adding depth, receding elements in the frame, and emphasizing the spatial relationships between objects. The degree of darkness in the shadow further correlates directly to the object's distance from the light source. This principle aids in representing secondary light effects, such as patches of light filtering through the tree canopy. The understanding of the role of light and shadow isn't always intuitive, and it requires practice to master. It's all about consistent observation, studying the effect of light at different times of the day and under different weather conditions. It is essentially to understand how the shadows are cast and learn how a particular light intensity can impact the scene's overall mood, depth, and balance. In conclusion, the interaction of light and shadow plays a defining role in transforming a forest drawing from a mere representation to a compelling, engaging piece of art, filled with life, depth and narrative. By harnessing the power and subtlety of light and shadow, the artist can evoke emotions, tell stories, and transport viewers to the heart of the forest right from the comfort of their home.
Embracing creativity and individual style while drawing
Embracing creativity and individual style while drawing a forest presents a unique opportunity for artists to showcase their unique expression in the world of realism. Not only does it allow the artist to color beyond the lines, it also opens the door for narrative storytelling, a crucial perspective that portrays the intricate beauty of nature. With the lush woods as the canvas, artists can breathe life into their forest by infusing their personal flair and creativity. Every forest has a personality, shaped by its regional characteristics, local climate, and the species it is home to. While some may picture the dark and mystical Black Forest of Germany, others may visualize the dense, emerald beauty of the Amazon rainforest. In both scenarios, an unforgettable story of the forest's character can unfold in the artist's mind. Drawing a forest is not about mimicking a photograph; it’s about capturing the soul of nature. The artist’s interaction with the canvas has the potential to transform from mere pencil strokes to a beautiful experience that embraces the individual's own style and creativity. The beauty of any artwork is subjective, and realism does not always have to mean photographic accuracy. Hence, an artist can add a twist by employing more abstract or impressionistic techniques, for instance, suggestive lines and colors to represent the forest instead of exact representation. Artists are also encouraged to play with unique perspectives and approaches. This could mean focusing on minute details like the hue of the leaves, the texture of tree trunks, or even the interplay of light and shadows, uniquely tailored to the artist's perspective. This can evoke a sense of familiarity and personal attachment in the viewers, as they lose themselves in the woods. By doing so, the artist not only brings the forest to life but also enhances its identity through one's own artistic vision. Hence, embracing creativity and individual style while drawing a forest is like opening a magical gateway to the artist's world of imagination. It is a reincarnation of the artist's inner thoughts, charms, and emotions as they echo through the woodland trails, dipping into the lush, green, mossy rocks, and whispering with the rustling leaves. It’s a vivid display of the meeting point between the stark realism of forest life and the wondrous creativity brimming inside the artist's mind. By promoting this blend of realism and creativity, we celebrate the diversity of thought, challenge the normative conventions in art, and highlight the transformative power of individual expression.