How To Do A Fade Haircut
A fade haircut is a popular style that requires precision and skill to execute. To achieve a seamless blend from the hairline to the scalp, it's essential to understand the fundamentals of the technique. In this article, we'll delve into the world of fade haircuts, exploring the essential steps to master this style. From preparation to technique and finishing touches, we'll cover it all. To start, preparation is key to a successful fade haircut. Before you begin, it's crucial to have the right tools, understand the client's preferences, and prepare the hair for the cut. In the following sections, we'll discuss the importance of preparation, mastering the fade technique, and adding the finishing touches to complete the look. By the end of this article, you'll be equipped with the knowledge and skills to deliver a high-quality fade haircut that will leave your clients looking and feeling great. So, let's start with the foundation of a great fade haircut: preparation.
Preparation is Key
When it comes to achieving a flawless fade haircut, preparation is key. A well-prepared barber or stylist can make all the difference in delivering a high-quality cut that meets the client's expectations. To ensure a successful fade haircut, it's essential to choose the right tools and equipment, understand the different types of fade haircuts, and prep the hair and scalp. By doing so, you'll be able to achieve a seamless blend of lengths, a defined edge, and a healthy-looking scalp. In this article, we'll dive into the importance of preparation and provide you with the necessary tips and tricks to take your fade haircut game to the next level. First, let's start with the basics – choosing the right tools and equipment.
Choose the Right Tools and Equipment
When it comes to cutting a fade haircut, having the right tools and equipment is crucial for achieving a professional-looking result. A good pair of clippers is essential, and it's recommended to use a high-quality clipper with adjustable blade lengths to ensure a seamless transition between different lengths. Additionally, a trimmer is necessary for tidying up the edges and creating a defined border around the hairline. A comb is also a must-have, as it helps to guide the clippers and trimmer, ensuring a straight cut and preventing any unevenness. Furthermore, a pair of thinning scissors can be useful for blending the layers and creating a natural-looking finish. It's also important to use a clipper oil to keep the blades well-lubricated and running smoothly, and a cleaning brush to remove any hair clippings and debris from the clippers. By investing in the right tools and equipment, you'll be able to achieve a high-quality fade haircut that looks professional and polished.
Understand the Different Types of Fade Haircuts
When it comes to fade haircuts, there are several types to choose from, each with its unique characteristics and styling options. The most common types of fade haircuts include the low fade, medium fade, high fade, skin fade, and bald fade. A low fade haircut features a gradual decrease in length as you move up the head, with the hair on the sides and back cut close to the head, while the hair on top is left longer. A medium fade haircut is similar, but the hair on the sides and back is cut closer to the head, with a more defined contrast between the lengths. A high fade haircut features a more dramatic contrast between the lengths, with the hair on the sides and back cut very close to the head, while the hair on top is left longer. A skin fade haircut features a seamless transition from the hair to the skin, with no visible line or edge. A bald fade haircut, on the other hand, features a complete shave of the hair on the sides and back, with the hair on top left longer. Understanding the different types of fade haircuts is essential in determining the best style for your face shape, hair type, and personal preference. By knowing the characteristics of each type of fade haircut, you can make an informed decision and achieve the look you want.
Prep the Hair and Scalp
Prep the hair and scalp by washing the hair with a clarifying shampoo to remove any product buildup. Towel-dry the hair, but not completely, as a damp hair is easier to cut. Use a comb or brush to detangle the hair, working from the ends up to the roots. This will help prevent any knots or tangles that could interfere with the cutting process. Next, use a clipper oil or lubricant to keep the clippers running smoothly and prevent them from getting clogged with hair. Apply a small amount of oil to the blades and wipe off any excess with a cloth. Finally, use a clean towel to wipe down the scalp and remove any dirt, oil, or other debris that may be present. This will help the clippers glide smoothly over the scalp and prevent any irritation or ingrown hairs. By prepping the hair and scalp, you'll be able to achieve a clean, even cut and prevent any potential problems that could arise during the cutting process.
Mastering the Fade Technique
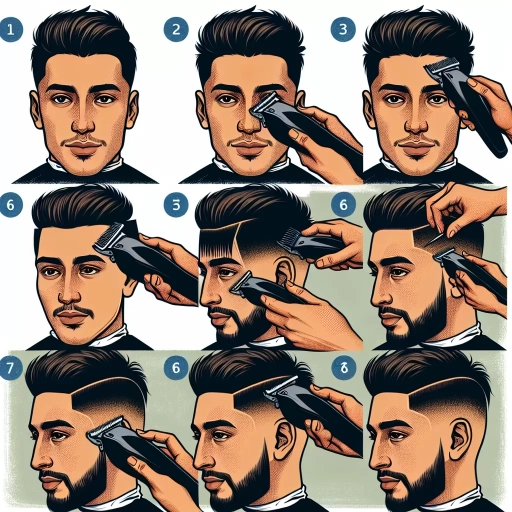
Mastering the fade technique is a crucial skill for any barber or stylist looking to deliver high-quality, modern haircuts. A well-executed fade can elevate a haircut from good to great, but it requires precision, patience, and practice. To achieve a seamless, natural-looking fade, it's essential to section the hair and work in small areas, using the right guard size and clipper angle to create a smooth, even transition. Additionally, blending the layers is critical to avoid any visible lines or demarcations. By following these key principles, barbers and stylists can master the fade technique and take their haircutting skills to the next level. In this article, we'll dive deeper into the first step of mastering the fade technique: sectioning the hair and working in small areas.
Section the Hair and Work in Small Areas
When it comes to mastering the fade technique, sectioning the hair and working in small areas is crucial for achieving a seamless and even blend. To start, divide the hair into sections, depending on how many fades you want to achieve. For a standard fade, you can section the hair into two parts - the top section, which will remain longer, and the bottom section, which will be faded. Clip the top section out of the way using a clipper clip, and focus on the bottom section. Divide the bottom section into smaller sub-sections, depending on the length and thickness of the hair. This will allow you to work more efficiently and maintain even tension on the hair. When working in small areas, use a comb or rat-tail comb to section off the hair, and use the clipper to cut the hair in small increments, working your way up the head. This will help you achieve a smooth and even fade, with no visible lines or demarcations. By sectioning the hair and working in small areas, you can also avoid cutting too much hair at once, which can lead to unevenness and a less-than-desirable finish. Additionally, working in small areas allows you to maintain better control over the clippers, which is essential for achieving a precise and even cut. By taking the time to section the hair and work in small areas, you can ensure a high-quality fade that looks professional and polished.
Use the Right Guard Size and Clipper Angle
When it comes to mastering the fade technique, using the right guard size and clipper angle is crucial. The guard size will determine the length of the hair, while the clipper angle will affect the shape and blend of the fade. For a seamless transition from one length to another, it's essential to use the right combination of guard sizes and clipper angles. For example, when cutting a high-and-tight fade, use a shorter guard size (such as a #0 or #1) with a steeper clipper angle (around 10-15 degrees) to create a defined edge. As you work your way up the head, switch to a longer guard size (such as a #2 or #3) with a more gradual clipper angle (around 5-10 degrees) to blend the layers. Remember to always follow the grain of the hair and use light, smooth strokes to avoid any unevenness or lines. By using the right guard size and clipper angle, you'll be able to achieve a smooth, natural-looking fade that enhances the overall shape of the haircut.
Blend the Layers for a Seamless Transition
When it comes to creating a seamless transition between layers in a fade haircut, blending is key. This technique involves using thinning scissors or hair shears to cut the hair at a slight angle, allowing the layers to blend together smoothly. To blend the layers, start by identifying the point where the fade meets the longer hair on top. This is usually the most visible area of the haircut, and it's essential to blend it carefully to avoid any noticeable lines or demarcations. Hold your thinning scissors vertically and place them at the point where the fade meets the longer hair, with the blades facing the direction of hair growth. Then, slowly open and close the scissors, cutting the hair at a slight angle as you move up the head. This will help to create a seamless transition between the layers, allowing the hair to flow smoothly from one length to the next. As you blend the layers, be sure to follow the shape of the head, using the natural contours of the skull to guide your scissors. This will help to create a more natural-looking haircut that moves with the head, rather than against it. By blending the layers carefully, you can create a seamless transition that adds depth and dimension to the haircut, while also creating a more polished and refined finish.
Finishing Touches and Maintenance
The finishing touches and maintenance of a fade haircut are crucial in ensuring the style looks its best and lasts longer. To achieve a polished look, it's essential to neaten up the edges and neckline, style the hair to enhance the fade, and provide after-care instructions for the client. By paying attention to these details, barbers and stylists can deliver a high-quality service that meets their clients' expectations. In this article, we will explore these three key aspects of finishing touches and maintenance, starting with the importance of neaten up the edges and neckline.
Neaten Up the Edges and Neckline
When it comes to finishing touches and maintenance, neaten up the edges and neckline is a crucial step in perfecting a fade haircut. This step involves using clippers without a guard attachment to carefully tidy up the hairline, creating a seamless transition from the hair to the skin. To achieve a clean and defined edge, place the clippers at a slight angle, with the blade facing the direction of hair growth. Gently run the clippers along the edge of the hairline, using light, smooth strokes to remove any stray hairs or unevenness. Be cautious not to press too hard, as this can cause irritation or ingrown hairs. For the neckline, use a slower and more deliberate motion, following the natural curve of the neck. This will help create a smooth, even line that complements the overall shape of the fade. By taking the time to neaten up the edges and neckline, you can add a level of sophistication and polish to the haircut, making it look more professional and well-groomed. Regular maintenance of the edges and neckline is also essential to keep the fade looking its best, as it can help prevent ingrown hairs and keep the hairline looking defined and clean.
Style the Hair to Enhance the Fade
To style the hair to enhance the fade, start by applying a small amount of styling product, such as pomade or hair wax, to the top section of the hair. Use a comb or your fingers to distribute the product evenly, focusing on the roots and mid-lengths. This will help add texture and definition to the hair, while also enhancing the contrast between the faded sides and the longer top section. Next, use a blow dryer on a low setting to dry the hair, or allow it to air dry if you prefer a more natural look. Once the hair is dry, use a comb or your fingers to style the hair as desired, such as sweeping it to the side or styling it up and away from the face. To add extra texture and volume, try using a texturizing spray or dry shampoo on the roots and mid-lengths. Finally, finish the look by applying a small amount of hair serum or oil to the ends of the hair, to add shine and protect the hair from damage. By following these steps, you can create a stylish and polished look that showcases your fade haircut.
Provide After-Care Instructions for the Client
After completing the fade haircut, it's essential to provide the client with after-care instructions to ensure the style lasts longer and the scalp remains healthy. Start by advising the client to wash their hair with a gentle shampoo, preferably a sulfate-free one, to prevent dryness and irritation. Recommend a hydrating conditioner to keep the hair and scalp moisturized, especially if the client has a sensitive scalp. For the first few days, suggest that the client avoid using hot water, which can strip the hair of its natural oils, and instead use warm or cool water. Also, advise the client to avoid using harsh chemicals or styling products that can damage the hair and scalp. To maintain the fade, recommend that the client use a trimmer or clipper with a guard attachment to tidy up the edges and neckline every 4-6 weeks. Additionally, suggest that the client use a scalp serum or oil to keep the scalp healthy and moisturized. Finally, remind the client to schedule regular follow-up appointments to maintain the style and prevent split ends. By providing these after-care instructions, you can ensure that the client enjoys their fade haircut for a longer period and maintains a healthy scalp.