How To Make Rainbow Loom Bracelets
Here is the introduction paragraph: Making rainbow loom bracelets is a fun and creative activity that can be enjoyed by people of all ages. With a few simple tools and some colorful rubber bands, you can create a wide variety of unique and stylish accessories. In this article, we will take you through the process of making rainbow loom bracelets, from the basics to more advanced techniques. We will start by getting you started with the rainbow loom, including the materials you need and how to set it up. Then, we will move on to basic techniques for making rainbow loom bracelets, including how to create simple patterns and designs. Finally, we will explore advanced techniques and designs, including how to add embellishments and create complex patterns. With these skills, you will be able to create your own unique rainbow loom bracelets and show off your creativity. So, let's get started with the rainbow loom and begin our journey to making beautiful rainbow loom bracelets.
Getting Started with Rainbow Loom
Getting started with Rainbow Loom can be an exciting and creative journey, but it can also be overwhelming for beginners. To ensure a smooth and enjoyable experience, it's essential to understand the basics of this popular craft. Before diving into your first project, it's crucial to familiarize yourself with the basic tools and materials needed, such as the loom itself, hooks, and rubber bands. Choosing the right rubber bands is also vital, as it can affect the quality and appearance of your finished product. Additionally, setting up a comfortable and organized workspace is necessary to help you stay focused and avoid mistakes. By mastering these fundamental aspects, you'll be well on your way to creating beautiful and intricate designs with your Rainbow Loom. In this article, we'll start by exploring the basic tools and materials you'll need to get started.
Understanding the Basic Tools and Materials
To get started with making Rainbow Loom bracelets, it's essential to understand the basic tools and materials required. The primary tool needed is the Rainbow Loom itself, a plastic device with rows of pegs that hold the rubber bands in place. You'll also need a hook, which is used to pick up and move the rubber bands around the loom. Additionally, you'll need a pair of scissors to cut the rubber bands as needed. The main material used is, of course, the rubber bands, which come in a variety of colors and sizes. It's recommended to start with a few basic colors and gradually add more as you become more comfortable with the process. You may also want to invest in a bag or container to store your rubber bands and keep them organized. Some people also find it helpful to use a clip or clamp to hold the loom in place while they work, but this is not strictly necessary. By familiarizing yourself with these basic tools and materials, you'll be well on your way to creating your own unique Rainbow Loom bracelets.
Choosing the Right Rubber Bands
Choosing the right rubber bands is crucial for creating beautiful and durable Rainbow Loom bracelets. With so many colors, sizes, and types of rubber bands available, it can be overwhelming to decide which ones to use. Here are some tips to help you choose the right rubber bands for your project. First, consider the size of the rubber bands. Rainbow Loom recommends using rubber bands that are 1/4 inch wide and 3 inches long. These sizes work well for most projects, but you can experiment with different sizes to create different effects. Next, think about the color palette you want to use. Rainbow Loom offers a wide range of colors, from classic red, blue, and yellow to pastel shades and neon hues. You can choose a single color or mix and match different colors to create a unique look. It's also important to consider the type of rubber bands you use. Latex-free rubber bands are a good option for people with sensitive skin, while glow-in-the-dark rubber bands can add an extra touch of fun to your project. Finally, make sure to choose high-quality rubber bands that are durable and long-lasting. Look for rubber bands that are made from 100% rubber and have a smooth, consistent texture. By choosing the right rubber bands, you can create beautiful and durable Rainbow Loom bracelets that will last for a long time.
Setting Up Your Workspace
Setting up your workspace is a crucial step in getting started with Rainbow Loom. To create a comfortable and efficient workspace, start by clearing a flat surface, such as a table or countertop, of any clutter or distractions. Cover the surface with a protective cloth or mat to prevent damage from stray bands or other materials. Next, gather all the necessary tools and supplies, including your Rainbow Loom, bands, and any other accessories you plan to use. Organize these supplies in a logical and accessible manner, such as in a container or on a tray. Consider investing in a band organizer or storage case to keep your bands tidy and within reach. Good lighting is also essential, so position your workspace near a natural light source or use a desk lamp to illuminate your work area. Finally, make sure your workspace is at a comfortable height and distance from your body, allowing you to work without straining your back or eyes. By setting up your workspace in this way, you'll be able to focus on creating your Rainbow Loom masterpieces without any distractions or discomfort.
Basic Techniques for Making Rainbow Loom Bracelets
Here is the introduction paragraph: Making rainbow loom bracelets is a fun and creative activity that can be enjoyed by people of all ages. With a few simple techniques, you can create a wide variety of colorful and stylish bracelets. To get started, it's essential to learn the basic stitches and patterns that form the foundation of rainbow loom bracelet making. In this article, we'll explore three fundamental techniques: learning the forward and backward stitches, mastering the crisscross pattern, and creating a simple single-strand bracelet. By mastering these techniques, you'll be able to create a wide range of beautiful and unique bracelets. Let's start by learning the forward and backward stitches, which are the building blocks of most rainbow loom bracelet designs.
Learning the Forward and Backward Stitches
The forward and backward stitches are the foundation of creating beautiful and intricate designs on your Rainbow Loom bracelet. To start, you'll need to learn the forward stitch, which involves picking up a band and placing it on the loom, then moving it to the next peg. To do this, hold the loom in your non-dominant hand and use your dominant hand to pick up a band. Place the band on the first peg, making sure it's snug and even. Next, use your dominant hand to move the band to the next peg, keeping it taut. Repeat this process, moving the band from peg to peg, until you've completed the desired length. The backward stitch is similar, but instead of moving the band forward, you'll move it backward, picking up the band on the last peg and moving it to the previous one. This stitch is used to create a seamless join and to add texture to your design. To master the forward and backward stitches, practice makes perfect. Start with a simple project, such as a single-colored bracelet, and gradually move on to more complex designs. As you become more confident, you can experiment with different colors and patterns, creating unique and eye-catching Rainbow Loom bracelets.
Mastering the Crisscross Pattern
Mastering the Crisscross Pattern is a fundamental skill for creating stunning Rainbow Loom bracelets. This pattern involves crossing one band over another, forming an "X" shape, to create a textured and visually appealing design. To start, begin by placing two bands on the loom, side by side, with the ends facing away from you. Take the right band and cross it over the left band, forming an "X" shape. Then, take the left band and cross it over the right band, creating another "X" shape. Continue this process, moving the bands in a zigzag pattern, to create the crisscross design. As you work, make sure to keep the tension even and the bands snug against each other to prevent gaps or loose threads. With practice, you'll be able to master the crisscross pattern and create beautiful, intricate designs that add a touch of elegance to any Rainbow Loom bracelet. By combining the crisscross pattern with other techniques, such as the fishtail or chevron patterns, you can create truly unique and eye-catching designs that showcase your creativity and skill. Whether you're a beginner or an experienced Rainbow Loom enthusiast, mastering the crisscross pattern is an essential skill that will take your bracelet-making to the next level.
Creating a Simple Single-Strand Bracelet
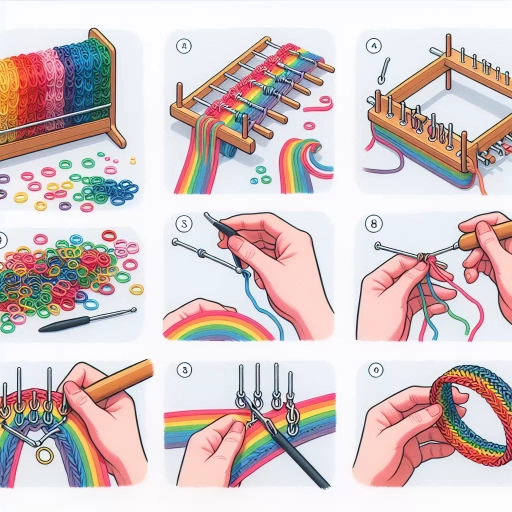
Creating a simple single-strand bracelet is a great way to start your Rainbow Loom journey. To begin, you'll need a few basic supplies, including a Rainbow Loom, a hook, and some rubber bands. Start by placing a single rubber band on the loom, making sure it's centered and not twisted. Then, take the hook and grab the rubber band, pulling it over the first peg on the loom. Next, take another rubber band and place it on the loom, making sure it's also centered and not twisted. Use the hook to grab the second rubber band and pull it over the second peg on the loom. Continue this process, adding one rubber band at a time and pulling it over the next peg on the loom. As you add more rubber bands, you'll start to see your bracelet take shape. To finish the bracelet, simply tie a knot at the end of the last rubber band and trim the excess. You can also add a clasp or charm to the end of the bracelet to give it a more finished look. With a little practice, you'll be able to create a simple single-strand bracelet in no time, and you can use this technique as a building block to create more complex and intricate designs.
Advanced Techniques and Designs
Advanced Techniques and Designs As you become more confident in your jewelry-making skills, you may want to explore more advanced techniques and designs to take your creations to the next level. One way to do this is by adding beads and charms to your bracelets, which can add a touch of personality and whimsy to your designs. You can also experiment with creating multi-strand and woven designs, which can add depth and visual interest to your pieces. Additionally, trying out different patterns and textures can help you create unique and eye-catching designs. By incorporating these advanced techniques into your jewelry-making practice, you can create truly one-of-a-kind pieces that showcase your creativity and skill. For example, let's start with adding beads and charms to your bracelets, which can be a great way to add a personal touch to your designs.
Adding Beads and Charms to Your Bracelets
Adding beads and charms to your Rainbow Loom bracelets can elevate them from simple, colorful accessories to unique, eye-catching pieces of jewelry. To add beads, start by threading the bead onto the loom's hook, then use the hook to pick up the desired number of loops and slide the bead into place. For charms, you can use a jump ring to attach them to the bracelet, or thread the charm directly onto the loom's hook and incorporate it into the design. When using beads and charms, it's essential to consider the size and weight of the additions, as they can affect the overall tension and stability of the bracelet. To avoid overwhelming the design, start with a few strategically placed beads or charms and adjust as needed. You can also experiment with different bead and charm combinations to create unique textures, patterns, and themes. For example, pairing small, delicate beads with larger, statement charms can add visual interest and depth to the design. By incorporating beads and charms into your Rainbow Loom creations, you can add an extra layer of personality and style to your bracelets, making them truly one-of-a-kind accessories.
Creating Multi-Strand and Woven Designs
Creating multi-strand and woven designs is an advanced technique that can elevate your Rainbow Loom creations to the next level. To start, you'll need to create multiple strands of the same or different colors, depending on the design you want to achieve. You can use the same method as creating a single strand, but with multiple colors or patterns. Once you have your strands, you can begin to weave them together using a variety of techniques, such as the "crisscross" or "twist" method. This involves crossing one strand over another, then twisting them together to create a secure and intricate design. You can also experiment with different weaving patterns, such as the "herringbone" or "chevron" pattern, to add texture and visual interest to your design. As you weave, you can also incorporate beads or other embellishments to add an extra layer of detail and personality to your design. With practice and patience, you can create complex and beautiful multi-strand and woven designs that showcase your creativity and skill.
Experimenting with Different Patterns and Textures
Experimenting with different patterns and textures is an exciting way to take your rainbow loom bracelets to the next level. By combining various techniques, such as the fishtail, chevron, and herringbone patterns, you can create unique and eye-catching designs. Adding different textures, like beads, charms, or even fabric, can add an extra layer of visual interest to your bracelets. For example, you can incorporate seed beads or gemstone beads to add a touch of elegance, or use metallic threads to give your bracelet a futuristic look. You can also experiment with different loom patterns, such as the zig-zag or the spiral, to create a more dynamic and playful design. Additionally, you can try combining different colors and textures to create a marbled or ombre effect, which can add a beautiful, multi-dimensional look to your bracelet. By pushing the boundaries of traditional rainbow loom designs, you can create truly one-of-a-kind pieces that reflect your personal style and creativity. Whether you're a seasoned crafter or just starting out, experimenting with different patterns and textures is a great way to challenge yourself and take your rainbow loom skills to new heights.