How To Regrout Shower Tiles
 The process of regrouting shower tiles involves more than just applying a fresh layer of grout. It’s a meticulous task demanding a sound understanding of the basics, a step-by-step guide to follow, and necessary measures to ensure the durability of the newly regrouted tiles. This article is structured to provide you a comprehensive approach to such a task. First, we'll build a strong foundation by unveiling the basics of regrouting shower tiles, including what grout is and why it requires routine maintenance. Following this, a methodical step-by-step guide will lead you through the practical aspects of the regouting process, ensuring you're prepared to tackle the task confidently. Finally, we will delve into how you can prolong the lifespan of your freshly laid grout, keeping those shower tiles gleaming for years to come. Let's embark on this journey with the first step, that is - understanding the fundamentals of regrouting shower tiles.
Understanding the Basics of Regrouting Shower Tiles
Regouting shower tiles may not be a task you undertake regularly, but understanding the basics can help you maintain the value and aesthetics of your bathroom. In order to fully appreciate this process, it's crucial to delve deeper into the world of grouting, its role for shower tiles, and the factors that distinguish it from caulk — the other component often mentioned in bathroom maintenance discussions. Furthermore, it's essential to recognize signs that your shower tiles need regrouting, which can be less apparent than you might think. By arming yourself with this knowledge, you can ensure longevity for your bathroom tiles and save significant time, effort and even money in the long run. This comprehensive guide will lay out the aforementioned points in subsequent paragraphs starting with: grouting and its importance for shower tiles. Buckle up, as we venture into the underappreciated yet indispensable realm of shower tile maintenance.
Grouting and its Importance for Shower Tiles
Grouting is a crucial process in installing and maintaining shower tiles. It is the act of filling the spaces between tiles with a fine, dense mortar or paste, effectively creating a waterproof barrier, preventing moisture and water from seeping beneath the tiles. This typifies the relevance of grouting, particularly in shower areas where constant exposure to water might result in mold accumulation or dampness that could degrade the quality of your wall or floor structure quickly. The well-executed grouting process contributes directly to the longevity of shower tiles, ensuring each tile is firmly held in place, minimizing the risks of movement and damage over time. The grouting material is compact and durable, offering a stress distributor role that reduces pressure on important points that could trigger tile cracking and enhance the aesthetics by providing a clean and uniform look to the entire tiled area. Furthermore, grouting carries an aesthetic significance. It provides a finished look to your shower area by offering a smooth transition between tiles and creating an effective visual linkage that binds the design together. The choice of grout color can dramatically influence your shower's aesthetic appeal, either by providing contrast or blending seamlessly with the tile color. Moreover, grouting also aids in tile cleaning and maintenance. A well-grouted tile surface prevents dirt, soap scum, and other grime from accumulating in the crevices, making the cleaning process easier and more efficient. This importance of grouting is particularly pertinent in shower areas, where hygiene and ease of maintenance are paramount. In the context of regrouting, understanding the importance of grouting becomes even more significant. Over time, grout can discolour, crack or degrade, affecting the functionality and aesthetic of your shower. Regrouting process involves replacing the old grout with new ones, revitalizing your shower space, and extending the lifespan of your tiles. Thus, grouting serves not only as a functional necessity but also adds aesthetic refinement, ensuring that your shower tiles remain durable and visually appealing over time. It's an unskippable part of tile installation and maintenance, which emphasizes the durability and lasting appeal of your shower area.
Difference Between Grout and Caulk
The difference between grout and caulk is instrumental when comprehending the basics of regrouting shower tiles. Grout is a dense fluid that is used to fill gaps or used as reinforcement in existing structures and is typically a mixture of water, cement, and sand. It is mainly utilized to fill the spaces between tiles and to secure them in place. Grout's porous nature, contributes to its vulnerability to stain absorption, which can eventually lead to deterioration and the need for replacement or regrouting. On the other hand, caulk, which is also a sealant, presents a chemical composition that offers flexibility and moisture resistance, predominantly made from latex or silicone. Unlike grout, caulk has a less porous nature, making it an optimal choice for areas that are frequently exposed to water such as shower corners, bathtubs, and sinks. It holds the capability to bear the expansion and contraction without cracking that walls often encounter due to the change in temperature and humidity within a bathroom. Although both materials serve their distinctive purposes, they shouldn't be used interchangeably. Using grout instead of caulk could lead to cracks from normal structural movements, and using caulk as an alternative to grout may mean dealing with mildew or quick decay due to the retained moisture. Awareness of their unique characteristics and proper application are key in ensuring the longevity and cleanliness of your bathroom, eventually making the regrouting process more efficient and effective.
Recognizing When Your Shower Tiles Need Regrouting
Recognizing when your shower tiles need regrouting is a vital component of the broader topic of understanding the basics of regrouting. Tiles, especially in damp environments like the bathroom, undergo numerous challenges ranging from exposure to hard water, constant moisture, and cleaning chemicals, potentially leading to deterioration of the grout over time. One of the most apparent signs that you may need to regrout your shower tiles is the presence of noticeable cracks or gaps in the grout. These can be small, tiny holes, or they might appear as large, gaping cracks between the tiles. When you see these, it's a surefire indication that water might seep in, possibly causing expensive water damage. Another compelling sign to watch out for is persistent mold or mildew that won't go away even after rigorous cleaning. This could indicate that water has seeped underneath the tiles through compromised grout, producing a fertile breeding ground for these organisms. Stained or discolored grout is also a common sign that your grout is outdated and requires regrouting. Through cleaning solutions or hard water exposure, grout might lose its original color, looking unsightly and suggesting potential underlying issues. Falling tiles are also a grave indication of much-needed regrouting. When the grout no longer has the strength to hold the tiles in place, they may start to loosen and, ultimately, fall off. This is a dire signal that immediate regrouting is necessary. Lastly, the age of the grout can also be a less visible, yet significant, determinant. Grout does not last forever and frequent exposure to harsh conditions could drastically diminish its lifespan. In conclusion, the key to ensuring a healthy, damage-free bathroom lies in our adeptness at recognizing these signs promptly, thus understanding when our shower tiles require regrouting. In the long run, responding to these alerts will undoubtedly save us lots of time, energy, and expenses.
Step-by-Step Guide to Regrouting Shower Tiles
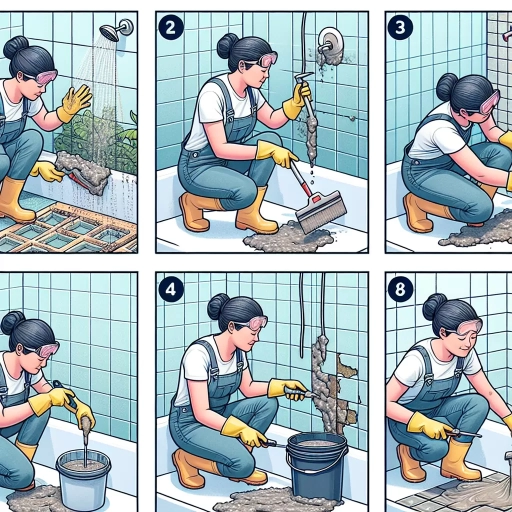
In the journey of home improvements, there comes the essential task of regrouting shower tiles. Contrary to popular belief, this task is not rocket science, and with a well-devised plan, can be successfully executed with relative ease. This comprehensive guide will take you through a detailed, step by step process to help you regrout your shower tiles like a pro. The article is divided into three core phases, each crucial for the process. Initially, you will be guided to gather the necessary tools and materials, followed by elaborative instructions on removing old grout from shower tiles. Finally, the key steps on applying new grout are intricately described. Each of these stages contributes significantly to the overall results, ensuring your regrouting project is nothing less than perfect. As we transition into the nuts and bolts of the project, let's kick off with the first phase, 'Gathering the Necessary Tools and Materials', a fundamental stage setting the groundwork for the subsequent steps.
Gathering the Necessary Tools and Materials
Gathering the necessary tools and materials is an integral part of the process when it comes to regrouting shower tiles. Well-equipped preparation is crucial in achieving a task of this nature, it not only facilitates a smoother process but also ensures a high-quality finish. From a novice DIY enthusiast to a professional handyman, it’s a requisite to have the right instruments and supplies at your disposal. Let's start with the tools that will be required for this project. A grout saw, grout float, and a sponge are few of the essential items to keep handy. A grout saw is necessary for removing the old grout from between the tiles, while a grout float helps in efficiently applying the new grout in its place. And a simple sponge aids in cleaning any excess grout left on the tiles, ensuring a neat finish. Then comes the material, which primarily revolves around grout. When choosing grout, keep in mind that it needs to be waterproof and resistant to mold and mildew. Therefore, it's ideal to go for a high-quality, epoxy-based grout that is designed for showers. Mixing the grout to the right consistency requires clean water and a mixing bucket. Purchase grout in a color that matches your tiles to maintain aesthetics. It’s a good idea to purchase a little extra in case of mistakes or if you decide to extend the project to other areas of the bathroom. Additionally, you may need a utility knife or a grout remover as well, to carefully remove any silicone caulk around the edge of the shower. Safety goggles and protective gloves are also wise to have on hand both for protection from debris and harmful substances. In conclusion, gathering all the necessary tools and materials prior to starting your project is imperative. It not only assists in completing the project efficiently but also ensures that the finished work is high-quality, providing you with a refreshed and revitalized shower space. Investing time in preparation, therefore, would reward you with long-lasting, visually appealing, and functional results.
Removing Old Grout from Shower Tiles
Removing old grout from shower tiles is an essential process in regrouting your bathroom tiles, and requires attention to detail and precision. Gone are the days when overlooking this key step was thought to be harmless; today, experts realize that eliminating prevailing traces of grout presents the new layer with an optimal environment to bind, creating a stronger and more durable surface. Now, before we delve into the intricacies involved, it is essential to understand what grout is. Grout is essentially the material that binds your tiles together, sealing spaces to prevent leakage while also adding to the aesthetic appeal of the shower. Over time, grout tends to absorb moisture and can grow mouldy or discoloured, which has a significant effect on the overall appearance and hygiene of your shower. The removal of the old grout is initiated with the use of a grout saw or a grout removal tool. The tool must be angled correctly to avoid damaging tile edges, as excessive force can lead to unwanted chipping. This approach is much more controlled than using a utility knife, but like all skill-based tasks, it requires patience. Roll the tool along the grout lines and apply pressure for best results. For hard-to-reach corners, a smaller hand tool known as a grout rake could be more effective. A noteworthy point here is the importance of safety equipment during the process. It is advised to wear protective gloves and eyewear to prevent the fine dust from the grout from causing harm. In addition, once the grout has been removed, consider vacuuming or wiping down the area to make sure no grout dust remains. Not only will this make the regrouting process easier, but it also keeps the bathroom clean and dust-free. Moreover, while DIY options for grout removal are increasingly popular, this job does require accuracy and patience. For those who are unversed with the process, getting a professional to perform the task may be beneficial to avoid damaging tiles. However, with the right tools and understanding, it is certainly a task that can be accomplished by any enthusiastic homeowner. Finally, removing the grout is the most laborious part of the regrouting process, but doing it thoroughly pays off in the long run. And while the process can be time-consuming, remember that a fresh layer of grout can transform a bathroom, making it look as good as new. So, don't rush through it. Instead, approach it methodically, understanding that your efforts will add not just to the aesthetics of your bathroom, but also to its longevity and hygiene standards. In conclusion, the right methods and the necessary patience make the process of removing the old grout from shower tiles a rewarding exercise, leading to a refreshed and visually appealing bathroom.
Applying New Grout on Shower Tiles
Applying new grout on shower tiles may seem like a daunting task, but with proper guidance and steps, it can be an exciting DIY project that transforms your bathroom's aesthetics. It's not just about visual appeal though, regrouting your shower tiles also has practical implications - this process helps maintain the integrity of your shower walls by preventing moisture seepage and thus the onset of mold or mildew. Regrouting begins with choosing the right grout. It can be un-sanded or sanded; where the former is ideal for gaps less than 0.1inches and the latter for larger gaps. When it comes to color, consider the tile color, your personal taste, and cleanliness – light grout shows dirt more than dark grout but can make a room seem brighter. You could also consider stain-resistant and waterproof grout to further enhance longevity. As for the application process, you start by protecting the edges of tiles and shower fixtures with painter’s tape to ensure neatness. The grout is then mixed with water or a special grout additive until it attains the consistency of a thick peanut butter. The key to grout application is a rubber grout float. You press the grout into the joints using the float at a 45 degrees angle, which pushes the grout into the tile cracks to fill them completely. After this, it is vital to remove as much excess grout as possible from the tile surface before it hardens. Always be patient with the drying process - rushing this can result in a weak bond. After it has dried, a haze will likely form on the tiles. A simple wipe down with a soft, damp cloth or sponge will suffice in removing this. The task involves some sweat and grit, but the result is immensely satisfying and worth every effort. An aesthetically pleasing and waterproof shower is, after all, crucial for a comfortable and hassle-free bath experience. Therefore, regrouting your shower tiles is more than just a mere cosmetic upgrade, it's an essential maintenance measure that promises long benefits. This step-by-step guide will provide easy understanding, allowing even novices to transform their bathroom into a beautiful and functional oasis. Trust the process and see how this task enriches not just your shower’s life but also your DIY skills. This 500-word guide on "Applying New Grout on Shower Tiles" has adeptly shed light on the varying valves, simplifying the complex process whilst ensuring that you have all the information at your fingertips for a successful DIY project. A well-grouted shower gives your bathroom a fresh look and feel, giving you a sense of accomplishment and invigorating bathing experience every time you step in. Reward yourself and refurbish your bathroom with this handy skill.
Ensuring the Durability of Your Newly Regrouted Shower Tiles
Ensuring the durability of your newly regrouted shower tiles requires a blend of choosing quality materials, adopted effective maintenance habits, and recognizing common regrouting mistakes to be avoided. If these factors are cooperatively executed, the lifespan of your bathroom tiles can be significantly extended. Your journey to achieving this durability starts with selecting the right grout for your shower tiles, which forms the core factor in terms of the grout’s resistance to mildew, discoloration, and its overall longevity. The second supporting aspect revolves around maintenance tips and ways to look after your regrouted shower tiles, meaning, how regular cleaning routines and proper usage can effectively preserve the grout. Lastly, we'll take you through the pitfalls and errors often made during the regrouting process that can inhibit the durability of your shower tiles. By understanding and incorporating these three aspects into your shower tile care, you will be setting the stage for a drastically improved lifespan for your tiles. Now, let's dive deeper into choosing the right grout for your shower tiles, as this first step is crucial in paving way for tile durability.
Choosing the Right Grout for Your Shower Tiles
Choosing the right bathroom grout is crucial in ensuring the durability of your newly regrouted shower tiles. Remember, regrouting is not just about improving the aesthetics of your bathroom; it's also about boosting its longevity and protecting it from water damage. So, how does one choose the right grout? First, understand that grouts are available in two types based on composition: cement-based grout and epoxy grout. Cement-based grouts, which further include sanded and unsanded variants, are popular, thanks to their affordability and ease of application. However, it is essential to note that cement-based grout is porous and thus susceptible to moisture and staining. This characteristic can make it a less durable choice for shower tiles that are constantly exposed to moisture. On the other hand, epoxy grout – which contains resin and hardener – is impervious to water and exceptionally resistant to staining. This makes it an outstanding choice for shower tiles. Although epoxy grout is more expensive than cement-based grout and a little trickier to install, its durability and water resistance often outweigh these considerations. Color stability is another key factor to consider when choosing grout for your shower tiles. You'd want a grout that maintains its color over time without fading or discoloring. Lighter grout colors are known to show stains more easily, while darker ones might fade and lose their vibrancy over time. If you want a grout that maintains its color, consider those with built-in colorants and sealants. These are often pigment-rich, enabling them to retain their color even in the harshest conditions. Lastly, take into account the size of your tile joints. For joints wider than 1/8”, sanded grout is recommended due to its hardiness, while unsanded grout, which is smoother and sticky, is suitable for joints narrower than 1/8”. However, with epoxy grout, the same product can be used for all sizes of joints, making it a versatile choice. In summary, the right grout for your shower tiles depends on various factors, including the type of grout, color stability, and joint size. By considering these aspects, you can ensure the durability of your freshly regrouted shower tiles and enhance your bathroom's overall appeal.
Tips on Maintaining Your Regrouted Shower Tiles
Consistent maintenance is one of the critical aspects when it comes to extending the lifespan of your regrouted shower tiles and ensuring their durability. After investing time, effort, and resources to regrout your shower tiles, you certainly want to make the most out of it. Here are some practical tips to help you maintain the newly repaired bathroom feature. Firstly, be sure to seal your fresh grout after it has dried to safeguard it against water damage, staining, and mold growth which can deteriorate its structure over time. Sealing should be done within 48-72 hours after regrouting, and repeated every 6-12 months in high-use showers. Use a quality grout sealer designed to penetrate beneath the surface, providing optimal protection. Secondly, regular cleaning is vital. Monitor your tiles once or twice a week for any discoloration, spots, or mildew formations. Use mild, non-abrasive cleaners to avoid scratching or damaging the grout lines. Avoid bleach-based products as they can erode grout over time, and rinse residues thoroughly after cleaning. Another key maintenance practice is to ensure adequate ventilation in your bathroom. Moisture is often the arch enemy of grout, contributing to mold and mildew problems that can quickly ruin the appearance of your shower tiles and deteriorate the grout. Open windows or utilize ventilation fans after showers to quickly dry out the bathroom. One under-emphasized, but vital tip, is addressing minor grout damages or cracks as soon as they appear. Overlooking tiny grout issues can lead to larger problems, including extensive tile damage and costly repairs. Doing repairs promptly will uphold the integrity of your shower tiles and maintain their durability. Lastly, reduce the frequency of steam showers or very hot showers. High temperatures can strain your grout and lead to quicker degradation. Instead, strive for warm, less steamy showers. By adhering to these maintenance tips, you can keep your regrouted shower tiles in near-perfect shape for a lengthy period, reflecting the effort and resources initially invested in the regrouting process. Remember, the key is consistency in maintenance, keen observation for potential damages, and prompt interventions when necessary.
Avoiding Common Mistakes in Regrouting Shower Tiles
Ensuring the durability of your newly regrouted shower tiles is paramount to maintaining the aesthetic appeal and functionality of your bathroom. One of the key ways to achieve this is by avoiding common mistakes during the regrouting process. First, many homeowners neglect the aspect of tile cleaning before regrouting. Any form of dirt or soap scum can compromise the adhesion of the new grout, hence curtailing its longevity. As such, deep cleaning your tiles ahead of regrouting could be a deciding factor in the durability of your application. Secondly, it's crucial not to underestimate the importance of completely removing the old grout. Leaving traces of the old grout may prevent the new grout from adhering properly. Although the process can be tedious and time-consuming, it's essential to use the right tools, like a grout saw or an oscillating tool, to remove every bit of the old grout. Incorrect grout mixing is another common mistake. The consistency of the grout matters greatly; if it’s too thin, it might run down the tile and take forever to cure, while if it’s too thick, it might not easily get into the crevices between the tiles. The right texture is often compared to that of peanut butter, as it's easy to spread and manipulate into the grout lines. Lastly, patience is key during the drying process. Many people make the mistake of using the shower soon after regrouting. It's advisable to wait for at least 72 hours to allow complete drying and curing. During this period, the grout becomes hard and waterproof, thus enhancing its durability. By paying close attention to these common pitfalls, you can ensure a more successful and lasting regrouting job. Remember, consistency and patience are the hallmarks of a well-done DIY home improvement project like regrouting shower tiles.