How To Draw A Skull Easy
Drawing a skull can be a fun and creative activity, but it can also be intimidating, especially for beginners. However, with the right guidance and techniques, anyone can learn to draw a skull with ease. To get started, it's essential to understand the basics of drawing a skull, including its overall shape, proportions, and key features. Once you have a solid grasp of these fundamentals, you can begin sketching the skull's basic shape, using simple shapes and lines to bring your drawing to life. As you progress, you can add details and refine your skull drawing, adding texture, shading, and other elements to create a realistic and striking image. In this article, we'll take you through each of these steps, starting with the basics of drawing a skull. (Note: I made some minor adjustments to the paragraph to make it flow better and be more engaging)
Understanding the Basics of Drawing a Skull
Drawing a skull can be a fascinating and rewarding experience, especially for those interested in art and anatomy. To create a realistic and detailed skull drawing, it's essential to understand the basics of drawing a skull. This involves familiarizing yourself with the skull's structure, choosing the right drawing tools, and setting up your drawing space. By mastering these fundamental aspects, you'll be able to create a skull drawing that is both accurate and visually appealing. In this article, we'll delve into the basics of drawing a skull, starting with the importance of familiarizing yourself with the skull's structure. By understanding the different parts of the skull, including the cranium, facial bones, and jaw, you'll be able to create a more realistic and detailed drawing. Let's begin by exploring the skull's structure and how it can help you create a more accurate and impressive skull drawing.
Familiarizing with the Skull's Structure
Familiarizing yourself with the skull's structure is a crucial step in drawing a realistic skull. The skull is composed of 22 bones that fuse together to form the cranium and facial bones. The cranium is the upper part of the skull, which houses the brain, while the facial bones form the lower part of the skull, including the jaw, nose, and eye sockets. The skull's structure can be divided into several key areas, including the frontal bone, parietal bones, occipital bone, temporal bones, and sphenoid bone. The frontal bone forms the forehead and upper part of the eye sockets, while the parietal bones form the sides and top of the cranium. The occipital bone forms the back and base of the skull, and the temporal bones form the sides of the skull, just behind the ear. The sphenoid bone is a butterfly-shaped bone that forms the base of the skull and the floor of the cranium. Understanding the relationships between these bones and how they fit together is essential for drawing a realistic skull. By studying the skull's structure, you can gain a deeper understanding of its overall shape and proportions, which will help you to draw a more accurate and detailed skull. Additionally, familiarizing yourself with the skull's structure will also help you to identify the different features of the skull, such as the eye sockets, nose, and jaw, and how they relate to each other. This knowledge will enable you to draw a skull that is not only anatomically correct but also visually appealing.
Choosing the Right Drawing Tools
Choosing the right drawing tools is essential for creating a realistic and detailed skull drawing. The type of tools you use can greatly impact the overall quality of your artwork. For a skull drawing, you'll want to use a range of tools that allow for precision, detail, and texture. A set of graphite pencils (HB, 2B, 4B, 6B) is a must-have for creating a range of values and shading. A sharpener is also necessary to keep your pencils sharp and ready to use. In addition to pencils, a set of fine-tip pens (0.1mm, 0.3mm, 0.5mm) can be used to add fine details and lines to your drawing. A blending stump or tortillon can be used to smooth out transitions and create subtle gradations of tone. A kneaded eraser is also a useful tool for correcting mistakes and creating highlights. For added texture and detail, you can also use a range of drawing tools such as charcoal, pastels, or even digital drawing software. Ultimately, the right tools will depend on your personal preference and the style of drawing you're aiming to achieve. By investing in a range of high-quality drawing tools, you'll be able to create a detailed and realistic skull drawing that showcases your artistic skills.
Setting Up Your Drawing Space
Setting up your drawing space is a crucial step in creating an ideal environment for drawing a skull. To start, choose a quiet and comfortable spot with good lighting, preferably natural light. Ensure the surface you're working on is flat, smooth, and large enough to accommodate your paper and drawing tools. Invest in a comfortable and ergonomic chair, as you'll likely be sitting for an extended period. Consider using a drawing board or a lap desk to keep your paper at a comfortable drawing height. Keep your drawing tools, such as pencils, erasers, and sharpeners, organized and within easy reach. A pencil case or a small container can help keep your workspace clutter-free. Additionally, having a reference image of a skull nearby can be helpful in ensuring accuracy and detail in your drawing. Finally, minimize distractions by turning off your phone or finding a quiet spot away from foot traffic, allowing you to focus on your drawing. By setting up your drawing space thoughtfully, you'll be able to concentrate on the task at hand and produce a high-quality drawing of a skull.
Sketching the Skull's Basic Shape
Sketching the skull's basic shape is a fundamental skill for artists, anatomists, and anyone interested in understanding the human body. To accurately draw the skull, it's essential to break down its complex structure into manageable parts. This article will guide you through the process of sketching the skull's basic shape, covering the overall shape and proportions, adding the eye sockets and nasal cavity, and sketching the jawline and dental structure. By mastering these fundamental elements, you'll be able to create a realistic and detailed representation of the skull. Let's start by exploring the overall shape and proportions of the skull, which will provide the foundation for the rest of our drawing.
Drawing the Overall Shape and Proportions
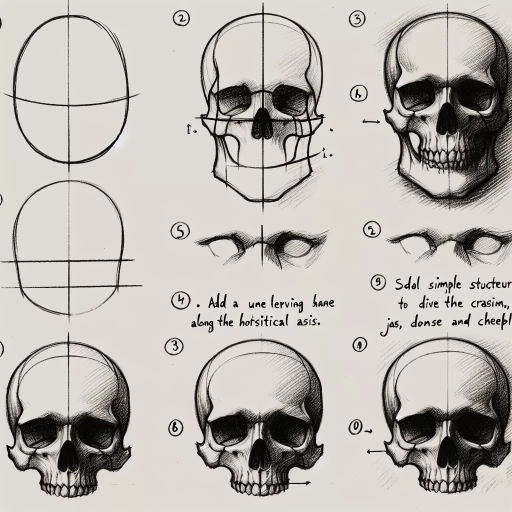
When drawing the overall shape and proportions of a skull, it's essential to start with the basics. Begin by sketching a rough outline of the skull, using simple shapes to help you get the proportions right. Start with a large oval for the cranium, making sure it's tall rather than wide. The oval should be slightly tilted, with the top end leaning towards the back of the skull. Next, add a smaller oval for the facial area, connected to the cranium by a gentle curve. The facial oval should be positioned about one-third of the way down from the top of the cranium. Pay attention to the proportions of the skull, ensuring that the cranium is about 1.5 times the size of the facial area. Use a pencil to lightly sketch these shapes, as you'll be refining them later. As you draw, keep in mind that the skull is not a perfect oval, but rather a complex shape with many subtle curves and contours. By starting with simple shapes, you'll be able to capture the overall proportions and structure of the skull, making it easier to add details later on.
Adding the Eye Sockets and Nasal Cavity
When adding the eye sockets and nasal cavity, it's essential to maintain the skull's overall proportions and symmetry. Start by drawing two almond-shaped eye sockets, making sure they are evenly spaced and about one-third of the way down from the top of the skull. The eye sockets should be slightly tilted, with the outer corners pointing downwards. Next, draw the nasal cavity, which is a triangular-shaped opening located between the eye sockets. The nasal cavity should be centered and about one-quarter of the way down from the top of the skull. The edges of the nasal cavity should be smooth and curved, with the bottom edge being slightly more rounded. To add depth and dimension to the eye sockets and nasal cavity, use gentle, curved lines to suggest the contours of the skull's interior. Be careful not to make the lines too dark or heavy, as this can make the skull appear too dense or heavy. Instead, aim for a delicate, subtle approach that captures the skull's intricate details. By carefully rendering the eye sockets and nasal cavity, you can create a more realistic and detailed skull that showcases your artistic skills.
Sketching the Jawline and Dental Structure
When sketching the jawline and dental structure, it's essential to consider the overall shape and proportions of the skull. The jawline, also known as the mandible, is a curved bone that forms the lower jaw. To draw the jawline, start by sketching a gentle curve that follows the contours of the skull's lower edge. The curve should be more pronounced at the front of the skull, where the jawbone meets the skull's facial structure. As you move towards the back of the skull, the curve should gradually become less pronounced, eventually meeting the skull's base. The jawline should be slightly angled, with the front of the jawbone pointing downwards and the back of the jawbone pointing upwards. When drawing the dental structure, focus on the overall shape and arrangement of the teeth. The teeth should be evenly spaced and slightly angled, with the front teeth pointing slightly outwards and the back teeth pointing slightly inwards. The canine teeth should be slightly longer and more pointed than the other teeth, while the molars should be larger and more rounded. To add depth and dimension to your sketch, pay attention to the way the teeth overlap and fit together. The front teeth should overlap the back teeth slightly, creating a sense of layering and depth. By carefully sketching the jawline and dental structure, you can create a detailed and realistic representation of the skull's lower jaw.
Adding Details and Refining Your Skull Drawing
Adding details and refining your skull drawing can elevate it from a simple sketch to a stunning work of art. To achieve this, it's essential to focus on several key areas, including the teeth and gums, texture and shading, and the eye sockets and nasal cavity. By carefully rendering these features, you can create a skull drawing that is both visually striking and anatomically accurate. In this article, we'll explore how to add these details and refine your skull drawing, starting with the often-overlooked but crucial aspect of drawing the teeth and gums. By mastering this fundamental element, you'll be able to create a solid foundation for the rest of your drawing, and set yourself up for success in adding texture, shading, and other details that will bring your skull to life. With attention to detail and practice, you can create a skull drawing that is both beautiful and haunting. Let's begin by examining the intricacies of drawing the teeth and gums.
Drawing the Teeth and Gums
Drawing the teeth and gums is a crucial step in creating a realistic skull drawing. To start, draw the upper and lower jaws, making sure to capture their unique shapes and proportions. The upper jaw is typically wider and more curved, while the lower jaw is narrower and more angular. Next, draw the teeth, starting with the incisors and working your way back to the molars. Use a gentle, curved line to suggest the shape of each tooth, and pay attention to the spacing and alignment of the teeth. The incisors should be slightly overlapping, while the molars should be more spaced out. To add depth and dimension to your teeth, use a range of values and shading techniques. Start by blocking in the basic shape of each tooth with a light pencil mark, then gradually build up layers of shading to create a sense of texture and volume. Pay particular attention to the edges of the teeth, where the light catches and creates a subtle highlight. Moving on to the gums, use a soft, gentle line to suggest the shape of the gum tissue. The gums should be slightly curved and follow the contours of the teeth, with a subtle dip between each tooth. To add texture and detail to the gums, use a range of short, curved lines to suggest the tiny blood vessels and fibers that make up the gum tissue. Finally, use a light touch to suggest the subtle curves and contours of the gum line, where it meets the teeth. By paying close attention to the shape, texture, and detail of the teeth and gums, you can create a realistic and engaging skull drawing that captures the intricate beauty of the human skull.
Adding Texture and Shading to the Skull
Adding texture and shading to your skull drawing can elevate it from a basic outline to a more realistic and captivating piece of art. To start, use a range of pencils or shading tools to create depth and dimension on the skull's surface. Begin by adding gentle, curved lines to suggest the shape and contours of the bone, paying attention to the areas where the skull's surface is more rounded or angular. Next, focus on adding texture to the skull, using short, hatching lines to create a rough, bumpy surface. You can also use a range of shading techniques, such as hatching, cross-hatching, and stippling, to create areas of light and shadow that add depth and volume to the skull. For example, you can use darker shading to create deep shadows in the eye sockets and nasal cavity, while lighter shading can be used to create highlights on the skull's surface. Additionally, consider adding subtle texture and shading to the teeth and jawbone to create a more realistic and detailed appearance. By carefully balancing texture and shading, you can create a skull drawing that is both visually striking and anatomically accurate.
Refining the Eye Sockets and Nasal Cavity
Refining the eye sockets and nasal cavity is a crucial step in adding depth and realism to your skull drawing. Start by defining the shape of the eye sockets, making sure they are symmetrical and in proportion to the rest of the skull. Use gentle, curved lines to suggest the contours of the sockets, and pay attention to the subtle curvature of the bone around the edges. Next, focus on the nasal cavity, using a combination of curved and straight lines to define its shape and contours. Make sure to capture the subtle nuances of the nasal bone, including the slight curvature of the bridge and the rounded edges of the nostrils. To add further depth and dimension, use hatching and cross-hatching techniques to suggest the texture and shading of the bone. Pay particular attention to the areas around the eye sockets and nasal cavity, where the bone is thinner and more delicate. By carefully refining these areas, you can create a more detailed and realistic skull drawing that captures the intricate beauty of the human skull.