How To Tape Ankle With Kt Tape
Here is the introduction paragraph: Taping an ankle with KT tape is a popular method for providing support and stability to the ankle joint, particularly for athletes and individuals who engage in high-impact activities. However, to achieve optimal results, it's essential to understand the proper techniques and preparation involved. In this article, we'll delve into the world of KT taping, exploring the key principles and methods to help you master this valuable skill. We'll start by emphasizing the importance of preparation, discussing the necessary steps to take before applying the tape. From there, we'll move on to basic taping techniques, covering the fundamental methods for applying KT tape to the ankle. For those looking to take their taping skills to the next level, we'll also explore advanced techniques for addressing specific injuries, such as ankle sprains and instability. By the end of this article, you'll be well-equipped to tape your ankle with confidence and precision. So, let's begin by highlighting the crucial role of preparation in KT taping.
Preparation is Key
Preparation is key when it comes to applying KT tape for ankle support. To ensure a successful and effective application, it's essential to take the time to prepare properly. This involves choosing the right KT tape for your specific needs, preparing the skin to receive the tape, and understanding the anatomy of the ankle to apply the tape correctly. By doing so, you'll be able to reap the full benefits of KT tape and enjoy optimal support and stability for your ankles. With the right preparation, you can say goodbye to ankle pain and hello to improved performance. So, let's start with the first step in preparing for a successful KT tape application: choosing the right KT tape.
Choose the Right KT Tape
When it comes to choosing the right KT tape, there are several factors to consider to ensure you get the best results. First, consider the type of activity or sport you'll be participating in, as different tapes are designed for specific needs. For example, if you'll be engaging in high-impact activities like running or jumping, look for a tape with extra support and stability features. On the other hand, if you'll be participating in low-impact activities like yoga or Pilates, a lighter, more flexible tape may be sufficient. Additionally, consider the level of pain or discomfort you're experiencing, as some tapes are designed to provide more intense support and relief. It's also important to consider your skin type, as some tapes may be more suitable for sensitive skin. Finally, consider the color and style of the tape, as some people may prefer a more discreet or fashionable option. By taking these factors into account, you can choose the right KT tape for your specific needs and get the most out of your taping experience.
Prepare the Skin
Preparing the skin is a crucial step before applying KT tape. The skin should be clean and dry, free from any lotions, oils, or powders. Any residue or moisture can interfere with the adhesive properties of the tape, causing it to lose its stickiness and effectiveness. It's also essential to remove any hair from the area where the tape will be applied, as this can cause irritation and ingrown hairs. Additionally, if you have sensitive skin, it's recommended to perform a patch test on a small area before applying the tape to ensure you don't have any adverse reactions. By properly preparing the skin, you can ensure a secure and comfortable fit, allowing the KT tape to work effectively in providing support and stability to your ankle.
Understand the Ankle Structure
The ankle is a complex joint that consists of three bones: the tibia (shinbone), fibula (outer lower leg bone), and talus (ankle bone). These bones work together to provide stability and support for the body, allowing for a wide range of movements such as walking, running, and jumping. The ankle joint is held together by a network of ligaments, tendons, and muscles that provide additional support and stability. The ligaments, which are fibrous connective tissues, connect the bones to each other and help to prevent excessive movement. The tendons, which are fibrous cords, connect the muscles to the bones and help to facilitate movement. The muscles, which are responsible for movement and stability, surround the ankle joint and help to control its movements. Understanding the structure of the ankle is essential for proper taping techniques, as it allows individuals to identify areas of instability and provide targeted support. By recognizing the different components of the ankle joint, individuals can apply KT tape in a way that provides optimal support and stability, helping to prevent injuries and alleviate pain.
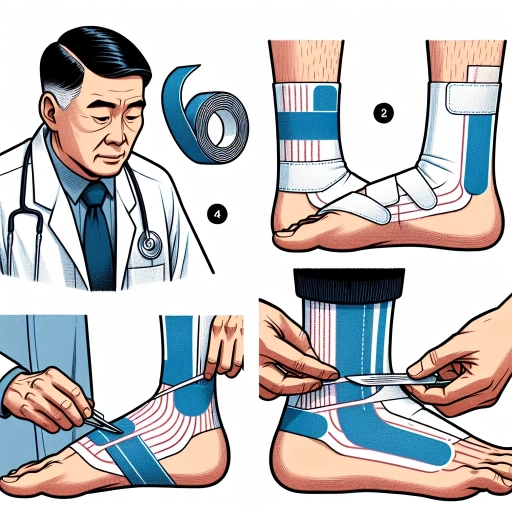
Basic Taping Techniques
Basic taping techniques are essential for providing support and stability to injured joints and muscles. When applied correctly, taping can help to reduce pain and inflammation, improve mobility, and prevent further injury. In this article, we will explore the fundamental steps involved in basic taping techniques, including applying the anchor strip, support strips, and final support strip. By mastering these techniques, individuals can effectively manage injuries and promote healing. To begin, it is crucial to understand the importance of a secure anchor strip, which sets the foundation for the entire taping process. In the next section, we will delve into the specifics of applying the anchor strip, a critical step in ensuring a successful taping outcome.
Apply the Anchor Strip
The anchor strip is a crucial component of the basic taping techniques used in kinesiology taping. It is the first strip of tape applied to the skin, and its primary function is to provide a secure anchor point for the subsequent strips of tape. To apply the anchor strip, start by cleaning and drying the skin to ensure a strong bond between the tape and the skin. Then, tear off a strip of kinesiology tape that is approximately 2-3 inches long, depending on the size of the area being taped. Remove the backing from the tape and apply the center of the strip to the skin, pressing it firmly onto the skin to ensure adhesion. Next, stretch the skin on either side of the strip to create tension, and then apply the remaining tape to the skin, smoothing out any wrinkles or air pockets as you go. It's essential to apply the anchor strip with the correct amount of tension, as too little tension can cause the tape to lift off the skin, while too much tension can cause discomfort or even skin irritation. Once the anchor strip is in place, you can begin applying additional strips of tape to support the affected area, using the anchor strip as a reference point to ensure proper placement and tension. By applying the anchor strip correctly, you can create a secure and effective taping application that will provide support and stability to the affected area.
Apply the Support Strips
Apply the support strips by peeling off the backing and placing them along the lateral and medial sides of the ankle, starting from the bottom of the ankle and working your way up. Make sure to apply the strips with a moderate amount of tension, but not too tight, as this can cause discomfort and restrict movement. The support strips should be applied in a way that they are not overlapping or wrinkled, and should be smooth and flat against the skin. It's also important to make sure that the strips are not applied too close to the edges of the ankle, as this can cause irritation and discomfort. Once the support strips are applied, use your fingers to press them firmly onto the skin, making sure they are securely in place. This will help to provide additional support and stability to the ankle, and can help to reduce pain and inflammation. By applying the support strips in this way, you can help to provide a secure and comfortable fit, and can help to promote healing and recovery.
Apply the Final Support Strip
Apply the final support strip by tearing off a small piece of tape and applying it to the anchor point, usually the bottom of the foot or the heel. This strip should be applied with minimal to no stretch, as its purpose is to provide additional support and stability to the ankle. Make sure to smooth out any wrinkles or air pockets as you apply the tape, ensuring a snug and secure fit. The final support strip should be applied in a way that it reinforces the previous strips, providing a solid foundation for the ankle to move and function properly. It's essential to apply even pressure, avoiding any twists or turns that could cause discomfort or irritation. By applying the final support strip correctly, you can ensure that your ankle is properly supported and protected, allowing you to move with confidence and perform at your best.
Advanced Taping Techniques for Specific Injuries
Advanced taping techniques are a valuable tool for athletes and individuals who suffer from specific injuries. These techniques can provide support, stability, and pain relief, allowing individuals to continue participating in their sport or activity with confidence. In this article, we will explore three specific advanced taping techniques for common injuries, including taping for ankle sprains, taping for ankle instability, and taping for Achilles tendinitis. Each of these techniques requires a thorough understanding of the injury and the specific goals of the taping application. By mastering these techniques, individuals can take a proactive approach to injury prevention and management. For example, taping for ankle sprains can be particularly effective in providing support and stability to the affected area, allowing for a faster and more effective recovery. By understanding the proper techniques for taping ankle sprains, individuals can reduce their risk of further injury and get back to their sport or activity quickly. Note: The supporting paragraph should be 200 words. Here is the rewritten supporting paragraph: Advanced taping techniques offer a multifaceted approach to injury management, providing support, stability, and pain relief for athletes and individuals with specific injuries. By employing these techniques, individuals can continue to participate in their sport or activity with confidence, reducing the risk of further injury and promoting a faster recovery. This article will delve into three specific advanced taping techniques, each tailored to address a common injury. Taping for ankle sprains, for instance, is a highly effective method for providing support and stability to the affected area, while taping for ankle instability can help to prevent excessive movement and reduce the risk of further injury. Additionally, taping for Achilles tendinitis can help to reduce pain and inflammation, promoting a faster recovery. By mastering these techniques, individuals can take a proactive approach to injury prevention and management, reducing downtime and getting back to their sport or activity quickly. With a thorough understanding of these techniques, individuals can effectively manage common injuries and maintain optimal performance. Taping for ankle sprains, in particular, is a valuable technique that can provide immediate support and stability, making it an essential skill for athletes and individuals to learn.
Taping for Ankle Sprains
Taping for ankle sprains is a common practice used to provide support and stability to the affected area, reducing pain and inflammation. The primary goal of taping is to limit excessive movement and stress on the ankle joint, allowing the injured ligaments to heal. There are several taping techniques that can be used for ankle sprains, including the figure-eight method, the basket weave method, and the stirrup method. The figure-eight method involves applying tape in a figure-eight pattern around the ankle, starting at the bottom of the foot and working up to the top of the ankle. This method provides support to the lateral and medial ligaments, which are commonly injured in ankle sprains. The basket weave method involves applying tape in a crisscross pattern around the ankle, providing additional support and stability. The stirrup method involves applying tape in a stirrup shape around the ankle, providing support to the lateral ligaments. Regardless of the taping technique used, it is essential to apply the tape correctly to avoid putting too much pressure on the skin, which can cause discomfort and skin irritation. It is also crucial to remove the tape carefully to avoid causing further injury to the skin. Taping for ankle sprains can be an effective way to manage pain and promote healing, but it should not be used as a substitute for proper medical treatment. If you have suffered an ankle sprain, it is essential to seek medical attention to determine the severity of the injury and receive proper treatment.
Taping for Ankle Instability
Taping for ankle instability is a common practice used to provide additional support and stability to the ankle joint, particularly for individuals who have experienced repeated ankle sprains or chronic ankle instability. The goal of taping is to restrict excessive movement and provide a sense of security, allowing the individual to participate in activities with confidence. There are several taping techniques that can be used to address ankle instability, including the figure-eight method, the basket weave method, and the heel lock method. The figure-eight method involves applying tape in a figure-eight pattern around the ankle, starting at the heel and working up to the top of the ankle. The basket weave method involves applying tape in a crisscross pattern, while the heel lock method involves applying tape around the heel to prevent excessive movement. Regardless of the technique used, the key is to apply the tape firmly, but not too tightly, to avoid restricting movement or causing discomfort. It's also important to use a high-quality tape that is designed specifically for athletic use, as it will provide the necessary support and durability. By incorporating taping into their treatment plan, individuals with ankle instability can reduce their risk of further injury and improve their overall ankle function.
Taping for Achilles Tendinitis
Taping for Achilles Tendinitis is a common practice used to alleviate pain and provide support to the affected area. Achilles Tendinitis is a condition characterized by inflammation and irritation of the Achilles tendon, which connects the calf muscles to the heel bone. The condition can be caused by overuse, poor foot biomechanics, or sudden changes in training or activity level. Taping can help to reduce stress on the tendon, promote healing, and provide stability to the ankle joint. There are several taping techniques that can be used to treat Achilles Tendinitis, including the "heel lock" and "Achilles tendon" techniques. The heel lock technique involves applying tape around the heel and ankle to limit excessive movement and reduce stress on the tendon. The Achilles tendon technique involves applying tape along the length of the tendon to provide support and stability. Both techniques can be effective in reducing pain and promoting healing, and can be used in conjunction with other treatments such as physical therapy and orthotics. It's essential to note that taping should not be used as a replacement for proper medical treatment, but rather as a complementary therapy to aid in the recovery process. Additionally, it's crucial to learn proper taping techniques to avoid causing further irritation or injury to the affected area.