How To Cook Perogies In Oven
Here is the introduction paragraph: Cooking perogies in the oven is a simple and delicious way to enjoy this traditional dish. To achieve the perfect oven-baked perogies, it's essential to follow a few key steps. Preparation is crucial, as it sets the stage for a successful cooking process. By understanding the importance of preparation, cooking perogies to perfection, and adding the finishing touches, you'll be able to create a mouth-watering dish that's sure to please. In this article, we'll explore these three essential steps in detail, starting with the foundation of it all: preparation is key.
Preparation is Key
Preparation is key when it comes to cooking perogies. To achieve the perfect dish, it's essential to start with the right foundation. This involves selecting the right type of perogies, thawing them properly, and preheating the oven to the correct temperature. By doing so, you'll be able to bring out the natural flavors and textures of the perogies, resulting in a delicious and satisfying meal. In this article, we'll explore the importance of preparation in cooking perogies, starting with the crucial step of choosing the right type of perogies.
Choose the Right Type of Perogies
When it comes to cooking perogies in the oven, choosing the right type is crucial for achieving the best results. There are several types of perogies available, each with its own unique characteristics, ingredients, and cooking requirements. Potato and cheese perogies are a classic choice and work well with a variety of toppings, while fruit perogies are perfect for a sweet treat. Meat-filled perogies, on the other hand, are ideal for those looking for a heartier option. It's also important to consider the size of the perogies, as larger ones may require a longer cooking time. Additionally, some perogies may be specifically labeled as "oven-ready" or "boil-then-bake," so be sure to check the packaging for any special instructions. By selecting the right type of perogies for your oven-cooked dish, you'll be able to achieve a delicious and satisfying meal with minimal effort.
Thaw Frozen Perogies
Thawing frozen perogies is a crucial step before cooking them in the oven. To thaw frozen perogies, you can follow a few simple methods. First, you can thaw them overnight in the refrigerator. Simply place the desired number of perogies in a single layer on a plate or tray, cover them with plastic wrap or aluminum foil, and refrigerate them for 8-10 hours. This method is ideal if you plan to cook them the next day. Alternatively, you can thaw frozen perogies quickly by submerging them in cold water. Place the perogies in a large bowl or container, cover them with cold water, and let them sit for about 30 minutes. Change the water halfway through to ensure they thaw evenly. Once thawed, drain the perogies and pat them dry with paper towels to remove excess moisture. You can also thaw frozen perogies at room temperature, but this method is not recommended as it can lead to bacterial growth and foodborne illness. It's essential to thaw frozen perogies safely and handle them properly to prevent contamination. After thawing, you can proceed to cook your perogies in the oven according to your desired recipe. Remember to always follow safe food handling practices when thawing and cooking frozen perogies.
Preheat the Oven
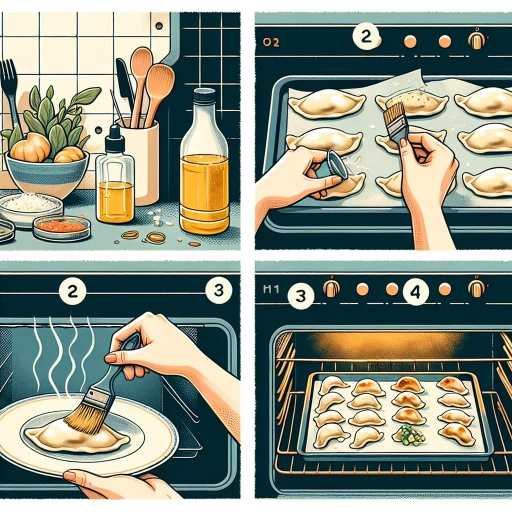
Here is the paragraphy: Preheating the oven is a crucial step in cooking perogies to perfection. To preheat the oven, start by setting the temperature to 400°F (200°C). While the oven is heating up, you can prepare the perogies by placing them on a baking sheet lined with parchment paper. Make sure to leave some space between each perogy to allow for even cooking. Once the oven is preheated, you can place the baking sheet with the perogies inside and set the timer according to your desired level of crispiness. It's essential to preheat the oven to the right temperature to ensure that the perogies cook evenly and thoroughly. If the oven is not preheated correctly, the perogies may not cook properly, leading to a disappointing texture and flavor. By preheating the oven, you can achieve a crispy exterior and a tender interior, making your perogies a delicious and satisfying meal.
Cooking Perogies to Perfection
Cooking perogies to perfection requires attention to detail and a few simple techniques. To achieve a deliciously crispy exterior and a fluffy interior, it's essential to start with the right preparation. This involves lining the baking sheet with parchment paper, drizzling with oil and adding seasonings, and baking at the right temperature. By following these steps, you'll be able to bring out the best flavors and textures in your perogies. In this article, we'll dive deeper into each of these techniques, starting with the importance of lining the baking sheet with parchment paper.
Line the Baking Sheet with Parchment Paper
When it comes to cooking perogies in the oven, one of the most crucial steps is to line the baking sheet with parchment paper. This simple yet effective technique can make all the difference in achieving perfectly cooked perogies. By lining the baking sheet with parchment paper, you create a non-stick surface that prevents the perogies from sticking and forming unwanted attachments. This, in turn, allows for easy removal and serving, making the cooking process much more efficient. Moreover, parchment paper helps to distribute heat evenly, ensuring that the perogies cook consistently and thoroughly. This is especially important when cooking perogies in large batches, as it prevents hotspots and undercooked areas. Additionally, parchment paper makes cleanup a breeze, as any spills or messes can be easily contained and discarded. To line the baking sheet with parchment paper, simply cut a sheet to the desired size, place it on the baking sheet, and arrange the perogies on top. With this simple step, you'll be well on your way to cooking perogies to perfection in the oven.
Drizzle with Oil and Add Seasonings
Here is the paragraphy: Drizzle with oil and add seasonings is a crucial step in cooking perogies to perfection. Once the perogies are done boiling, it's essential to drizzle them with a high-quality oil to prevent them from sticking together. Olive oil, avocado oil, or grapeseed oil are excellent options. Not only do they add flavor, but they also help to create a tender and delicate texture. After drizzling with oil, it's time to add some seasonings. Salt and pepper are a must, but you can also get creative with other herbs and spices. Garlic powder, onion powder, and dried dill weed are popular choices that complement the natural flavor of perogies. If you're feeling adventurous, you can also try adding some grated cheese, chopped fresh herbs, or a sprinkle of paprika. The key is to taste as you go and adjust the seasonings to your liking. By drizzling with oil and adding seasonings, you'll elevate your perogies from a simple side dish to a flavorful and satisfying meal.
Bake at the Right Temperature
Baking perogies at the right temperature is crucial to achieve the perfect texture and flavor. The ideal temperature for baking perogies is between 375°F to 400°F (190°C to 200°C). This temperature range allows the perogies to cook evenly and prevents them from becoming too crispy or too soft. If you're looking for a crispy exterior and a tender interior, bake the perogies at 400°F (200°C) for 15-20 minutes. On the other hand, if you prefer a softer texture, bake them at 375°F (190°C) for 20-25 minutes. It's also important to note that the baking time may vary depending on the size and thickness of the perogies, as well as the type of filling used. To ensure that your perogies are cooked to perfection, it's best to check on them halfway through the baking time and adjust the temperature or baking time as needed. By baking your perogies at the right temperature, you'll be able to achieve a delicious and satisfying dish that's sure to please even the pickiest of eaters.
Adding the Finishing Touches
Adding the finishing touches to your dish can elevate it from ordinary to extraordinary. When it comes to adding the final flourishes, there are several options to consider. For a rich and creamy element, consider topping with cheese, sour cream, or bacon bits. Alternatively, adding fresh herbs can provide a bright and refreshing contrast to the dish. Finally, serving the dish hot and straight from the oven can help to preserve the flavors and textures. By incorporating one or more of these techniques, you can take your dish to the next level. One of the simplest and most effective ways to add a finishing touch is to top with cheese, sour cream, or bacon bits.
Top with Cheese, Sour Cream, or Bacon Bits
When it comes to adding the finishing touches to your oven-baked perogies, the toppings are endless, but some classic combinations stand out from the rest. For a comforting and indulgent treat, top your perogies with a generous helping of melted cheese, such as cheddar, mozzarella, or a blend of your favorite varieties. The creamy texture and rich flavor of the cheese perfectly complement the soft, pillowy perogies, creating a match made in heaven. Alternatively, a dollop of sour cream adds a tangy and refreshing contrast to the warm, savory perogies. The coolness of the sour cream helps to balance out the richness of the dish, making it a great option for those looking for a lighter take. For a smoky and savory twist, sprinkle some crispy bacon bits on top of your perogies. The smoky flavor of the bacon pairs beautifully with the earthy taste of the potatoes, creating a delightful harmony of flavors. Whether you choose to top your perogies with cheese, sour cream, or bacon bits, one thing is certain - the result will be a delicious and satisfying dish that is sure to please even the pickiest of eaters.
Add Fresh Herbs for Extra Flavor
Adding fresh herbs to your oven-baked pierogies can elevate their flavor to a whole new level. Chopped fresh herbs like parsley, dill, chives, or thyme can be sprinkled on top of the pierogies before baking, allowing their fragrant oils to infuse into the dough and filling. You can also mix minced herbs into the sour cream or butter topping for an extra burst of flavor. For a more subtle flavor, you can add a few sprigs of rosemary or thyme to the baking sheet with the pierogies, allowing their aroma to waft up and infuse into the dish. Fresh herbs can also be used to make a flavorful herb butter to brush onto the pierogies during the last few minutes of baking. Simply mix softened butter with chopped herbs and a pinch of salt, and brush it onto the pierogies for a rich and aromatic flavor. By adding fresh herbs to your oven-baked pierogies, you can add a bright, fresh flavor that complements the richness of the cheese and potatoes, making for a truly delicious and satisfying dish.
Serve Hot and Enjoy
The final step in cooking perogies in the oven is to serve them hot and enjoy. This is the moment you've been waiting for - the culmination of your efforts in preparing a delicious meal. To serve, carefully remove the perogies from the oven and place them on a serving platter or individual plates. You can add your favorite toppings, such as melted butter, sour cream, cheese, bacon bits, or chives, to give them an extra burst of flavor. If you're feeling adventurous, you can also try adding some caramelized onions, sautéed mushrooms, or diced ham to give your perogies a gourmet twist. Whatever toppings you choose, make sure to serve the perogies hot, straight from the oven, to ensure they retain their crispy exterior and fluffy interior. As you take your first bite, the combination of flavors and textures will surely delight your taste buds, and you'll be glad you took the time to cook your perogies in the oven. So go ahead, serve hot, and enjoy the fruits of your labor!