How To Draw Curls
Drawing curls can be a challenging task, but with the right techniques and understanding, it can also be a fun and creative process. Whether you're an artist looking to improve your skills or a beginner looking to learn the basics, drawing curls can add a new level of depth and dimension to your artwork. To get started, it's essential to understand the basics of drawing curls, including the different types of curls and how to capture their texture and movement. From there, you can move on to more advanced techniques for drawing realistic curls, such as using different line weights and shading to create a sense of volume and depth. Finally, adding depth and dimension to your curls can take your artwork to the next level, making it look more realistic and engaging. In this article, we'll start by exploring the basics of drawing curls, including the different types of curls and how to capture their texture and movement.
Understanding the Basics of Drawing Curls
Drawing curls can be a challenging yet rewarding task, especially for those who are new to the world of art. To create realistic and beautiful curls, it's essential to understand the basics of drawing them. This involves recognizing the different types of curls, mastering the basic shapes and lines, and understanding the importance of texture and volume. By grasping these fundamental concepts, artists can bring their drawings to life and add depth and dimension to their work. In this article, we'll delve into the world of drawing curls, starting with the first crucial step: recognizing the different types of curls. By understanding the various curl patterns and characteristics, artists can lay the foundation for creating stunning and realistic curls that capture the essence of their subject. So, let's begin by exploring the different types of curls and how to identify them.
Recognizing the Different Types of Curls
Recognizing the different types of curls is essential to accurately drawing them. There are several main types of curls, each with its own unique characteristics. The first type is the "S" curl, which is a smooth, flowing curl that resembles the letter "S". This type of curl is often seen in loose, wavy hair. The second type is the "C" curl, which is a tighter, more defined curl that resembles the letter "C". This type of curl is often seen in tighter, more spiral curls. The third type is the "O" curl, which is a loose, open curl that resembles the letter "O". This type of curl is often seen in very loose, relaxed hair. In addition to these main types, there are also sub-types of curls, such as tight spirals, loose waves, and everything in between. Understanding the different types of curls and their characteristics is key to drawing realistic and varied curls. By recognizing the unique shape and texture of each type of curl, artists can create more accurate and detailed drawings of curly hair. Furthermore, understanding the different types of curls can also help artists to create more realistic and varied hairstyles, as different types of curls can be combined and styled in different ways to create a wide range of looks.
Mastering the Basic Shapes and Lines
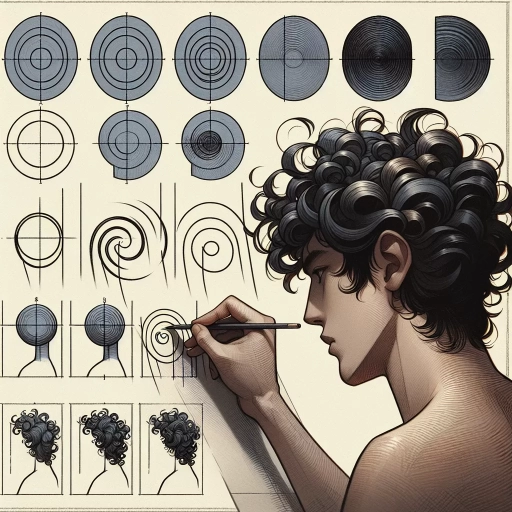
Mastering the basic shapes and lines is a fundamental step in drawing curls. To begin, it's essential to understand that curls are composed of a series of interconnected spirals, which can be broken down into simple shapes such as circles, ovals, and S-curves. By mastering these basic shapes, you can create a wide range of curls, from tight and bouncy to loose and flowing. Start by practicing drawing individual shapes, paying attention to their proportions and relationships to one another. For example, a tight curl might be composed of a series of small, connected circles, while a loose curl might be made up of larger, more flowing ovals. As you become more comfortable with drawing individual shapes, practice combining them to create more complex curl patterns. Pay attention to the way the shapes intersect and overlap, and experiment with different line weights and textures to add depth and dimension to your curls. By mastering the basic shapes and lines, you'll be able to create a wide range of curls that are full of life and movement.
Understanding the Importance of Texture and Volume
Understanding the importance of texture and volume is crucial when it comes to drawing realistic curls. Texture refers to the surface quality or "feel" of the curls, while volume refers to their three-dimensional shape and size. To accurately capture the texture of curls, artists should pay attention to the way light interacts with the hair, creating highlights and shadows that give the impression of softness, smoothness, or coarseness. For example, tight curls tend to have a more uniform texture, while loose curls may have a more varied texture with visible strands and flyaways. Volume, on the other hand, is essential for creating a sense of depth and dimensionality in the drawing. Artists can achieve this by using a range of values (light and dark) to suggest the roundness and fullness of the curls. By combining texture and volume, artists can create a convincing and engaging representation of curls that invites the viewer to touch and explore. To draw realistic curls, artists should also consider the way the hair moves and flows, using gentle, curved lines to suggest the softness and flexibility of the curls. By mastering the interplay between texture, volume, and movement, artists can create stunning and lifelike drawings of curls that capture their beauty and essence.
Techniques for Drawing Realistic Curls
Capturing the beauty of realistic curls in a drawing requires a combination of technique, patience, and attention to detail. To achieve this, artists can employ various methods to convey the texture, movement, and flow of curly hair. Three key techniques for drawing realistic curls include using soft, gentle lines for loose curls, employing tight, spiraling lines for tight curls, and creating movement and flow with curved lines. By mastering these techniques, artists can add depth and dimension to their portraits, making the subject's hair look more lifelike and engaging. When drawing loose curls, it's essential to start with soft, gentle lines that mimic the relaxed, flowing texture of the hair. By using soft, gentle lines, artists can create a sense of movement and flow, drawing the viewer's eye through the curls.
Using Soft, Gentle Lines for Loose Curls
Using soft, gentle lines is a great way to create loose curls in your drawings. To achieve this, start by using a soft pencil or a fine-tip pen to create the outline of the curl. Instead of drawing a tight, defined shape, focus on creating a loose, flowing curve that suggests the shape of the curl. Use gentle, sweeping motions to guide your pencil or pen, allowing the line to flow freely without too much pressure. As you draw, pay attention to the direction of the curl, using the line to indicate the way the hair is moving. For loose curls, you can also use a series of soft, connected lines to create a sense of movement and flow. This will help to give the impression of soft, bouncy curls that are full of life and energy. By using soft, gentle lines, you can create loose curls that look natural and effortless, adding a touch of elegance and sophistication to your drawings.
Employing Tight, Spiraling Lines for Tight Curls
Employing tight, spiraling lines is a fundamental technique for drawing realistic curls. To achieve this, start by creating a series of connected, curved lines that spiral outward from a central point. The key is to maintain a consistent tension and curvature throughout the line, allowing the curl to take shape. As you draw, focus on varying the line width and pressure to convey texture and depth. Thicker lines can be used to suggest the curl's outer edges, while thinner lines can be used to indicate the inner layers. To add volume and dimension, experiment with layering multiple spiraling lines, allowing each layer to build upon the last. By carefully controlling the direction and curvature of your lines, you can create a range of curl patterns, from tight, uniform spirals to looser, more relaxed waves. With practice, this technique can be adapted to capture the unique characteristics of different hair types and textures, allowing you to draw realistic curls that are both visually striking and authentic.
Creating Movement and Flow with Curved Lines
Creating movement and flow with curved lines is a crucial technique for drawing realistic curls. To achieve this, start by using gentle, flowing curves to suggest the overall shape and direction of the curls. Vary the size and shape of the curves to create a sense of movement and energy. For tighter curls, use smaller, more compact curves, while looser curls can be suggested with longer, more sweeping curves. To add depth and dimension, use a range of line weights and textures, from soft, delicate lines for the outer edges of the curls to thicker, more expressive lines for the inner curves. By combining these techniques, you can create a sense of movement and flow that brings your curls to life. Additionally, pay attention to the way the curls interact with each other, using curved lines to suggest the way they twist and turn around each other. This will help to create a sense of volume and texture, and add to the overall sense of movement and flow. By mastering the use of curved lines, you can create curls that are not only realistic, but also full of energy and life.
Adding Depth and Dimension to Your Curls
Adding depth and dimension to your curls can elevate your hairstyle from ordinary to extraordinary. One of the most effective ways to achieve this is by using shading and highlighting techniques to create the illusion of volume and texture. By strategically applying darker and lighter shades to specific areas of your curls, you can create a multi-dimensional look that adds visual interest and depth. Additionally, adding volume and texture with layering can also enhance the overall appearance of your curls, making them look more vibrant and dynamic. Furthermore, enhancing curls with subtle, soft edges can add a touch of sophistication and elegance to your hairstyle. By incorporating these techniques into your curl care routine, you can take your curls to the next level and achieve a look that is truly stunning. To start, let's explore how using shading and highlighting can create dimension in your curls.
Using Shading and Highlighting to Create Dimension
Using shading and highlighting is a crucial step in creating dimension in your curls. To achieve this, you'll need to understand the way light interacts with the curls. Light typically hits the top of the curls, creating highlights, while the underside remains in shadow. To create a realistic and three-dimensional effect, use a range of shading techniques, such as hatching and cross-hatching, to build up layers of tone and texture. Start by applying gentle, soft strokes to suggest the overall shape and direction of the curls, then gradually increase the pressure and density of the strokes to create deeper shadows and more defined highlights. Pay attention to the edges of the curls, where the light catches and creates a subtle gradient of tone. By carefully balancing shading and highlighting, you can create a sense of volume and depth in your curls, drawing the viewer's eye into the intricate, swirling patterns. To add an extra layer of dimension, experiment with different shading tools, such as pencils, charcoal, or pastels, each of which can produce unique textures and effects. By mastering the art of shading and highlighting, you can bring your curls to life, imbuing them with a sense of energy, movement, and vitality.
Adding Volume and Texture with Layering
Adding volume and texture to your curls can be achieved through the technique of layering. This involves creating multiple layers of curls, with each layer building upon the previous one to create a more dimensional and voluminous look. To start, take a small section of hair and curl it away from your face using a curling iron or wand. Hold the curl in place for a few seconds to set it, then release it and move on to the next section of hair. As you work your way through your hair, gently rake your fingers through the curls to loosen them and create a more relaxed, effortless look. To add even more volume and texture, try layering your curls in a staggered pattern, with some curls starting higher up on your head and others starting lower down. This will create a more dynamic, piecey look that adds depth and visual interest to your curls. You can also experiment with different curl patterns and textures, such as tight spirals and loose waves, to add even more variety and dimension to your look. By layering your curls in a way that creates movement and flow, you can add volume, texture, and a sense of energy to your hair that's perfect for making a statement.
Enhancing Curls with Subtle, Soft Edges
Enhancing curls with subtle, soft edges can add a new level of sophistication and elegance to your artwork. To achieve this, focus on creating gentle, flowing lines that blend seamlessly into the surrounding hair. Start by using a soft pencil or a fine-tip pen to sketch the outline of the curls, paying attention to the natural movement and texture of the hair. As you add more detail, use short, gentle strokes to suggest the softness and volume of the curls, rather than trying to draw every individual strand. To create a sense of depth and dimension, use subtle variations in line weight and texture to suggest the layers and contours of the hair. For example, you can use thicker lines to indicate the underside of the curls, and softer lines to suggest the outer layers. By enhancing your curls with subtle, soft edges, you can add a level of nuance and realism to your artwork that will draw the viewer's eye and create a lasting impression.