How To Hang Canvas On Wall
Hanging a canvas on a wall can be a daunting task, especially for those who are new to home decor or DIY projects. However, with the right guidance, it can be a straightforward and rewarding experience. To achieve a professional-looking result, it's essential to follow a few key steps. First, you'll need to choose the right tools and materials for the job, including a sturdy frame, a reliable hanging system, and a level to ensure everything is straight. Next, you'll need to prepare the canvas for hanging, which may involve attaching a wire or D-rings to the back of the frame. Finally, you'll need to mount the canvas on the wall, taking care to position it perfectly and secure it firmly. In this article, we'll take a closer look at each of these steps, starting with the crucial first step: choosing the right tools and materials.
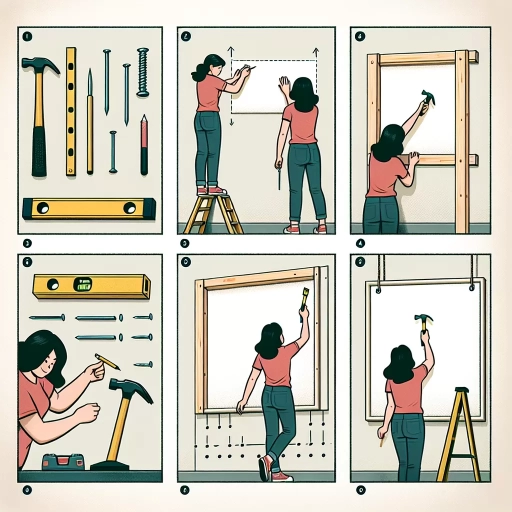
Choosing the Right Tools and Materials
When it comes to hanging a large piece of art or a heavy mirror, having the right tools and materials is crucial to ensure a safe and successful installation. To achieve this, it's essential to start by measuring the canvas and the wall to determine the best placement and to avoid any costly mistakes. Additionally, selecting the appropriate hanging hardware is vital to support the weight of the artwork or mirror, and to prevent it from falling or becoming damaged. Furthermore, preparing the necessary safety equipment, such as a ladder and gloves, is also important to protect yourself from potential hazards. By taking the time to carefully plan and prepare, you can ensure a professional-looking installation that will enhance the beauty of your artwork or mirror. With the right tools and materials, you'll be able to hang your piece with confidence, starting with measuring the canvas and the wall.
Measuring the Canvas and the Wall
When measuring the canvas and the wall, it's essential to take precise measurements to ensure a perfect fit. Start by measuring the width and length of the canvas, taking note of any irregularities or unique features, such as a rounded corner or an uneven edge. Next, measure the width of the wall where you plan to hang the canvas, making sure to account for any obstacles, such as electrical outlets or windows. Use a level to ensure the wall is straight and a pencil to mark the spot where you want to hang the canvas. Measure the distance between the mark and the edge of the wall, as well as the distance between the mark and any surrounding features, such as a doorframe or a piece of furniture. Take note of the type of wall you're working with, whether it's drywall, plaster, or concrete, as this will affect the type of hanging hardware you'll need. Finally, double-check your measurements to ensure accuracy, and consider enlisting a second pair of hands to help with the hanging process. By taking the time to carefully measure the canvas and the wall, you'll be able to achieve a professional-looking installation that showcases your artwork to its fullest potential.
Selecting the Appropriate Hanging Hardware
When it comes to hanging a canvas on a wall, selecting the appropriate hanging hardware is crucial to ensure a secure and level installation. The type of hardware needed depends on the weight and size of the canvas, as well as the type of wall it will be hung on. For smaller canvases, a simple picture hook or nail may suffice, while larger or heavier pieces may require more substantial hardware such as a screw eye or a D-ring. It's also important to consider the type of wall anchor needed, as drywall, plaster, or concrete walls require different types of anchors to prevent damage or collapse. Additionally, the hanging hardware should be rated for the weight of the canvas to prevent it from falling or becoming dislodged over time. Some common types of hanging hardware include French cleats, which consist of two parts that attach to the wall and the canvas, and security hangers, which are designed to prevent the canvas from being removed or tampered with. By selecting the right hanging hardware, you can ensure a safe and secure installation that will showcase your canvas for years to come.
Preparing the Necessary Safety Equipment
When it comes to hanging a canvas on a wall, safety should always be the top priority. To ensure a secure and damage-free installation, it's essential to prepare the necessary safety equipment. Start by gathering a sturdy ladder or step stool that can support your weight, as well as a spotter to hold the ladder in place. Make sure the ladder is placed on a firm, level surface and consider using ladder levelers or anti-slip mats for added stability. Additionally, wear a pair of gloves to protect your hands from sharp edges and splinters, and consider wearing safety glasses to shield your eyes from debris. A dust mask can also be useful when working with power tools or handling materials that may release particles into the air. Furthermore, keep a first aid kit nearby in case of any accidents or injuries. By taking the time to prepare the necessary safety equipment, you can minimize the risk of injury and ensure a successful canvas installation.
Preparing the Canvas for Hanging
Preparing a canvas for hanging is a crucial step in showcasing your artwork. To ensure a secure and professional display, it's essential to take the time to properly prepare your canvas. This involves several key steps, including attaching D-rings or hanging wire, adding a hanging bracket or French cleat, and securing the canvas to a stretcher frame. By following these steps, you can ensure that your canvas is safely and securely hung, allowing you to enjoy your artwork for years to come. In this article, we'll explore each of these steps in detail, starting with the first and most critical step: attaching D-rings or hanging wire.
Attaching D-Rings or Hanging Wire
Attaching D-Rings or Hanging Wire is a crucial step in preparing your canvas for hanging. To attach D-Rings, start by measuring the width of your canvas and marking the spot where you want to place the rings, usually about 1-2 inches from the top edge. Use a pencil to mark the spot, then use a drill or screwdriver to make a small hole for the screw. Insert the screw into the hole and attach the D-Ring, making sure it's securely fastened. For a hanging wire, cut a piece of wire to the desired length, leaving some extra for wrapping around the D-Ring. Thread the wire through the D-Ring and wrap the ends around the ring to secure it. Make sure the wire is taut and evenly spaced to prevent the canvas from tilting. Alternatively, you can use a wire hanger with a built-in D-Ring, which eliminates the need for separate D-Rings. When attaching the wire or D-Rings, make sure they're centered and evenly spaced to ensure the canvas hangs straight and level. It's also essential to use the right type of wire or D-Rings for the weight and size of your canvas to prevent it from falling or becoming damaged. By following these steps, you'll be able to securely attach your D-Rings or hanging wire, ensuring your canvas is ready for hanging.
Adding a Hanging Bracket or French Cleat
Adding a hanging bracket or French cleat to your canvas is a crucial step in preparing it for hanging. A hanging bracket is a small metal or plastic device that is attached to the back of the canvas, providing a sturdy hook for hanging. A French cleat, on the other hand, is a two-part system consisting of a bracket that attaches to the wall and a corresponding bracket that attaches to the back of the canvas. Both options provide a secure and level way to hang your canvas, but the French cleat is particularly useful for larger or heavier pieces. To add a hanging bracket or French cleat, start by measuring the width of your canvas and determining the best placement for the bracket. Typically, the bracket should be centered and about 1-2 inches from the top of the canvas. Next, use a level to ensure the bracket is straight, and then attach it to the back of the canvas using screws or nails. If using a French cleat, attach the wall bracket to the wall at the desired height, making sure it is level and secure. Then, attach the corresponding bracket to the back of the canvas, following the manufacturer's instructions. With the hanging bracket or French cleat in place, your canvas is now ready to be hung on the wall.
Securing the Canvas to a Stretcher Frame
Securing the canvas to a stretcher frame is a crucial step in preparing it for hanging. To do this, you will need a few basic tools and materials, including a staple gun, staples, and a pair of pliers. Start by laying the canvas flat on a work surface, with the side that will face the wall facing down. Next, place the stretcher frame on top of the canvas, ensuring that it is centered and evenly spaced. Use the staple gun to attach the canvas to the frame, starting from the center and working your way outwards. Make sure to staple the canvas tightly, but not too tightly, as this can cause it to pucker or distort. Once you have stapled the canvas to the frame, use the pliers to tighten any loose staples and ensure that the canvas is securely attached. Finally, flip the canvas over and inspect it to make sure that it is evenly stretched and securely attached to the frame. If necessary, make any adjustments to the staples or the frame to ensure that the canvas is properly secured. By following these steps, you can ensure that your canvas is properly secured to the stretcher frame and ready for hanging.
Mounting the Canvas on the Wall
Mounting a canvas on the wall can be a daunting task, especially for those who are not familiar with DIY projects. However, with the right tools and a bit of patience, it can be a straightforward process. To ensure a secure and level installation, it's essential to locate the wall studs and mark the spot where you want to hang the canvas. This will provide a solid foundation for the rest of the process. Next, you'll need to drill pilot holes and screw in the hardware, making sure it's securely attached to the wall. Finally, you'll need to adjust the canvas to ensure it's level and plumb, making any necessary adjustments to the hardware. By following these steps, you'll be able to mount your canvas on the wall with confidence. So, let's start by locating the wall studs and marking the spot where you want to hang your canvas.
Locating the Wall Studs and Marking the Spot
When it comes to mounting a canvas on the wall, one of the most crucial steps is locating the wall studs and marking the spot. This is because wall studs provide the necessary support and stability for the weight of the canvas, ensuring that it remains securely in place. To locate the wall studs, you can use a stud finder, which is a handy tool that detects the density of the material behind the wall. Simply move the stud finder along the wall, and it will beep or light up when it detects a stud. Alternatively, you can knock gently on the wall with your knuckles, and the sound will be more solid when you hit a stud. Once you've located the stud, use a pencil to mark the spot where you want to place the screw or nail. Make sure to mark the spot carefully, as this will ensure that your canvas is hung straight and level. It's also a good idea to double-check the location of the stud by measuring the distance between the marks, as this will give you a more accurate reading. By taking the time to locate the wall studs and mark the spot, you'll be able to hang your canvas with confidence, knowing that it will remain securely in place for years to come.
Drilling Pilot Holes and Screwing in the Hardware
Drilling pilot holes and screwing in the hardware is a crucial step in mounting a canvas on the wall. To start, locate the spot where you want to hang the canvas and mark it with a pencil. Next, hold the hanging hardware, such as a D-ring or screw eye, against the back of the canvas and mark the spot where the screw will go. Use a drill bit that is slightly smaller than the screw to create a pilot hole. This will help prevent the canvas from splitting or cracking when the screw is inserted. Once the pilot hole is drilled, screw the hardware into place, making sure it is securely attached to the canvas. If you are using a hanging kit, follow the manufacturer's instructions for assembling the hardware. Finally, hang the canvas on the wall, adjusting the hardware as needed to ensure it is level and secure. By taking the time to drill pilot holes and screw in the hardware correctly, you can ensure that your canvas is safely and securely mounted on the wall.
Adjusting the Canvas to Ensure Level and Plumb
Adjusting the canvas to ensure it is level and plumb is a crucial step in the process of mounting it on the wall. To achieve this, start by holding the canvas against the wall and checking its position using a level tool. If the canvas is not level, adjust it slightly until the bubble in the level tool is centered, indicating that the canvas is perfectly horizontal. Next, use a plumb line or a laser level to ensure the canvas is plumb, meaning it is perfectly vertical. If necessary, make adjustments to the canvas's position until it is both level and plumb. It's also a good idea to double-check the canvas's position by measuring the distance from the top of the canvas to the ceiling and from the sides of the canvas to the adjacent walls. This will help ensure that the canvas is not only level and plumb but also evenly spaced and symmetrical. By taking the time to adjust the canvas to ensure it is level and plumb, you can achieve a professional-looking installation that enhances the overall aesthetic of the room.