How To Tuck In A Shirt
Here is the introduction paragraph: Tucking in a shirt is a simple yet essential skill that can elevate your overall style and confidence. However, for many, it can be a daunting task, especially when it comes to achieving a polished and professional look. In this article, we will guide you through the process of mastering the art of tucking in a shirt, from the basics to advanced techniques. First, we will cover the fundamentals of tucking in a shirt, including the importance of choosing the right shirt and pants, and the basic steps involved in the process. Then, we will provide a step-by-step guide on how to tuck in a shirt, including tips on how to create a smooth and wrinkle-free finish. Finally, we will explore advanced techniques for achieving a polished and professional look, including how to tuck in a shirt with a belt and how to create a sleek and streamlined silhouette. By mastering these skills, you'll be able to tuck in your shirt with confidence and style. Let's start by mastering the basics of tucking in a shirt.
Mastering the Basics of Tucking in a Shirt
Mastering the basics of tucking in a shirt is an essential skill for anyone who wants to look polished and professional. While it may seem like a simple task, it requires a combination of understanding, preparation, and technique. To start, it's crucial to understand the importance of a well-fitted shirt, as a shirt that is too loose or too tight can be difficult to tuck in properly. Additionally, choosing the right pants and belt can make a big difference in how well your shirt stays tucked in. Finally, preparing your shirt for tucking by smoothing out wrinkles and making any necessary adjustments is key to a successful tuck. By focusing on these three key areas, you'll be well on your way to mastering the basics of tucking in a shirt. With a well-fitted shirt as your foundation, you'll be able to move on to the next step in perfecting your tucking technique.
Understanding the Importance of a Well-Fitted Shirt
A well-fitted shirt is essential for a polished and professional look, and it plays a significant role in mastering the basics of tucking in a shirt. When a shirt fits well, it creates a clean line from the shoulders to the waist, making it easier to tuck in and creating a more streamlined appearance. A well-fitted shirt also ensures that the fabric lies flat against the body, reducing wrinkles and creases that can make the shirt look rumpled and unkempt. Furthermore, a well-fitted shirt allows for a full range of motion, making it more comfortable to move around and perform daily activities. On the other hand, a poorly fitted shirt can be distracting and take away from the overall appearance of an outfit. A shirt that is too loose can look sloppy and unprofessional, while a shirt that is too tight can be constricting and uncomfortable. By investing in a well-fitted shirt, individuals can elevate their style and create a more put-together look that is perfect for both formal and casual occasions. Additionally, a well-fitted shirt can also boost confidence and make a person feel more prepared to take on the day. Overall, understanding the importance of a well-fitted shirt is crucial for mastering the basics of tucking in a shirt and creating a stylish and professional appearance.
Choosing the Right Pants and Belt
When it comes to tucking in a shirt, the right pants and belt can make all the difference. The key is to create a streamlined look that complements the tucked-in shirt. For pants, opt for a pair that fits well and sits at the natural waistline. This will help create a clean line from the shirt to the pants, making the tucked-in look more polished. Avoid pants that are too loose or too tight, as they can add bulk or create an unflattering silhouette. Instead, choose a pair that skims the body and creates a smooth, streamlined look. In terms of style, consider a pair of dress pants or chinos in a neutral color that complements the shirt. These styles are versatile and can be easily paired with a variety of shirts and shoes. When it comes to the belt, choose one that is simple and understated. A leather belt in a neutral color such as black, brown, or tan is a good choice. Avoid belts with bold buckles or excessive embellishments, as they can detract from the overall look. Instead, opt for a simple, classic design that adds a touch of sophistication to the outfit. By choosing the right pants and belt, you can create a polished, put-together look that complements the tucked-in shirt and elevates your overall style.
Preparing Your Shirt for Tucking
To prepare your shirt for tucking, start by ensuring it is clean and ironed. Wrinkled or creased shirts can make the tucking process more challenging and may result in an uneven appearance. Next, choose a shirt that fits you well, as baggy shirts can be difficult to tuck in neatly. Consider the type of collar your shirt has, as some collars, such as spread collars or point collars, may require a slightly different tucking technique. Additionally, make sure your shirt is the right length for your body type and the occasion. A shirt that is too long can be overwhelming, while one that is too short may not provide enough coverage. Once you have selected the right shirt, button it up to the top and smooth out any wrinkles or creases. This will help create a smooth, flat surface for tucking. Finally, stand up straight and adjust your shirt to ensure it is properly aligned with your body, making it easier to tuck in neatly. By following these steps, you can ensure your shirt is prepared for a smooth and successful tucking process.
Step-by-Step Guide to Tucking in a Shirt
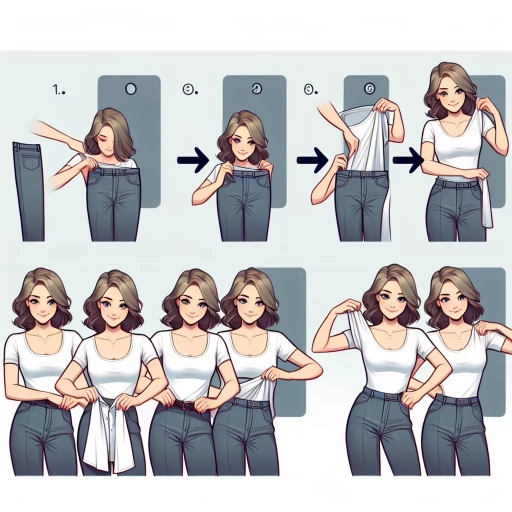
Tucking in a shirt can be a daunting task, especially for those who are new to dressing professionally or formally. However, with a few simple steps, you can master the art of tucking in a shirt and look polished and put-together. To start, it's essential to understand the basics of tucking in a shirt, which involves tucking in the front of the shirt, smoothing out wrinkles and adjusting the fit, and finally, tucking in the back of the shirt. By following these steps, you can achieve a crisp, clean look that's perfect for any occasion. In this article, we'll break down each step in detail, starting with the first and most crucial part: tucking in the front of the shirt.
Tucking in the Front of the Shirt
Here is the paragraph: Tucking in the front of the shirt is often considered the most challenging part of the process. To achieve a smooth and streamlined look, focus on tucking the front of the shirt into your pants with precision. Start by locating the center of the front of your shirt and identifying the midpoint between your two belt loops. Next, take the front of the shirt and tuck it into your pants, ensuring that the center of the shirt aligns with the midpoint between your belt loops. Gently pull the shirt down to create a smooth, flat surface, making sure to eliminate any wrinkles or creases. To maintain a crisp look, use your fingers to smooth out the front of the shirt, paying attention to the edges and ensuring they are evenly tucked into your pants. By taking your time and focusing on the front of the shirt, you can create a polished and put-together appearance that sets the tone for the rest of your outfit.
Smoothing Out Wrinkles and Adjusting the Fit
Here is the paragraphy: Smoothing out wrinkles and adjusting the fit is a crucial step in tucking in a shirt. To do this, start by gently pulling the fabric of the shirt taut and smoothing out any wrinkles or creases. Make sure to pay special attention to the areas around the buttons and the collar, as these tend to be the most prone to wrinkling. Once you've smoothed out the wrinkles, adjust the fit of the shirt by tugging gently on the hem and making sure it's even and symmetrical. If necessary, make any final adjustments to the collar or cuffs to ensure a crisp, polished look. By taking the time to smooth out wrinkles and adjust the fit, you'll be able to achieve a sleek, put-together appearance that's perfect for a variety of occasions.
Tucking in the Back of the Shirt
Tucking in the back of the shirt is a crucial step in achieving a neat and professional look. To do this, start by standing up straight and smoothing out any wrinkles on the back of the shirt. Locate the bottom hem of the shirt and identify the center point. Take the hem and fold it upwards towards the top of the shirt, creating a straight line. Tuck the folded hem into the waistband of your pants, making sure it is secure and even. Adjust the shirt as needed to ensure it is smooth and flat against your back. Repeat the process on the other side, making sure to maintain symmetry. For a more polished look, you can also tuck in the front of the shirt, following the same steps. By tucking in the back of the shirt, you can create a streamlined appearance that is perfect for formal events or business meetings.
Advanced Techniques for a Polished Look
To achieve a polished look, it's essential to incorporate advanced techniques into your daily routine. One way to do this is by experimenting with different tucking styles, which can instantly elevate your outfit. Adding a blazer or jacket can also make a significant difference, as it adds a professional touch to any ensemble. However, for a truly sleek finish, consider using the "Military Tuck," a technique that involves tucking your shirt into your pants in a specific way to create a streamlined look. By mastering this technique, you can take your style to the next level and achieve a put-together appearance that's perfect for any occasion. In this article, we'll explore the "Military Tuck" in more detail, and provide you with the tips and tricks you need to incorporate it into your daily routine.
Using the "Military Tuck" for a Sleek Finish
The "Military Tuck" is a technique used to achieve a sleek and polished finish when tucking in a shirt. This method involves tucking the shirt into the pants in a way that creates a smooth, flat surface, eliminating any wrinkles or bulges. To execute the Military Tuck, start by tucking the front of the shirt into the pants, making sure the fabric is smooth and flat. Then, take the excess fabric at the sides and tuck it into the pants, creating a straight line from the waist to the hem. Finally, tuck the back of the shirt into the pants, making sure it is smooth and flat, and adjust the fabric as needed to create a seamless finish. The Military Tuck is particularly useful for those who want a streamlined look, as it eliminates any excess fabric and creates a clean, polished finish. This technique is also useful for those who wear dress shirts with a slim fit, as it helps to create a smooth, streamlined silhouette. By mastering the Military Tuck, individuals can achieve a professional and put-together look that is perfect for formal events or business meetings.
Adding a Blazer or Jacket for a Professional Touch
Adding a blazer or jacket is a simple yet effective way to instantly elevate your look and add a professional touch. Whether you're dressing for a job interview, a networking event, or just want to look put-together for a day at the office, a well-fitted blazer or jacket can make all the difference. Not only does it add a level of sophistication and polish to your outfit, but it also helps to create a more streamlined and put-together appearance. A blazer or jacket can help to balance out a too-casual top or bottom, and can even help to draw attention away from any areas of the body you may be self-conscious about. Plus, it's a great way to add some extra texture and interest to your outfit, and can help to break up a sea of solid colors. To incorporate a blazer or jacket into your look, try pairing it with a crisp white shirt, a pair of dark-washed trousers or a pencil skirt, and a pair of loafers or heels. You can also experiment with different colors and patterns, such as a navy blue blazer with a white shirt and dark jeans, or a patterned jacket with a solid-colored top and bottom. Whatever you choose, make sure it's well-fitted and tailored to your body, as a boxy or ill-fitting jacket can have the opposite effect and make you look sloppy and unpolished. By adding a blazer or jacket to your outfit, you can instantly add a level of professionalism and sophistication, and take your look from basic to brilliant.
Experimenting with Different Tucking Styles
Experimenting with different tucking styles can elevate your overall look and add a touch of personality to your outfit. One popular style is the "military tuck," where the shirt is tucked in tightly and evenly, creating a crisp, streamlined appearance. This style works well for formal events or business attire. Another option is the "relaxed tuck," where the shirt is tucked in loosely, creating a more casual, effortless look. This style is perfect for everyday wear or a night out with friends. For a more fashion-forward approach, try the "asymmetrical tuck," where the shirt is tucked in on one side and left out on the other. This style adds a touch of whimsy and can be dressed up or down. Experimenting with different tucking styles can also help you find what works best for your body type. For example, if you have a larger midsection, a more relaxed tuck can help create a more balanced silhouette. On the other hand, if you have a smaller frame, a more fitted tuck can help accentuate your waistline. Ultimately, the key to pulling off any tucking style is confidence and a willingness to experiment until you find what works best for you.