How To Debone Chicken Thighs
Deboning chicken thighs can be a daunting task, especially for those who are new to cooking. However, with the right techniques and a little practice, it can become a simple and efficient process. In this article, we will guide you through the steps of deboning chicken thighs, from preparation to the actual deboning process, and provide you with some valuable tips and variations to enhance your cooking experience. To start, preparation is key to a successful deboning process. Having the right tools and a clear understanding of the anatomy of the chicken thigh will make the process much easier. In the following sections, we will delve into the preparation process, the deboning process itself, and finally, provide you with some expert tips and variations to take your cooking to the next level. So, let's begin by discussing the importance of preparation and how it sets the stage for a successful deboning process.
Preparation is Key
When it comes to cooking chicken thighs, preparation is key to achieving tender, juicy, and flavorful results. To ensure a successful dish, it's essential to focus on three critical aspects: choosing the right tools, selecting fresh and high-quality chicken thighs, and understanding the anatomy of a chicken thigh. By mastering these elements, home cooks can elevate their cooking skills and produce mouth-watering meals. In this article, we'll delve into the importance of preparation and explore each of these aspects in detail. First, we'll start with the foundation of any successful cooking endeavor: choosing the right tools. With the right equipment, cooks can ensure that their chicken thighs are cooked evenly, safely, and efficiently. From sharp knives to reliable cooking vessels, the tools we use can make all the difference in the quality of our final product. By selecting the right tools, home cooks can set themselves up for success and create a solid foundation for their culinary creations.
Choosing the Right Tools
Choosing the right tools is essential for deboning chicken thighs efficiently and effectively. A good pair of kitchen shears or poultry shears is a must-have for cutting through the meat and bones. Look for shears with sharp blades and comfortable grips to make the process easier. A boning knife is also necessary for removing the bones and cartilage from the meat. A flexible boning knife is ideal for navigating the curves of the chicken thigh. Additionally, a cutting board and a pair of tweezers can be helpful for removing any remaining bones or cartilage. Having the right tools will make the deboning process faster and less frustrating, allowing you to focus on preparing a delicious meal.
Selecting Fresh and High-Quality Chicken Thighs
When it comes to selecting fresh and high-quality chicken thighs, there are several factors to consider. First and foremost, look for thighs with a pinkish-white color and a smooth, even texture. Avoid thighs with any visible signs of discoloration, such as green or grayish hues, as this can be an indication of spoilage. Next, check the packaging for any signs of leakage or tears, as this can compromise the freshness and safety of the chicken. It's also important to check the "sell by" or "use by" date on the packaging to ensure that the chicken is within its recommended timeframe for consumption. Additionally, opt for chicken thighs that are labeled as "hormone-free" or "antibiotic-free" to ensure that you're getting a product that is free from unwanted additives. Finally, give the chicken a sniff - fresh chicken should have a mild, slightly sweet smell, while spoiled chicken will often have a strong, unpleasant odor. By considering these factors, you can ensure that you're selecting the freshest and highest-quality chicken thighs for your recipe.
Understanding the Anatomy of a Chicken Thigh
Understanding the anatomy of a chicken thigh is crucial for effective deboning. A chicken thigh consists of three main bones: the femur, patella, and tibiotarsus. The femur is the longest bone, extending from the hip joint to the knee joint. The patella, or kneecap, is a small, triangular bone that protects the knee joint. The tibiotarsus is the lower leg bone, connecting the knee joint to the ankle. The thigh also contains several muscles, including the quadriceps, hamstrings, and adductor magnus, which are attached to the bones via tendons and ligaments. Familiarizing yourself with the anatomy of a chicken thigh will help you identify the bones and muscles, making it easier to locate the joints and remove the bones efficiently. By understanding the structure of the thigh, you'll be able to navigate the deboning process with confidence and precision.
The Deboning Process
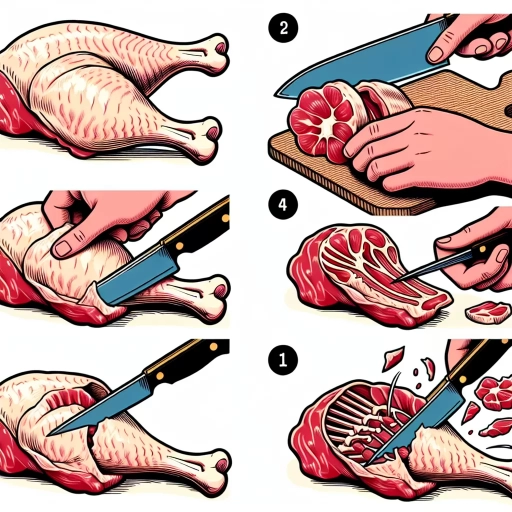
The deboning process is a crucial step in preparing meat for various culinary applications. It involves removing the bones from the meat to create a more versatile and easier-to-work-with product. To achieve this, several key steps must be taken. First, the skin and excess fat must be removed from the meat to expose the underlying bone structure. Next, the location of the bones must be identified, and careful cuts must be made around them to loosen their attachment to the surrounding meat. Finally, the bones must be gently pried out of the meat to avoid causing damage or tearing. By following these steps, meat can be effectively deboned, making it ideal for use in a wide range of dishes. The first step in this process is to remove the skin and excess fat, which will be discussed in more detail below.
Removing the Skin and Excess Fat
Removing the skin and excess fat from chicken thighs is a crucial step in the deboning process. To start, hold the chicken thigh skin side down and locate the edge of the skin. Gently pry the skin away from the meat using your fingers or a blunt instrument, working your way around the thigh until the skin is completely removed. Next, turn the thigh over and inspect the underside for any excess fat. Use a sharp knife to carefully trim away any visible fat, taking care not to cut too deeply and damage the surrounding meat. It's essential to remove as much excess fat as possible, as this will help the chicken cook more evenly and prevent it from becoming greasy. Once the skin and excess fat have been removed, the chicken thigh is ready to be deboned. This process not only makes the chicken more visually appealing, but it also helps to reduce the overall fat content, making it a healthier option for those looking to cook a leaner meal. By removing the skin and excess fat, you'll also be able to achieve a crisper exterior and a more tender interior when cooking the chicken, making it a worthwhile step in the deboning process.
Locating and Cutting Around the Bone
Here is the paragraphy: Once the skin is removed, locate the bone by feeling for the thickest part of the thigh. The bone will be slightly firmer to the touch than the surrounding meat. Hold the thigh firmly in place with one hand, and with the other hand, insert the tip of your boning knife into the thickest part of the meat, just above the bone. Gently pry the meat away from the bone, using a gentle sawing motion to cut around the bone. Continue to cut around the bone, working your way down the length of the thigh, using a combination of gentle prying and sawing motions. As you cut, use your fingers to gently pull the meat away from the bone, taking care not to tear the meat. The goal is to remove the bone in one piece, leaving the meat intact. If you encounter any resistance or difficulty cutting around the bone, do not apply too much pressure, as this can cause the meat to tear. Instead, reposition your knife and try again, using a gentle and controlled motion. By taking your time and working carefully, you should be able to successfully locate and cut around the bone, setting yourself up for a successful deboning process.
Gently Prying the Bone Out
Gently prying the bone out is a delicate process that requires patience and finesse. To begin, locate the thickest part of the bone, which is usually at the center of the thigh. Hold the chicken thigh firmly in place with one hand, and with the other hand, carefully insert the tip of your boning knife or kitchen shears into the gap between the bone and the meat. Gently pry the bone away from the meat, working your way around the thigh in a slow and gentle motion. Be careful not to apply too much pressure, as this can cause the bone to break or the meat to tear. As you continue to pry the bone out, you may need to use a bit of twisting motion to help dislodge it from the surrounding tissue. Once the bone is removed, use your fingers or a pair of tweezers to remove any remaining cartilage or connective tissue. The goal is to leave the meat intact and smooth, with no visible signs of the bone or cartilage. By taking your time and being gentle, you should be able to successfully remove the bone from the chicken thigh, leaving you with a beautifully deboned piece of meat that's ready to be cooked or used in your favorite recipe.
Tips and Variations
Deboning chicken thighs can be a daunting task, especially for those who are new to cooking. However, with the right techniques and tools, it can be a breeze. In this article, we will explore various tips and variations for deboning chicken thighs, including using kitchen shears for a quicker deboning process, deboning chicken thighs for specific recipes, and storing and freezing deboned chicken thighs. By mastering these techniques, you can take your cooking to the next level and enjoy a variety of delicious dishes. Whether you're a seasoned chef or a beginner in the kitchen, learning how to debone chicken thighs can open up a world of culinary possibilities. With the right approach, you can quickly and easily remove the bones from chicken thighs, making them perfect for a range of recipes. One of the most effective ways to debone chicken thighs is by using kitchen shears, which can significantly reduce the time and effort required for this task.
Using Kitchen Shears for a Quicker Deboning Process
Using kitchen shears for deboning chicken thighs can significantly speed up the process. This technique is especially useful when working with a large quantity of chicken thighs. To start, place the chicken thigh skin-side down on a cutting board. Locate the joint that connects the thigh to the drumstick, and cut through it using the kitchen shears. Next, cut along both sides of the bone, being careful not to cut too deeply and damage the surrounding meat. Continue to cut around the bone, using a gentle prying motion to help release it from the meat. Once the bone is removed, use the shears to trim any excess cartilage or connective tissue. This method is not only faster but also helps to reduce waste, as it allows for more precise removal of the bone and surrounding tissue. Additionally, using kitchen shears can be less intimidating for those who are new to deboning chicken, as it eliminates the need for a sharp knife and precise cutting techniques. Overall, incorporating kitchen shears into your deboning process can make the task more efficient and enjoyable.
Deboning Chicken Thighs for Specific Recipes
Deboning chicken thighs is a crucial step in preparing them for specific recipes, such as chicken cordon bleu, chicken parmesan, or chicken marsala. To debone chicken thighs, start by holding the thigh skin-side down and locating the joint that connects the thigh to the drumstick. Cut through the joint, then carefully cut along both sides of the bone, using a sharp boning knife or kitchen shears. Continue to cut around the bone, working your way down to the bottom of the thigh, until the bone is completely removed. Be careful not to cut too deeply, as this can cause the meat to tear. Once the bone is removed, use your fingers or a blunt instrument to gently pry the meat away from the surrounding tissue and cartilage. Rinse the deboned thigh under cold water to remove any remaining bits of bone or cartilage, then pat it dry with paper towels. Deboned chicken thighs can be used in a variety of recipes, such as stuffing and rolling them with herbs and cheese, or pounding them thin and breading them for a crispy exterior. By deboning chicken thighs, you can create a more uniform texture and a more visually appealing dish. Additionally, deboning chicken thighs can help to reduce cooking time, as the meat will cook more evenly and quickly without the bone. Overall, deboning chicken thighs is a simple and effective way to prepare them for a wide range of recipes, and can help to elevate the flavor and presentation of your dishes.
Storing and Freezing Deboned Chicken Thighs
Storing and freezing deboned chicken thighs is a convenient way to preserve their flavor and texture for future meals. When storing deboned chicken thighs in the refrigerator, it's essential to place them in a covered container or zip-top bag, making sure to press out as much air as possible before sealing. This helps prevent moisture from accumulating and promotes even cooling. Store them in the coldest part of the refrigerator, typically the bottom shelf, at a temperature of 40°F (4°C) or below. Use them within a day or two for optimal freshness. For longer storage, consider freezing deboned chicken thighs. To freeze, place the thighs in a single layer on a baking sheet lined with parchment paper, making sure they don't touch each other. Once frozen, transfer them to a freezer-safe bag or airtight container, pressing out as much air as possible before sealing. Frozen deboned chicken thighs can be stored for up to 9-12 months. When you're ready to use them, simply thaw overnight in the refrigerator or thaw quickly by submerging the bag in cold water. Always cook deboned chicken thighs to an internal temperature of 165°F (74°C) to ensure food safety. Additionally, consider labeling and dating the stored or frozen chicken thighs to keep track of how long they've been stored. By following these storage and freezing tips, you can enjoy your deboned chicken thighs in a variety of dishes, from soups and stews to salads and sandwiches, while maintaining their quality and flavor.