How To Draw A Star
Understanding the Basics of Drawing a Star
Fundamental Techniques in Pencil Drawing
Before starting with the specific process of drawing a star, it is necessary to understand the underlying principles of pencil drawing. Pencil drawing involves a variety of techniques, including contour drawing, shading, and adding texture. This could be as simple as understanding how to hold the pencil for varying line thicknesses or knowing when to use a soft pencil versus a hard pencil. These techniques are significant because they give your drawing depth and realism, even when drawing the simplest shapes like a star. When combined with the correct positioning and perspective, these strategies help produce a stellar sketch that is both symmetrical and proportionate.
Importance of Geometry in Star Drawing
Geometry plays a crucial role in creating a perfect star. Understanding the geometry of a star can help you create one efficiently. A regular star encompasses a five-pointed figure, usually drawn with five straight strokes. The concept of internal angles, symmetry, and the importance of a circle in defining these angles are essential considerations in sketching out your star. By becoming familiar with the geometric properties of a star, you increase the accuracy of your drawings, leading to a more proportional and realistic final product.
The Concept of Visual Measurement
Visual measurement is an important concept when it comes to drawing. Whether you are attempting to sketch a star or any other object, visual measuring helps to give proper dimensions. This method involves comparing lengths, widths, and distances to ensure that the proportions in your drawing are accurate and evenly scaled. By applying visual measurement techniques, you can make your star drawing appear more natural and realistic on the sketchpad, thereby creating a matching image to the mental or physical model you intend to replicate.
Step-by-Step Guide to Drawing a Perfect Star
Initial Sketching
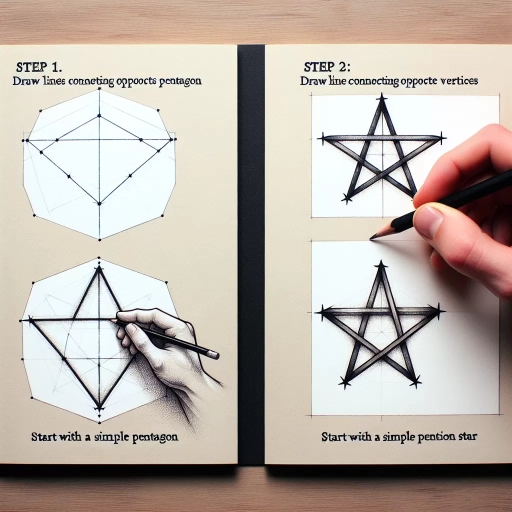
When starting to draw a star, the first step is to create a simple dot or a small circle. This will act as the core of the star and is vital in ensuring equal distances for each point of your sketch. Then, think about the star as a clock, with the first point aiming towards twelve o'clock. With equal distances, draw the remaining four points. This is the basic sketching phase in the process where you set the groundwork for a five-pointed star.
Refining the Lines and Angles
Next, consider the lines and angles, starting from the core. Connect all points in a criss-cross manner to form a star shape. Always remember that the angles have to be equal for a symmetrical star. Refining the lines and angles involves constant checking and adjusting until you achieve that perfect symmetry and balance. Fine-tuning your lines and angles is an iterative process. Keep monitoring and adjusting your drawing throughout this step to create the perfect star shape.
Adding Finishing Touches
After drawing the star, add finishing touches to enhance its appearance and make it stand out on paper. This could include shading the star to make it appear three-dimensional or creating a glow around it for a celestial effect. The finishing touches depend largely on personal creativity, allowing you to tailor your star to your specific style and preferences. Experiment with different textures and shades to achieve a unique outcome.
Common Mistakes and How to Avoid Them
Symmetry and Proportion Issues
Symmetry and proportion are often the main challenges when drawing a star. Many beginners make the mistake of drawing one side of the star longer or shorter than the other. This can be avoided by constantly checking and rechecking their spacing and using visual measurement techniques. Using tools like a ruler or protractor can also help maintain accuracy in drawing a perfect star. Dividing your drawing into measured sections can ensure your sketch is equally proportioned and symmetrical.
Inconsistent Line Thickness
A common error in star drawing involves inconsistent line thickness. Developing control over the pressure you apply on the pencil can resolve this issue. A lighter touch will create thinner lines, while a heavier touch will create thicker lines. Badly weighted lines can lead to a messy and unprofessional look. Mastering pencil control ensures consistent line thickness and a cleaner, more professional look in all sketches, not just in drawing a star.
Ignoring the Basics
It is crucial to remember that good star drawing, like all forms of good art, comes from a solid understanding of basic drawing principles. Ignoring these basics, such as ignoring the tonal values or not understanding geometry, can make your star appear flat and unrealistic. It's always a good idea to brush up on basic techniques and concepts before venturing into complex or meticulous drawings like a star.