How To Draw A Hawk
Here is the introduction paragraph: Drawing a hawk can be a fun and rewarding experience, especially when you have a clear understanding of the steps involved. To create a realistic and detailed hawk drawing, you'll need to start with the basics, add some texture and depth, and finally refine your work with color and shading. In this article, we'll break down the process into three manageable steps: sketching the basic shape, adding feathers and details, and refining and coloring your drawing. By following these steps, you'll be able to create a stunning hawk drawing that showcases your artistic skills. So, let's get started with the first step: sketching the basic shape of your hawk.
Step 1: Sketch the Basic Shape
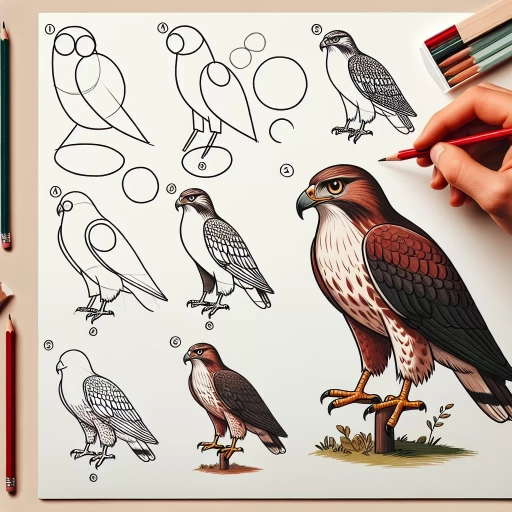
Sketching the basic shape of a bird is the first step in creating a realistic and detailed drawing. To begin, you'll need to start with a large oval for the body, which will serve as the foundation for the rest of the drawing. This oval should be tall and not too wide, with the top end slightly tilted towards the back. From there, you'll add a smaller oval for the head, which should be positioned at a slight angle to the body. The head oval should be about one-quarter to one-third the size of the body oval. Finally, you'll define the wings with long, curved lines that extend from the body and taper to a point at the tips. By starting with these basic shapes, you'll be able to build a solid foundation for your bird drawing and add more details and features later on. Start with a large oval for the body.
Start with a Large Oval for the Body
To start drawing a hawk, begin with a large oval for the body, making sure it's tall rather than wide. This oval will serve as the foundation for the rest of the bird's body, so take your time to get it right. The oval should be positioned in the center of your paper, with the top end slightly tilted and the bottom end rounded. Pay attention to the proportions, as the oval should be roughly one and a half times taller than it is wide. This will help you achieve a more realistic and balanced representation of the hawk's body. By starting with a large oval, you'll be able to build upon it and add the necessary details, such as the wings, tail, and head, to create a complete and accurate drawing of a hawk.
Add a Smaller Oval for the Head
The paragraphy should be written in a friendly and approachable tone. To add a smaller oval for the head, start by drawing a smaller oval shape that is connected to the top of the larger oval body. The head oval should be positioned at a slight angle, with the top end pointing towards the back of the body. Make sure the head oval is in proportion to the body oval, about one-quarter to one-third of the size. The head oval should also be slightly tilted, with the front end pointing downwards. This will help to create a sense of movement and dynamism in your hawk drawing. As you draw the head oval, pay attention to the overall shape and proportions of your hawk's head. Hawks have a distinctive head shape, with a flat forehead and a curved beak. You can use the head oval as a guide to help you draw these features in more detail later on. For now, focus on getting the basic shape and proportions of the head right, and don't worry too much about the details.
Define the Wings with Long, Curved Lines
The wings of a hawk are one of its most distinctive features, and drawing them requires attention to detail and a sense of fluidity. To define the wings with long, curved lines, start by sketching the overall shape of the wing, taking into account the hawk's posture and the angle at which the wing is positioned. Use gentle, sweeping curves to suggest the wing's contours, paying particular attention to the way the feathers overlap and curve around the wing's edges. As you draw, think about the way the wing's shape changes as it moves, with the curves becoming more pronounced and the lines more fluid. To add depth and dimension to the wing, use a range of line weights and textures, from soft, feathery lines to more defined, angular ones. By combining these elements, you can create a sense of movement and energy in the wing, capturing the hawk's dynamic presence.
Step 2: Add Feathers and Details
To bring your bird drawing to life, it's essential to add feathers and details. This step requires attention to texture, shape, and proportion. By incorporating these elements, you'll create a more realistic and engaging representation of your bird. To achieve this, you'll need to sketch the wing feathers with soft, curved lines, add the tail feathers with a long, broad shape, and define the beak and talons with sharp, pointed lines. By mastering these techniques, you'll be able to capture the unique characteristics of your bird and create a visually appealing drawing. Let's start by sketching the wing feathers with soft, curved lines.
Sketch the Wing Feathers with Soft, Curved Lines
When sketching the wing feathers, use soft, curved lines to capture their gentle, flowing shape. Start by drawing the longest feathers first, which are usually located at the leading edge of the wing. These feathers are typically the most prominent and have a more defined shape. Use a gentle, sweeping motion to draw the curved lines, making sure to vary the length and thickness of the feathers to create a natural, layered look. As you work your way down the wing, the feathers will become shorter and more rounded, so be sure to adjust your lines accordingly. Don't forget to add some subtle texture and detail to the feathers, such as the slight curvature of the quill and the soft, fluffy edges. By using soft, curved lines, you'll be able to capture the delicate, almost ethereal quality of the hawk's wing feathers, and add depth and dimension to your drawing.
Add the Tail Feathers with a Long, Broad Shape
To add the tail feathers with a long, broad shape, start by drawing a long, curved line that extends from the back of the hawk's body, just below the wing. The curve of this line should be smooth and flowing, with a gentle slope that follows the natural shape of the hawk's tail. As you draw this line, pay attention to its width, making sure it is broad enough to accommodate the tail feathers. The tail feathers themselves should be long and narrow, with a rounded tip and a slight curve to their shape. Draw each feather individually, starting from the center of the tail and working your way outwards. Make sure to leave a small gap between each feather to create a sense of depth and dimension. As you add more feathers, gradually increase their length and width, with the longest and broadest feathers at the outer edges of the tail. This will help create a sense of balance and harmony in the hawk's overall shape. Finally, use a soft pencil to add some gentle, feathery texture to the tail feathers, giving them a soft and fluffy appearance.
Define the Beak and Talons with Sharp, Pointed Lines
The beak and talons of a hawk are two of its most distinctive and essential features. The beak is a hard, keratin-based structure that is used for tearing flesh, breaking open shells, and grasping prey. It is typically curved and pointed, with a sharp, hooked tip that is perfect for ripping and tearing. When drawing a hawk's beak, use sharp, pointed lines to convey its strength and sharpness. Start by drawing a gentle curve that tapers to a point, making sure to keep the lines smooth and fluid. Add a slight hook at the tip to give the beak its characteristic shape. The beak should be in proportion to the rest of the hawk's head, so make sure to keep it in balance with the eyes and facial features. The talons, on the other hand, are the hawk's sharp, claw-like feet that are used for grasping and perching. They are typically long and curved, with a sharp, pointed tip that is perfect for digging into flesh or gripping onto branches. When drawing a hawk's talons, use sharp, pointed lines to convey their sharpness and strength. Start by drawing a long, curved line that tapers to a point, making sure to keep the lines smooth and fluid. Add a slight curve at the tip to give the talon its characteristic shape. The talons should be in proportion to the rest of the hawk's body, so make sure to keep them in balance with the wings and tail. By using sharp, pointed lines to draw the beak and talons, you can create a hawk that looks strong, sharp, and ready to take on its next meal.
Step 3: Refine and Color
Here is the introduction paragraph: Now that we have a solid foundation for our hawk drawing, it's time to refine and add details to make it more realistic and visually appealing. In this step, we will focus on refining the shape and proportions of the hawk, adding texture and pattern to the feathers, and choosing a color scheme that brings our bird to life. By the end of this step, our hawk will start to take on a more defined and polished look. Let's start by refining the shape and proportions of the hawk. Here is the 200 words supporting paragraph for Refine the Shape and Proportions of the Hawk: Refining the shape and proportions of the hawk is a crucial step in creating a realistic and accurate drawing. To do this, we need to pay attention to the overall shape of the bird, including the proportions of the head, body, wings, and tail. We can use reference images to get a better understanding of the hawk's anatomy and make any necessary adjustments to our drawing. It's also important to consider the pose and position of the hawk, as this can affect the overall shape and proportions of the bird. By refining the shape and proportions of the hawk, we can create a more believable and lifelike drawing that captures the essence of this magnificent bird. With a solid foundation in place, we can now move on to adding texture and pattern to the feathers, which will add depth and visual interest to our drawing.
Refine the Shape and Proportions of the Hawk
Refine the shape and proportions of the hawk by paying attention to the overall silhouette and making adjustments as needed. Start by ensuring the body is roughly 1.5 to 2 times the size of the head, with the wingspan being around 2 to 3 times the length of the body. The tail should be long and broad, making up about one-third of the hawk's total length. Check that the wings are in proportion to the body, with the primary flight feathers being the longest and the secondary feathers being slightly shorter. The legs and talons should be strong and muscular, with the talons being sharp and curved. Refine the shape of the beak, making sure it is strong and hooked, with a slight curve downwards. Pay attention to the eyes, making sure they are large and expressive, with a sharp, piercing gaze. Finally, add some texture and detail to the feathers, using short, curved lines to suggest the softness and fluffiness of the plumage. By refining the shape and proportions of the hawk, you can create a more realistic and detailed drawing that captures the essence of this majestic bird.
Add Texture and Pattern to the Feathers
To add texture and pattern to the feathers, start by identifying the different types of feathers on the hawk's body. The flight feathers, which include the primaries and secondaries, have a stiff and smooth texture, while the body feathers are softer and more fluffy. Use short, curved strokes to suggest the softness of the body feathers, and longer, more angular strokes to indicate the stiffness of the flight feathers. For the coverts, which cover the base of the flight feathers, use a combination of short and long strokes to create a layered, textured look. To add pattern, look for the distinctive markings on the hawk's feathers, such as the dark stripes on the primaries and the white tips on the secondaries. Use a fine-tip pen or a small brush to add these details, taking care to vary the thickness and texture of the lines to create a sense of depth and dimension. Finally, pay attention to the way the feathers overlap and intersect, using gentle, curved lines to suggest the softness and flexibility of the feathers. By adding texture and pattern to the feathers, you can create a more realistic and detailed drawing of the hawk.
Choose a Color Scheme and Apply it to the Hawk
When it comes to choosing a color scheme for your hawk drawing, you have a wide range of options to consider. Hawks are known for their striking plumage, which can vary in color depending on the species. For a realistic look, you could opt for a palette that reflects the natural colors of a hawk, such as shades of brown, gray, and white. Alternatively, you could choose a more vibrant and bold color scheme to give your drawing a unique and eye-catching twist. Consider the mood and atmosphere you want to convey with your drawing, as well as the personality of the hawk you're trying to capture. Once you've selected your color scheme, apply it to your hawk drawing using a range of techniques, such as layering, blending, and texture. Start by blocking in the main areas of color, then gradually build up layers of detail and shading to create depth and dimension. Don't be afraid to experiment and try out different colors and techniques until you achieve the desired effect. With practice and patience, you can create a stunning and realistic hawk drawing that showcases your artistic skills.