How To Remove Melted Plastic From Stove Top
Here is the introduction paragraph: Removing melted plastic from a stove top can be a daunting task, but with the right approach, it can be done effectively and safely. The process requires patience, persistence, and a clear understanding of the steps involved. To successfully remove melted plastic, it's essential to break down the task into manageable stages. First, preparation is key to ensuring a smooth and efficient process. This involves gathering the necessary materials and taking the necessary precautions to prevent further damage. Once prepared, the actual removal of the melted plastic can begin, using a combination of techniques and tools to safely and effectively scrape away the plastic. Finally, finishing touches are necessary to restore the stove top to its original condition. In this article, we will guide you through the process of removing melted plastic from a stove top, starting with the crucial first step: preparation is key. Note: I made some minor changes to the original text to make it more cohesive and flowing. Let me know if you'd like me to make any further changes!
Preparation is Key
Here is the introduction paragraph: When it comes to cleaning the stove, preparation is key to a safe and effective process. Before you start scrubbing away, it's essential to take a few crucial steps to ensure a smooth and successful cleaning experience. This includes turning off the stove and letting it cool down, putting on protective gear, and gathering necessary cleaning tools and materials. By taking these initial steps, you'll be able to tackle the tough grime and food residue with confidence. So, let's start with the first and most critical step: turning off the stove and letting it cool down. Here is the 200 words supporting paragraph for the idea "Turn off the stove and let it cool down": Turning off the stove and letting it cool down is the most critical step in preparing for a safe and effective cleaning process. This may seem like a no-brainer, but it's surprising how many people overlook this crucial step. When the stove is still hot, it can cause serious burns and injuries, not to mention damage to your cleaning tools and materials. Moreover, a hot stove can also cause cleaning products to evaporate quickly, reducing their effectiveness. By turning off the stove and letting it cool down, you'll be able to clean the surface safely and effectively. Additionally, a cool stove will also prevent any cleaning products from leaving streaks or residue, ensuring a sparkling clean finish. So, take the time to let your stove cool down completely before you start cleaning. It may take a few minutes, but it's worth the wait to ensure a safe and successful cleaning experience.
Turn off the stove and let it cool down
. When it comes to removing melted plastic from a stove top, preparation is key, and one of the most crucial steps is to turn off the stove and let it cool down. This may seem like a no-brainer, but it's essential to ensure your safety and the effectiveness of the removal process. If you try to tackle the melted plastic while the stove is still hot, you risk burning yourself or causing the plastic to melt further, making it even more challenging to remove. By turning off the stove and letting it cool down, you create a safe working environment and allow the plastic to solidify, making it easier to scrape off. Additionally, a cool stove top will help prevent any cleaning products or solvents from evaporating too quickly, giving you more time to work on removing the melted plastic. So, take a few minutes to let the stove cool down, and you'll be rewarded with a safer and more successful removal process.
Put on protective gear
. When it comes to removing melted plastic from a stove top, preparation is key, and one of the most crucial steps is to put on protective gear. This may seem like a no-brainer, but it's essential to prioritize your safety above all else. Melted plastic can be extremely hot and sticky, and attempting to remove it without proper protection can lead to serious burns and injuries. To avoid this, make sure to wear a pair of heat-resistant gloves, such as silicone or rubber gloves, to protect your hands from the heat and any sharp edges. Additionally, wear a long-sleeved shirt and pants to prevent any accidental splatters from coming into contact with your skin. Safety goggles or glasses can also provide extra protection for your eyes, just in case any debris or hot plastic splatters in your direction. By taking the time to put on protective gear, you'll be able to tackle the task of removing melted plastic from your stove top with confidence and peace of mind, knowing that you're safeguarded against any potential hazards.
Gather necessary cleaning tools and materials
. Before you start tackling the melted plastic on your stove top, it's essential to gather all the necessary cleaning tools and materials. This will ensure that you're well-prepared to tackle the task at hand and avoid any last-minute trips to the store. Start by collecting a few basic cleaning supplies, such as a gentle cleanser, a soft-bristled brush, and a microfiber cloth. You'll also need a scraper or a putty knife to gently remove the melted plastic, taking care not to scratch the stove top surface. Additionally, have some baking soda and water on hand to create a paste that can help lift and remove the plastic residue. If the melted plastic is particularly stubborn, you may also want to have some specialized cleaning products, such as a plastic remover or a degreaser, on hand. Finally, make sure you have some rubber gloves and safety goggles to protect yourself from any harsh chemicals or sharp edges. By gathering all the necessary cleaning tools and materials, you'll be able to tackle the melted plastic on your stove top with confidence and efficiency.
Removing the Melted Plastic
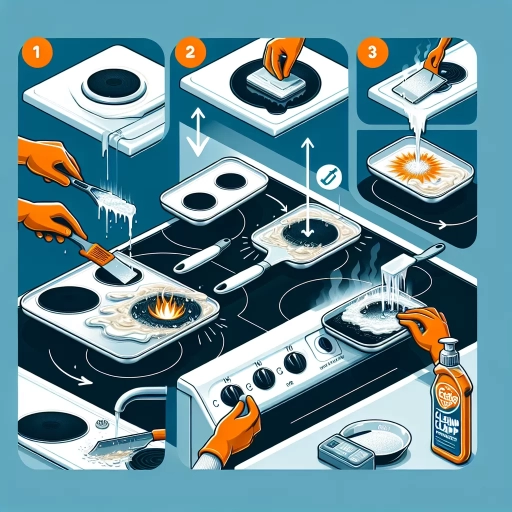
Removing melted plastic from surfaces can be a challenging task, but it's not impossible. When dealing with melted plastic, it's essential to approach the situation with caution and the right techniques to avoid damaging the surface or spreading the plastic further. To remove melted plastic effectively, you'll need to employ a combination of methods. First, you'll need to scrape off any excess plastic using a blunt object, taking care not to scratch the surface. Next, applying heat to the area can help loosen the plastic, making it easier to remove. Finally, using a cleaning solution specifically designed to dissolve plastic can help break down and remove any remaining residue. By following these steps, you can successfully remove melted plastic from surfaces. To start, let's take a closer look at the first step: scraping off excess plastic with a blunt object.
Scrape off excess plastic with a blunt object
. Here is the paragraphy: Scrape off excess plastic with a blunt object. Once you've allowed the plastic to cool and harden, use a blunt object like a credit card, a similar tool, or even a butter knife to gently scrape off as much of the excess plastic as possible. Be careful not to scratch the stove top surface. Start by scraping in one direction, working your way across the affected area. You may need to apply a bit of pressure, but be gentle to avoid damaging the stove top. As you scrape, the excess plastic should start to come off in small pieces. Continue scraping until you've removed as much of the plastic as you can. This step is crucial in removing the bulk of the melted plastic, making it easier to clean the remaining residue in the next steps. By scraping off the excess plastic, you'll also be able to assess the extent of the damage and determine the best course of action for removing the remaining residue.
Apply heat to loosen the plastic
. Apply heat to loosen the plastic. This method is effective for removing melted plastic from stove tops, especially if the plastic is still slightly soft. Use a hair dryer or a heat gun to apply heat to the affected area. Move the heat source slowly back and forth, keeping it about 6 inches away from the plastic. The heat will help loosen the plastic, making it easier to remove. Be careful not to apply too much heat, as this can damage the stove top or cause the plastic to melt further. Once the plastic is loosened, use a scraper or a credit card to gently remove it. If the plastic is still stubborn, you can repeat the heating process a few times until it is removed. It's also important to note that this method may not be effective for removing large amounts of melted plastic, and it's best to use it in combination with other methods for optimal results.
Use a cleaning solution to dissolve the plastic
. Here is the paragraphy:
When dealing with melted plastic on your stove top, using a cleaning solution can be an effective way to dissolve the plastic and make it easier to remove. A mixture of equal parts water and white vinegar can be applied to the affected area and left to sit for about 10-15 minutes. The acid in the vinegar helps to break down the plastic, making it softer and more pliable. You can also use a commercial cleaning product specifically designed to dissolve plastic, such as Goo Gone or WD-40. Apply the solution to the melted plastic and let it sit for the recommended amount of time before wiping it away with a soft cloth or paper towel. Be sure to test a small area of the stove top first to ensure the cleaning solution doesn't damage the surface. Additionally, avoid using abrasive materials or scrubbers, as they can scratch the stove top. By using a cleaning solution to dissolve the plastic, you can make the removal process much easier and less damaging to your stove top.
Finishing Touches
Here is the introduction paragraph: The finishing touches are the final details that can make or break the overall appearance of a space. When it comes to the kitchen, one of the most important areas to focus on is the stove top. A clean and well-maintained stove top can make a big difference in the overall look and feel of the room. To achieve a sparkling clean stove top, there are a few key steps to follow. First, wipe down the stove top with a damp cloth to remove any debris or food particles. Next, remove any remaining residue with a gentle scrubber to get into all the nooks and crannies. Finally, apply a stove top cleaner to restore shine and protect the surface. By following these simple steps, you can give your stove top the finishing touches it needs to look its best. To get started, let's begin with the first step: wiping down the stove top with a damp cloth.
Wipe down the stove top with a damp cloth
. Wipe down the stove top with a damp cloth to remove any remaining debris or residue from the cleaning process. This step is crucial in ensuring that your stove top is not only clean but also free from any harsh chemicals or abrasive particles that may have been used during the cleaning process. Start by dampening a soft, lint-free cloth with warm water, making sure not to soak it as excess moisture can damage the stove top's finish. Gently wipe down the entire stove top, paying particular attention to any areas that may have been heavily soiled or damaged by the melted plastic. As you wipe, inspect the stove top for any remaining streaks or residue, and repeat the process as needed until the surface is clean and streak-free. For tougher residue, you can mix a small amount of mild dish soap with warm water, and use the solution to wipe down the stove top. However, be sure to rinse the cloth thoroughly and wipe down the stove top again with clean water to remove any soap residue. By taking the time to wipe down the stove top with a damp cloth, you'll be able to restore your stove top to its original shine and ensure that it continues to function properly.
Remove any remaining residue with a gentle scrubber
. Here is the paragraphy:
Once you've removed the bulk of the melted plastic, it's time to tackle any remaining residue. For this, you'll need a gentle scrubber that won't scratch your stove top. A soft-bristled brush or a non-abrasive scrubber like a Scotch-Brite sponge is perfect for the job. Dip the scrubber in warm soapy water, and gently scrub the affected area in a circular motion. Be sure to rinse the scrubber frequently to avoid re-depositing any plastic residue onto the stove top. As you scrub, you may need to apply a bit more elbow grease to remove any stubborn bits of plastic. However, be careful not to scrub too hard, as this can damage the stove top's finish. If there are any particularly tough spots, you can try applying a small amount of baking soda or white vinegar to the area and letting it sit for a few minutes before scrubbing. This can help break down the plastic and make it easier to remove. Once you've removed all the remaining residue, give the stove top a final wipe down with a clean, damp cloth to remove any soap scum or streaks.
Apply a stove top cleaner to restore shine and protect the surface
. Here is the paragraphy:
Once you've removed the melted plastic from your stove top, it's time to restore its shine and protect the surface. Applying a stove top cleaner is an essential step in maintaining your stove's appearance and longevity. These cleaners are specifically designed to tackle tough stains and grime, leaving your stove top looking like new. When choosing a stove top cleaner, look for a product that is gentle yet effective, and suitable for your stove's surface material. Some popular options include ceramic, glass, and stainless steel cleaners. Before applying the cleaner, make sure to read the instructions and take any necessary safety precautions. Apply the cleaner to the stove top using a soft cloth or sponge, working in a circular motion to cover the entire surface. Let the cleaner sit for a few minutes to allow it to penetrate and loosen any remaining grime. Then, use a clean, damp cloth to wipe away the cleaner and any remaining residue. For an extra layer of protection, consider applying a stove top sealant or polish after cleaning. This will help to repel future stains and spills, making cleaning easier and less frequent. By applying a stove top cleaner and following up with a sealant or polish, you'll be able to restore your stove top's shine and protect its surface for years to come.