How To Draw Poppy
Here is the introduction paragraph: Drawing a poppy can be a fun and creative activity, but it requires some skill and knowledge to get it right. To create a beautiful and realistic poppy drawing, you need to understand the basics of drawing a poppy, including its shape, structure, and proportions. Once you have a good grasp of the basics, you can move on to sketching the poppy, following a step-by-step guide to ensure that your drawing is accurate and detailed. Finally, to take your poppy drawing to the next level, you can use various techniques to enhance its appearance, such as adding texture, shading, and color. In this article, we will explore these three key aspects of drawing a poppy, starting with the basics. Understanding the Basics of Drawing a Poppy is the first step in creating a stunning poppy drawing, and it is where we will begin our journey.
Understanding the Basics of Drawing a Poppy
Drawing a poppy can be a fun and rewarding experience, but it requires a good understanding of the basics. To get started, it's essential to familiarize yourself with the shapes and forms that make up a poppy, including the delicate petals, the prominent center, and the slender stem. Additionally, choosing the right drawing tools and materials is crucial to capturing the intricate details and textures of the flower. Observing the color palette and texture of poppies is also vital, as it will help you to accurately depict the subtle nuances of the flower's appearance. By mastering these fundamental elements, you'll be well on your way to creating a beautiful and realistic drawing of a poppy. In this article, we'll explore each of these key aspects in more detail, starting with the importance of familiarizing yourself with poppy shapes and forms.
Familiarizing Yourself with Poppy Shapes and Forms
Familiarizing yourself with poppy shapes and forms is a crucial step in drawing a realistic and beautiful poppy. Start by observing the overall shape of the poppy, noting its rounded, cup-like appearance. The petals of a poppy are typically delicate and curved, with a soft, ruffled texture. Study the way the petals overlap and curve around the center of the flower, creating a sense of depth and dimension. Notice the shape of the center of the poppy, which is typically a cluster of dark, rounded stamens surrounded by a ring of lighter-colored, delicate petals. Observe the way the stem and leaves of the poppy are shaped, with the stem being long and slender and the leaves being oval-shaped with a pointed tip. By familiarizing yourself with these shapes and forms, you'll be able to accurately capture the essence of a poppy in your drawing. Additionally, take note of the proportions of the different parts of the poppy, such as the size of the petals in relation to the center of the flower, and the length of the stem in relation to the leaves. This will help you to create a balanced and harmonious drawing.
Choosing the Right Drawing Tools and Materials
Choosing the right drawing tools and materials is essential to create a beautiful and realistic poppy drawing. To start, you'll need a few basic drawing tools, including a pencil, eraser, and sharpener. A graphite pencil (#2) is ideal for creating a range of values and shading, while a charcoal pencil can add depth and texture to your drawing. A blending stump or tortillon can help smooth out transitions and create subtle gradations of tone. For color, you can use colored pencils, markers, or paints, depending on your personal preference and the desired effect. Look for high-quality, light-fast materials that will not fade or bleed over time. Additionally, consider investing in a drawing board or paper with a smooth, even texture to help you achieve crisp lines and precise details. By selecting the right tools and materials, you'll be well on your way to creating a stunning poppy drawing that showcases your artistic skills.
Observing the Color Palette and Texture of Poppies
Observing the color palette and texture of poppies is a crucial step in drawing these beautiful flowers. Poppies are known for their delicate, papery petals that come in a variety of colors, including vibrant reds, soft pinks, and pure whites. To accurately capture their color palette, observe how the light interacts with the petals, creating subtle gradations of tone and hue. Notice how the colors deepen and become more saturated towards the center of the flower, while the edges remain soft and delicate. In addition to their color, poppies are also characterized by their unique texture. The petals are thin and almost translucent, with a subtle sheen that catches the light. The centers of the flowers are often covered in a delicate, fuzzy texture that adds depth and interest to the overall appearance of the poppy. To capture this texture in your drawing, pay attention to the way the light reflects off the petals and the center of the flower, and use a range of techniques, such as hatching and cross-hatching, to create a sense of depth and dimensionality. By carefully observing the color palette and texture of poppies, you can create a drawing that is not only visually stunning but also highly realistic and detailed.
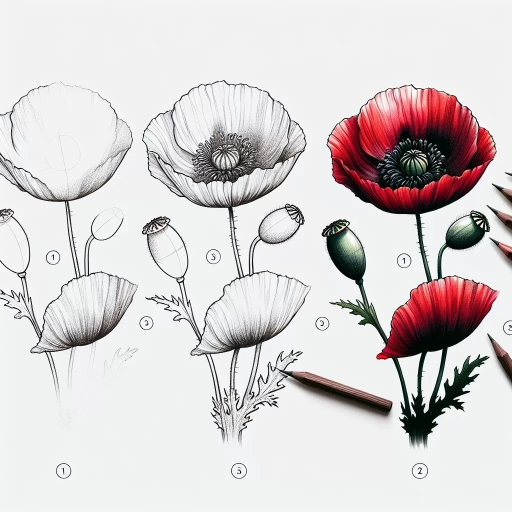
Sketching the Poppy: Step-by-Step Guide
Sketching the poppy, with its delicate petals and vibrant colors, can be a challenging yet rewarding experience for artists of all levels. To create a realistic and captivating poppy sketch, it's essential to break down the process into manageable steps. This guide will walk you through the key elements of sketching a poppy, starting with the intricate details of the center, where the stamen and pistils reside. We'll then explore the art of sketching the petals, understanding the curves and movement that give the poppy its signature appearance. Finally, we'll complete the poppy structure by adding the stem and leaves, bringing the entire piece together. By mastering these individual components, you'll be well on your way to creating a stunning poppy sketch. Let's begin by examining the heart of the poppy: the center, where the stamen and pistils play a crucial role in the flower's beauty and functionality.
Drawing the Center of the Poppy: The Stamen and Pistils
Drawing the center of the poppy, comprising the stamen and pistils, is a crucial step in capturing the flower's intricate details. To begin, start by sketching a small circle in the center of the poppy, representing the base of the stamen. From this circle, draw a series of thin, curved lines that radiate outward, resembling the stamen's delicate filaments. These lines should be gentle and feathery, with a soft, organic quality to them. As you draw, pay attention to the spacing and arrangement of the stamen, taking care to distribute them evenly around the center of the flower. Next, focus on the pistils, which are typically shorter and thicker than the stamen. Draw a small cluster of short, stout lines that emerge from the center of the circle, using a slightly firmer line weight to distinguish them from the stamen. Be sure to vary the length and thickness of the pistils to create a sense of depth and dimensionality. Finally, add some subtle texture and detail to the center of the poppy by drawing a few short, curved lines that suggest the presence of pollen or other tiny details. By carefully rendering the stamen and pistils, you'll be able to capture the intricate beauty of the poppy's center and add depth and realism to your drawing.
Sketching the Petals: Understanding Curves and Movement
Sketching the petals of a poppy flower requires a deep understanding of curves and movement. To begin, observe the gentle, flowing curves of the petals, which are often irregular and asymmetrical. Note how the curves of the petals are not uniform, but rather, they vary in shape and size, creating a sense of organic movement. When sketching the petals, use soft, gentle lines to capture the subtle curves and contours. Start by sketching the overall shape of the petal, using a light touch to suggest the gentle curve of the edge. Then, add more detail and texture to the petal, using short, curved lines to suggest the soft, delicate folds of the flower. As you sketch, pay attention to the way the petals move and flow around the center of the flower, creating a sense of dynamic energy and movement. By capturing the curves and movement of the petals, you can create a sketch that is full of life and vitality, and that truly captures the beauty of the poppy flower.
Adding the Stem and Leaves: Completing the Poppy Structure
Adding the stem and leaves is a crucial step in completing the poppy structure. To start, draw a long, curved line extending from the base of the flower, making sure it's slightly thicker at the bottom and tapers off towards the top. This will form the stem of the poppy. Next, add a few leaves along the stem, using teardrop shapes with pointed tips. The leaves should be spaced out evenly, with the largest ones at the base of the stem and the smallest ones towards the top. Make sure to vary the size and shape of the leaves to create a natural, organic look. To add some texture and depth to the leaves, use short, curved lines to suggest the veins, and gentle, wavy lines to indicate the edges. Finally, use a soft pencil to shade the leaves and stem, adding a subtle gradient of tone to create a sense of volume and dimension. By adding the stem and leaves, you'll be able to complete the poppy structure and create a beautiful, lifelike drawing.
Enhancing Your Poppy Drawing: Tips and Techniques
When it comes to drawing poppies, there are several techniques that can help take your artwork to the next level. To create a stunning and realistic poppy drawing, it's essential to focus on three key elements: shading and lighting, details and texture, and color and expressive brushstrokes. By mastering these techniques, you can add depth, dimension, and visual interest to your poppy drawing. In this article, we'll explore how to use shading and lighting to create a sense of depth and dimension, how to add details and texture to the petals and center of the poppy, and how to experiment with colors and expressive brushstrokes to capture the flower's delicate beauty. By incorporating these techniques into your drawing practice, you'll be able to create a breathtaking poppy drawing that showcases your artistic skills. Let's start by exploring the importance of shading and lighting in creating a realistic and captivating poppy drawing.
Using Shading and Lighting to Create Depth and Dimension
Using shading and lighting is a crucial technique to create depth and dimension in your poppy drawing. By manipulating light and shadow, you can add volume and texture to your flowers, making them appear more realistic and visually appealing. To achieve this, start by identifying the light source in your drawing, which will help you determine where to place the shadows. Typically, the light source comes from the top left or right, casting a gentle glow on the petals. Use a range of shading techniques, such as hatching, cross-hatching, and stippling, to create a gradual transition from light to dark. Soft, gentle shading can be used to suggest the delicate texture of the petals, while deeper, more defined shading can be used to create the illusion of depth and dimension. Pay attention to the way the light interacts with the different parts of the flower, such as the way it catches the edges of the petals or creates a subtle glow on the center of the bloom. By carefully observing and rendering the play of light and shadow, you can create a sense of depth and dimension that draws the viewer's eye into the drawing. Additionally, consider using atmospheric perspective to create a sense of distance and depth in your drawing. This can be achieved by using softer, more muted colors and gentle shading in the background, which will help to create a sense of depth and distance. By combining these techniques, you can create a beautiful, realistic, and engaging poppy drawing that showcases your artistic skills.
Adding Details and Texture to the Petals and Center
To add details and texture to the petals and center of your poppy drawing, start by observing the intricate patterns and shapes found in real poppy flowers. Notice how the petals have delicate, ruffled edges and a soft, velvety texture. You can achieve this texture by using short, gentle strokes with a soft pencil or a blending stump. Begin by adding a series of curved lines to the edges of the petals, following the natural curve of the flower. Vary the length and thickness of these lines to create a sense of movement and energy. Next, use a range of shading techniques to add depth and dimension to the petals. Hatching and cross-hatching can be used to create a soft, gradient-like effect, while stippling can add a more textured, speckled appearance. To add even more detail, use a fine-tip pen or a small brush to draw the delicate, thread-like filaments that connect the petals to the center of the flower. For the center of the poppy, use a combination of shading and texture to create a sense of depth and dimension. Start by adding a series of concentric circles to the center of the flower, using a range of shading techniques to create a sense of depth and dimension. Then, use a small brush or a fine-tip pen to add the delicate, stamen-like structures that protrude from the center of the flower. Finally, use a range of texture and shading techniques to add a sense of softness and delicacy to the center of the flower, creating a sense of contrast with the bold, vibrant petals. By adding these details and textures, you can create a poppy drawing that is not only visually striking but also rich in depth and dimension.
Experimenting with Colors and Expressive Brushstrokes
Experimenting with colors and expressive brushstrokes can elevate your poppy drawing to the next level. To achieve a soft, delicate appearance, try using gentle, feathery brushstrokes with a small brush, applying light pressure and subtle color gradations. For a more vibrant and dynamic look, switch to bold, expressive brushstrokes with a larger brush, applying more pressure and saturated colors. You can also experiment with mixing colors to create unique shades and hues that capture the essence of the poppy's delicate petals. Consider using a wet-on-wet technique, where you add layers of paint to wet paper, allowing the colors to blend and merge in unexpected ways. This technique can create a beautiful, dreamy quality that's perfect for capturing the poppy's ethereal beauty. Additionally, don't be afraid to add texture and dimension to your drawing by incorporating different materials, such as pastels, colored pencils, or even fabric. By experimenting with colors and expressive brushstrokes, you can add depth, emotion, and personality to your poppy drawing, making it a truly one-of-a-kind piece of art.