How To Draw Mushrooms
Here is the introduction paragraph: Drawing mushrooms can be a fun and rewarding experience, especially when you have a good understanding of their structure, techniques to draw them, and how to bring them to life with color and composition. To get started, it's essential to understand the basic structure of mushrooms, including their caps, stems, and gills. Mastering various drawing techniques, such as hatching and shading, can also help you create realistic and detailed mushroom drawings. Finally, adding color and composition to your drawings can make them more visually appealing and engaging. In this article, we will explore these three key aspects of drawing mushrooms, starting with the foundation of it all: understanding the basic structure of mushrooms.
Understanding the Basic Structure of Mushrooms
Mushrooms are fascinating organisms that come in a wide range of shapes, sizes, and colors. Understanding their basic structure is essential for identifying different species and appreciating their unique characteristics. At their core, mushrooms consist of a cap, stem, and gills, which are the most distinctive features. However, they can vary greatly in shape and size, from the tiny, bell-shaped species to the large, flat ones. Additionally, the texture and patterns on the cap and stem can provide valuable clues about the type of mushroom. To gain a deeper understanding of mushrooms, it's essential to start by identifying the cap, stem, and gills, which will provide a foundation for recognizing their different shapes and sizes, as well as their textures and patterns. By examining these basic structures, you'll be able to distinguish between various species and develop a greater appreciation for the diversity of mushrooms. This understanding will also enable you to identify the cap, stem, and gills, which is the first step in understanding the basic structure of mushrooms.
Identifying the Cap, Stem, and Gills
When drawing mushrooms, it's essential to identify the cap, stem, and gills, as these are the primary components that make up the structure of a mushroom. The cap, also known as the pileus, is the top part of the mushroom, which can vary in shape, size, and color depending on the species. It can be rounded, flat, or conical, and may have a smooth or wrinkled surface. The cap is usually the most prominent feature of the mushroom and can be used to identify the species. The stem, or stipe, is the long, thin structure that supports the cap and connects it to the base of the mushroom. It can be straight, curved, or tapered, and may have a smooth or hairy surface. The stem can also vary in color and texture, and may have a distinctive shape or feature that can help identify the species. The gills, or lamellae, are the thin, plate-like structures that are attached to the underside of the cap and are responsible for producing spores. They can be crowded, spaced, or forked, and may have a smooth or serrated edge. The gills can also vary in color and shape, and may have a distinctive pattern or arrangement that can help identify the species. By accurately drawing the cap, stem, and gills, you can create a realistic and detailed representation of a mushroom that showcases its unique characteristics and features.
Recognizing the Different Shapes and Sizes
Recognizing the different shapes and sizes of mushrooms is a crucial step in understanding their basic structure. Mushrooms come in a wide range of shapes, from the familiar cap-and-stem shape of button mushrooms to the more exotic shapes of oyster and chanterelle mushrooms. Some mushrooms, like the morel, have a honeycomb-like appearance, while others, like the puffball, are rounded and puffy. In terms of size, mushrooms can range from the tiny, pea-sized mushrooms that grow on trees to the large, plate-sized mushrooms that grow on the forest floor. Understanding the different shapes and sizes of mushrooms can help you to identify the different species and to draw them more accurately. For example, the cap of a mushroom can be rounded, flat, or conical, and the stem can be long and slender or short and stout. The gills or pores on the underside of the cap can also vary in shape and size, and can be an important identifying feature. By paying attention to these details, you can create more realistic and detailed drawings of mushrooms. Additionally, recognizing the different shapes and sizes of mushrooms can also help you to understand their growth habits and habitats, which can be useful in creating more realistic and detailed drawings of the environments in which they grow.
Noticing the Texture and Patterns
When drawing mushrooms, it's essential to notice the texture and patterns on the cap and stem. The cap's surface can be smooth, wrinkled, or covered in small, rounded warts or scales. Some species have a distinctive pattern of gills or pores underneath the cap, which can be delicate and intricate or thick and fleshy. The stem can be slender and smooth or thick and scaly, with a distinctive ring or annulus around the base. Paying attention to these textures and patterns will help you capture the unique characteristics of the mushroom you're drawing. For example, the iconic morel mushroom has a honeycomb-like pattern on its cap, while the fly agaric has a bright red cap with white spots. By observing and rendering these textures and patterns accurately, you can add depth and realism to your mushroom drawings.
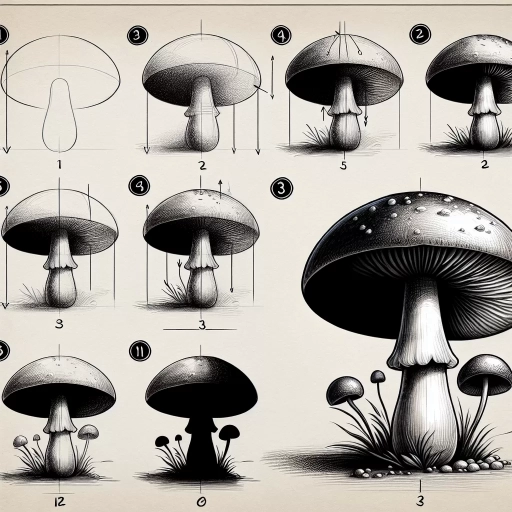
Mastering the Drawing Techniques for Mushrooms
Mastering the drawing techniques for mushrooms requires a combination of skills and attention to detail. To create realistic and visually appealing mushroom drawings, artists must employ a range of techniques that capture the unique characteristics of these fascinating organisms. Three key techniques are essential for achieving this goal: using shading to create depth and dimension, employing line work to define shapes and textures, and adding details with patterns and markings. By incorporating these techniques into their drawing practice, artists can bring their mushroom drawings to life and create stunning works of art. By starting with the foundation of shading, artists can establish a strong sense of depth and dimension, setting the stage for the addition of line work and details that will elevate their drawings to the next level. Using Shading to Create Depth and Dimension is the first crucial step in mastering the art of drawing mushrooms.
Using Shading to Create Depth and Dimension
Using shading to create depth and dimension is a crucial technique in drawing mushrooms, as it allows artists to convey the intricate textures and contours of these fascinating organisms. By applying varying degrees of shading, artists can create a sense of volume and three-dimensionality, drawing the viewer's eye into the drawing. To achieve this, artists can use a range of shading techniques, including hatching, cross-hatching, and stippling. Hatching involves creating parallel lines that follow the contours of the mushroom, with the density and thickness of the lines determining the level of shading. Cross-hatching involves layering hatching lines at different angles to create a more textured and dimensional appearance. Stippling, on the other hand, involves creating patterns of small dots to achieve a range of shading effects. By combining these techniques, artists can create a rich and nuanced range of shading that adds depth and dimension to their mushroom drawings. Additionally, shading can also be used to suggest the subtle play of light and shadow on the mushroom's surface, adding an extra layer of realism and visual interest to the drawing. By mastering the art of shading, artists can take their mushroom drawings to the next level, creating captivating and lifelike representations of these incredible organisms.
Employing Line Work to Define Shapes and Textures
Employing line work to define shapes and textures is a crucial aspect of drawing mushrooms. By varying the thickness, texture, and direction of lines, artists can create a range of effects that capture the unique characteristics of different mushroom species. To begin, use gentle, curved lines to suggest the overall shape of the mushroom cap, taking care to convey its rounded or pointed contours. For the stem, employ straighter, more vertical lines that taper slightly towards the base, giving the impression of a slender, cylindrical shape. To add texture and visual interest, incorporate a range of line weights and styles, from delicate, wispy lines to thicker, more expressive strokes. For example, use short, hatching lines to suggest the fine, downy texture of a mushroom's cap, or longer, more flowing lines to convey the smooth, waxy texture of a stem. By carefully observing and rendering the intricate patterns and textures of mushrooms, artists can create drawings that are not only visually striking but also highly detailed and realistic.
Adding Details with Patterns and Markings
When adding details to your mushroom drawings, incorporating patterns and markings can elevate your artwork and create a more realistic representation. Start by observing the unique characteristics of the mushroom species you're drawing, such as the shape, size, and arrangement of its gills, pores, or scales. For example, the iconic fly agaric mushroom has distinctive white spots on its bright red cap, while the morel mushroom features a honeycomb-like pattern on its cap. To capture these details, use a range of line weights and textures to suggest the intricate patterns and markings. For instance, you can use fine lines to draw the delicate gills of a mushroom, while thicker lines can be used to suggest the more robust scales on a species like the chanterelle. Additionally, consider using different shading techniques, such as hatching and cross-hatching, to create depth and dimension in your drawing. By carefully observing and rendering the unique patterns and markings of your subject, you can add a level of sophistication and realism to your mushroom drawings that will make them truly stand out.
Bringing Your Mushroom Drawings to Life with Color and Composition
Mushroom drawings can be a fascinating subject for artists, offering a wide range of creative possibilities. To bring your mushroom drawings to life, it's essential to consider the role of color and composition. A well-chosen color palette can evoke the natural world, while a thoughtful composition can create visual interest and draw the viewer's eye. In this article, we'll explore three key strategies for enhancing your mushroom drawings: selecting a color palette that reflects the natural world, experimenting with composition to create visual interest, and adding context with backgrounds and environments. By incorporating these techniques into your artistic practice, you can create engaging and realistic mushroom drawings that capture the beauty of these fascinating organisms. Let's start by exploring the importance of selecting a color palette that reflects the natural world.
Selecting a Color Palette that Reflects the Natural World
Here is the paragraphy: When selecting a color palette that reflects the natural world, consider the earthy tones that are commonly found in nature. Shades of brown, beige, and taupe can provide a warm and organic base for your mushroom drawings. You can also incorporate greens, such as mossy tones, sage, and olive, to represent foliage and vegetation. Blues and grays can be used to depict misty or cloudy environments, while earthy reds and oranges can add warmth and depth to your drawings. To create a cohesive look, choose a limited color palette and experiment with different shades and tints to add depth and dimension. Consider the time of day and the lighting conditions that you want to depict, as this can greatly impact the colors you choose. For example, a warm sunset might call for golden hues, while a misty morning might require cooler, bluer tones. By carefully selecting a color palette that reflects the natural world, you can create mushroom drawings that are not only visually appealing but also grounded in reality.
Experimenting with Composition to Create Visual Interest
Here is the paragraphy: Experimenting with composition is a great way to add visual interest to your mushroom drawings. By arranging the elements of your drawing in a unique and creative way, you can draw the viewer's eye through the image and create a sense of movement and energy. One way to experiment with composition is to play with the placement of the mushroom in the frame. Instead of centering the mushroom, try placing it off to one side or at an angle. This can create a sense of tension and dynamic movement in the image. You can also experiment with the placement of other elements, such as leaves or branches, to create a sense of depth and layering. Another way to add visual interest to your composition is to use a variety of shapes and forms. Mushrooms come in a wide range of shapes and sizes, from the rounded caps of button mushrooms to the tall, slender stems of oyster mushrooms. By incorporating a variety of shapes and forms into your drawing, you can create a sense of visual interest and diversity. Finally, don't be afraid to experiment with negative space. Leaving some areas of the drawing empty can create a sense of simplicity and elegance, and can help to draw the viewer's eye to the main subject of the image. By experimenting with composition, you can add visual interest and depth to your mushroom drawings, and create images that are engaging and dynamic.
Adding Context with Backgrounds and Environments
The key to adding context to your mushroom drawings lies in incorporating backgrounds and environments that enhance their visual appeal and create a sense of place. To start, consider the natural habitats where mushrooms grow, such as forests, grasslands, or woodlands. By including elements like trees, rocks, and foliage, you can transport your viewer into the world of the mushroom. When designing your background, think about the mood and atmosphere you want to convey – for example, a misty forest can evoke a sense of mystery, while a sunny meadow can feel warm and inviting. Pay attention to the color palette and textures you use, as these can greatly impact the overall feel of the drawing. Consider using earthy tones like browns, tans, and greens to create a natural, organic look. To add depth and dimension, experiment with layering different elements, such as leaves, twigs, and soil, to create a sense of complexity. Don't forget to balance your background with the main subject, ensuring that the mushroom remains the focal point. By incorporating a thoughtful and well-designed background, you can elevate your mushroom drawing from a simple illustration to a fully immersive and engaging artwork.