How To Draw A Zebra
Learning to draw a zebra can be a fun and creative activity for artists of all skill levels. With its distinctive black and white stripes, a zebra's unique appearance makes it a great subject for practicing various drawing techniques. To create a realistic and visually appealing zebra drawing, it's essential to understand the basics of drawing a zebra, including its overall shape, proportions, and key features. From there, you can add details and texture to bring your drawing to life, and finally, refine and enhance your artwork to make it truly stand out. In this article, we'll take you through the step-by-step process of drawing a zebra, starting with the fundamentals. By the end of this guide, you'll have a comprehensive understanding of how to draw a zebra that's both accurate and visually stunning. So, let's begin by understanding the basics of drawing a zebra.
Understanding the Basics of Drawing a Zebra
Drawing a zebra can be a fun and creative activity, but it requires some understanding of the basics. To get started, it's essential to recognize the unique patterns and colors of a zebra, which can be quite distinctive. You'll also need to choose the right drawing tools and materials to capture the texture and detail of the zebra's fur. Additionally, sketching the basic shape and proportions of a zebra is crucial to creating a realistic and balanced drawing. By mastering these fundamental skills, you'll be well on your way to creating a beautiful and accurate drawing of a zebra. In this article, we'll explore these basics in more detail, starting with the unique patterns and colors of a zebra.
Recognizing the Unique Patterns and Colors of a Zebra
Recognizing the unique patterns and colors of a zebra is crucial when drawing one. Each zebra has a distinct coat pattern, much like human fingerprints, making them easily identifiable. The most common type of zebra is the plains zebra, which has broad, horizontal stripes that are typically black and white. The stripes can be thick or thin, and some zebras may have brown or reddish tints to their coats. The Grevy's zebra, on the other hand, has thinner, more spaced-out stripes, while the mountain zebra has vertical stripes on its legs and horizontal stripes on its body. When drawing a zebra, it's essential to observe the unique pattern and coloration of the specific type you're trying to draw, taking note of the width, spacing, and orientation of the stripes. Additionally, the colors of a zebra's coat can vary depending on the lighting, with the black stripes appearing more blue or purple in certain conditions. By carefully observing and rendering these unique patterns and colors, you can create a realistic and captivating drawing of a zebra.
Choosing the Right Drawing Tools and Materials
Choosing the right drawing tools and materials is essential for creating a realistic and detailed zebra drawing. To start, you'll need a few basic drawing tools, including a pencil, eraser, and sharpener. A graphite pencil (#2) is ideal for sketching and shading, while a charcoal pencil can add depth and texture to your drawing. A blending stump or tortillon can help smooth out transitions and create subtle gradations of tone. For more precise lines and details, consider using a fine-tip pen or a set of technical pens. When it comes to paper, look for high-quality, smooth paper with a medium to heavy weight (around 80-100 gsm). This will allow for smooth pencil strokes and minimal buckling. You may also want to consider using a sketchbook or drawing pad with a built-in grid or guidelines to help you achieve accurate proportions and placement. Additionally, having a range of reference images and a comfortable drawing surface can also make a big difference in the quality of your drawing. By investing in the right tools and materials, you'll be well on your way to creating a stunning and realistic zebra drawing.
Sketching the Basic Shape and Proportions of a Zebra
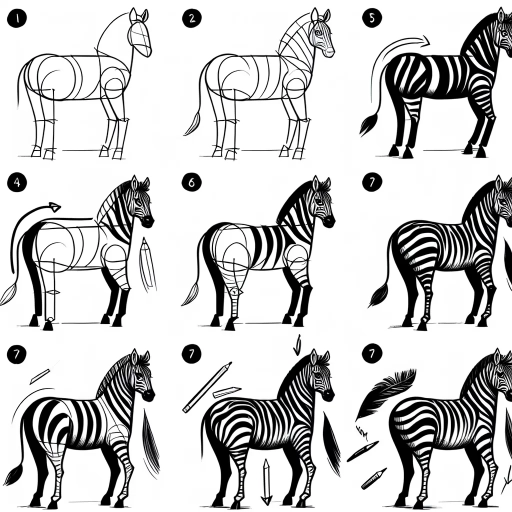
When sketching the basic shape and proportions of a zebra, it's essential to start with the overall body shape, which can be represented by a large oval or egg shape. The oval should be taller than it is wide, with the top end slightly tilted towards the back. The zebra's body is roughly 1.5 to 2 times the length of its head, so keep this proportion in mind as you sketch. Divide the oval into three sections: the front section, which includes the head and neck, the middle section, which is the body, and the back section, which includes the hindquarters. The front section should be slightly smaller than the middle section, while the back section should be the largest. Next, add the neck, which is relatively long and slender, connecting the head to the body. The neck should be roughly one-quarter of the way down from the top of the oval. The head itself can be represented by a smaller oval or a slightly flattened circle, connected to the neck. The ears are triangular and relatively small, positioned on either side of the head. The legs can be represented by straight lines or gentle curves, with the front legs being slightly shorter than the back legs. The hooves are small and oval-shaped. Pay attention to the proportions of the legs, as they should be in balance with the body. The tail is long and slender, extending from the back of the body. By sketching these basic shapes and proportions, you'll have a solid foundation for drawing a realistic zebra.
Adding Details and Texture to Your Zebra Drawing
When it comes to drawing a zebra, it's easy to get caught up in the basics of shape and proportion. However, to truly bring your zebra to life, it's essential to add details and texture. This is where the magic happens, and your drawing transforms from a simple outline to a vibrant, realistic representation of this incredible animal. By incorporating realistic stripes and patterns, you can capture the unique characteristics of your zebra's coat. Additionally, adding facial features and expressions can convey emotion and personality, making your drawing more engaging and relatable. Furthermore, defining the muscles and body structure of a zebra can add depth and dimension to your artwork. In this article, we'll explore these essential elements of zebra drawing, starting with the foundation of any great zebra artwork: creating realistic stripes and patterns.
Creating Realistic Stripes and Patterns
Creating realistic stripes and patterns on your zebra drawing requires attention to detail and a few simple techniques. To start, use a ruler or a straightedge to draw a series of parallel lines along the body of the zebra, spaced about 1-2 cm apart. These lines will serve as a guide for your stripes. Next, use a pencil or a fine-tip pen to draw the stripes, following the natural curve of the zebra's body. Vary the width and spacing of the stripes to create a more realistic and dynamic pattern. You can also add some subtle texture to your stripes by hatching or cross-hatching with a pencil or pen. To create a more intricate pattern, try layering different shades of gray or black to create a sense of depth and dimension. For example, you can use a light gray pencil to draw the base stripes, and then add darker shades of gray or black to create a sense of shading and texture. Additionally, pay attention to the direction of the stripes, as they tend to follow the natural contours of the zebra's body. On the legs, for example, the stripes tend to be more horizontal, while on the back, they tend to be more vertical. By paying attention to these details and using a range of techniques, you can create a realistic and engaging striped pattern for your zebra drawing.
Adding Facial Features and Expressions
Adding facial features and expressions to your zebra drawing can bring your artwork to life and give it a unique personality. Start by adding the eyes, which are typically almond-shaped and slanted upwards slightly. The eyes should be positioned on either side of the head, about one-third of the way down from the top. Use a small circle to draw the iris, and a slightly larger circle to draw the pupil. Add some eyelashes to give your zebra a bit of flair. Next, draw the nose, which should be small and rounded. The mouth should be a small, curved line that follows the shape of the jaw. To add some expression to your zebra's face, you can curve the mouth upwards or downwards to create a happy or sad look. You can also add some eyebrows to give your zebra a bit of attitude. Use short, curved lines to draw the eyebrows, and make sure they follow the shape of the eyes. Finally, add some texture to your zebra's face by drawing short, curved lines that follow the shape of the head. This will give your zebra a bit of depth and dimension. By adding these facial features and expressions, you can create a unique and engaging zebra drawing that captures the viewer's attention.
Defining the Muscles and Body Structure of a Zebra
The zebra's body structure is characterized by its distinctive black and white stripes, which serve as camouflage in its natural habitat. The muscles beneath the skin play a crucial role in defining the zebra's overall shape and movement. The neck and shoulder muscles, including the trapezius, rhomboids, and levator scapulae, work together to support the zebra's head and facilitate its distinctive nodding motion. The dorsal muscles, such as the latissimus dorsi and trapezius, run along the zebra's back and help to maintain its posture. The abdominal muscles, including the external and internal obliques, provide stability and support the zebra's internal organs. The hind leg muscles, comprising the gluteals, hamstrings, and quadriceps, enable the zebra to move with agility and speed. The foreleg muscles, including the biceps and triceps, allow for flexibility and maneuverability. Understanding the zebra's muscle structure is essential for accurately depicting its body shape and movement in a drawing. By incorporating these details, artists can create a more realistic and engaging representation of this iconic animal.
Refining and Enhancing Your Zebra Drawing
Once you have the basic outline of your zebra drawing, it's time to refine and enhance it to make it more visually appealing. One of the key elements to focus on is adding depth and dimension to your drawing. This can be achieved by using shading and lighting techniques to create a sense of volume and texture. Additionally, adding a background or environment to your zebra can help to create a sense of context and atmosphere. Finally, refining the details of your zebra drawing, such as the stripes, eyes, and mane, can help to bring the entire piece together. By focusing on these three key areas, you can take your zebra drawing from a simple outline to a stunning work of art. In this article, we will explore each of these techniques in more detail, starting with the use of shading and lighting to add depth to your zebra drawing.
Using Shading and Lighting Techniques to Add Depth
Using shading and lighting techniques is a crucial step in adding depth and dimension to your zebra drawing. To create a realistic and captivating image, you'll want to consider the way light interacts with the zebra's fur and body. Start by identifying the light source in your scene, whether it's the sun, a lamp, or even the soft glow of a cloudy day. Once you've established the light source, use a range of shading techniques to create areas of light and dark on your zebra's body. Hatching, cross-hatching, and stippling are all effective methods for creating texture and depth. Pay attention to the way the light catches the zebra's stripes, creating a sense of volume and curvature. You can also use lighting to create a sense of atmosphere and mood, such as a warm glow to evoke a sense of comfort and tranquility. To take your shading to the next level, experiment with different pencil grades and techniques, such as layering and blending. By mastering the art of shading and lighting, you'll be able to add a new level of sophistication and realism to your zebra drawing, drawing the viewer's eye into the image and creating a truly immersive experience.
Adding a Background or Environment to Your Zebra
Adding a background or environment to your zebra drawing can elevate the overall visual appeal and create a more immersive experience for the viewer. To start, consider the natural habitat of zebras, such as the savannas or grasslands of Africa. You can depict a simple horizon line with a few trees, rocks, or bushes to create a sense of depth and context. Alternatively, you can opt for a more dramatic background, such as a sunset or a stormy sky, to add mood and atmosphere to your drawing. When adding a background, be mindful of the color palette and ensure it complements the zebra's black and white stripes. Earthy tones such as browns, tans, and greens can create a harmonious and natural-looking environment. You can also experiment with different textures and patterns, such as grass or leaves, to add visual interest and depth to your background. Additionally, consider the placement of your zebra within the environment, taking into account the rule of thirds and negative space to create a balanced and visually appealing composition. By adding a thoughtful and well-executed background, you can transform your zebra drawing from a simple portrait to a captivating and engaging scene.
Finalizing and Refining the Details of Your Zebra Drawing
Finalizing and refining the details of your zebra drawing is a crucial step in bringing your artwork to life. To start, take a step back and evaluate your drawing as a whole, looking for any areas that may need improvement. Check the proportions, making sure the body, legs, and head are in balance. Pay attention to the stripes, ensuring they are evenly spaced and symmetrical. Next, focus on adding texture and depth to your zebra's coat. Use short, curved lines to suggest the softness of the fur, and add some longer, more defined lines to indicate the coarser texture of the mane and tail. Don't forget to add some subtle shading to give your zebra some dimension and depth. Use a range of values, from light to dark, to create a sense of volume and structure. Finally, refine the facial features, adding some personality and character to your zebra. Use a fine-tip pen or pencil to add details such as eyelashes, nostrils, and a mouth, and don't be afraid to experiment with different expressions to capture the unique spirit of your zebra. By taking the time to finalize and refine the details of your drawing, you'll be able to create a truly stunning and realistic zebra that showcases your artistic skills.