How To Make Press On Nails
Here is the introduction paragraph: Achieving salon-quality nails at home has never been easier, thanks to the innovative world of press-on nails. With the right techniques and a little practice, you can create stunning, long-lasting nail designs that rival those of professional nail technicians. To get started, it's essential to understand the three key elements of a successful press-on nail application: preparation, application, and finishing touches. In this article, we'll break down each of these steps, starting with the foundation of a flawless press-on nail application: preparation. By laying the groundwork with the right tools, techniques, and nail preparation, you'll be well on your way to achieving a professional-looking finish. So, let's dive in and explore the importance of preparation in creating a beautiful, long-lasting press-on nail design.
Preparation is Key
When it comes to applying press-on nail tips, preparation is key to achieving a long-lasting and professional-looking result. To ensure a successful application, it's essential to take the time to prepare your natural nails, select the right nail tips, and choose the best press-on nail glue for the job. By doing so, you'll be able to create a strong bond between the nail tip and your natural nail, preventing lifting and promoting a healthy nail environment. In this article, we'll explore the importance of preparation in applying press-on nail tips, starting with the crucial step of choosing the right nail tips. With the right tips, you'll be able to achieve a natural-looking shape and size that complements your natural nails, setting the stage for a successful application. So, let's dive in and explore the first step in preparing for a press-on nail tip application: choosing the right nail tips.
Choose the Right Nail Tips
When it comes to choosing the right nail tips, there are several factors to consider. First, think about the shape of your natural nail. If you have short or weak nails, you may want to opt for a nail tip that is more curved or tapered to create a more natural look. On the other hand, if you have longer or stronger nails, you can choose a nail tip that is more square or almond-shaped. Next, consider the size of your nail bed. If you have a smaller nail bed, you'll want to choose a nail tip that is proportionate to the size of your natural nail. You should also think about the style you're going for. If you want a more dramatic look, you can choose a nail tip that is longer or more pointed. If you want a more subtle look, you can choose a nail tip that is shorter or more rounded. Additionally, consider the material of the nail tip. There are many different types of nail tips available, including plastic, resin, and gel. Each type of nail tip has its own unique characteristics and benefits, so be sure to choose one that is right for you. Finally, think about the color of the nail tip. You can choose a nail tip that matches the color of your natural nail, or you can choose a nail tip that is a different color to create a bold and eye-catching look. By considering these factors, you can choose the right nail tip for your press-on nail application.
Prepare Your Natural Nails
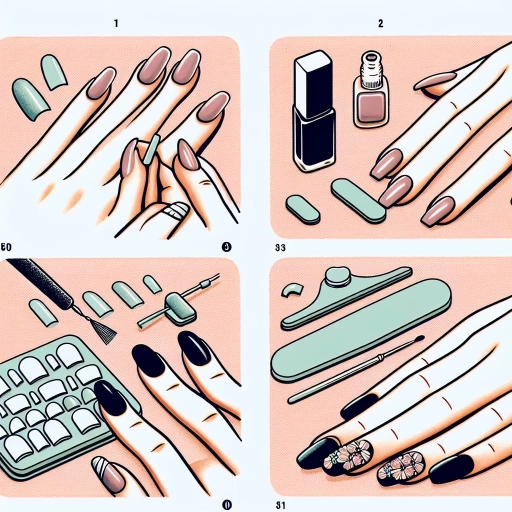
Here is the paragraphy: To prepare your natural nails for press-on nail application, start by removing any existing nail polish and pushing back your cuticles. Next, use a nail file to gently shape your natural nail to your desired shape, making sure to smooth out any ridges or imperfections. Then, use a buffer to buff the surface of your nail, removing any oils or residue. This will help the adhesive on the press-on nail stick better. After buffing, wipe your nail clean with a lint-free wipe or cotton ball to remove any dust or debris. Finally, apply a small amount of nail cleanser to your nail and let it dry completely before applying the press-on nail. This will help ensure a strong bond between your natural nail and the press-on nail. By following these steps, you'll be able to achieve a long-lasting and secure press-on nail application.
Select the Best Press-On Nail Glue
When it comes to selecting the best press-on nail glue, there are several factors to consider. First and foremost, you want a glue that is strong and long-lasting, able to withstand daily wear and tear. Look for a glue that is specifically designed for nail use and is made with high-quality ingredients. A good press-on nail glue should also be easy to apply and dry quickly, minimizing the risk of smudging or smearing. Additionally, consider a glue that is gentle on your natural nails and won't cause damage or lifting. Some popular options include nail glues that are infused with nourishing ingredients, such as keratin or calcium, to help promote healthy nail growth. When choosing a press-on nail glue, read reviews and do your research to find a product that is highly rated and recommended by other users. By selecting the right glue, you can ensure a secure and long-lasting bond between your press-on nails and your natural nails.
Application Made Easy
The world of nail art and design has become increasingly popular, with many individuals seeking to achieve salon-quality results from the comfort of their own homes. However, the process of applying press-on nails can be daunting, especially for those who are new to the world of at-home nail care. Fortunately, with a few simple steps, you can achieve professional-looking results with ease. To start, it's essential to apply a base coat to your natural nails, which helps to protect and prepare them for the application process. Next, attaching the press-on nails with precision is crucial to ensure a secure and long-lasting fit. Finally, finishing with a top coat is the key to sealing in your design and extending the wear of your press-on nails. By following these simple steps, you can achieve a flawless and professional-looking finish. So, let's dive in and explore the first step in more detail: applying a base coat to your natural nails.
Apply a Base Coat to Your Natural Nails
Applying a base coat to your natural nails is a crucial step in the press-on nail application process. A base coat serves as a protective barrier between your natural nail and the press-on nail, helping to prevent damage and staining. It also helps to create a smooth surface for the press-on nail to adhere to, ensuring a long-lasting and secure fit. To apply a base coat, start by gently wiping your natural nail with a lint-free wipe or cotton ball to remove any oils or residue. Next, apply a thin layer of clear base coat to each nail, making sure to cover the entire surface. Allow the base coat to dry completely before moving on to the next step. This will help to prevent any smudging or smearing of the base coat. By taking the time to apply a base coat, you can help to ensure a successful and long-lasting press-on nail application.
Attach the Press-On Nails with Precision
To attach the press-on nails with precision, start by selecting the correct size for each of your natural nails. Hold the press-on nail against your natural nail to ensure a snug fit, making sure not to overlap the cuticles. Next, apply a small amount of nail glue to the back of the press-on nail, spreading it evenly across the surface. Place the press-on nail onto your natural nail, starting at the center and gently pressing outward toward the tips. Hold the nail in place for a few seconds to secure it. Repeat this process for each nail, taking care to align the press-on nail with the natural curve of your nail bed. To finish, apply a thin layer of top coat to seal the glue and add shine. By following these steps, you can achieve a precise and long-lasting application of your press-on nails.
Finish with a Top Coat for Long-Lasting Wear
Finishing with a top coat is a crucial step in ensuring long-lasting wear for your press-on nails. A good top coat can help seal in the adhesive and prevent chipping or lifting, allowing your nails to stay in place for up to two weeks. When choosing a top coat, look for one that is specifically designed for use with press-on nails and contains ingredients such as UV protectants and nail strengtheners. Apply a thin layer of top coat to each nail, making sure to cover the entire surface, and finish with a quick-dry top coat to seal everything in place. This will help extend the wear of your press-on nails and keep them looking salon-fresh for longer. Additionally, using a top coat can also help to add shine and gloss to your nails, giving them a professional finish. By finishing with a top coat, you can enjoy long-lasting, high-quality press-on nails that look and feel great.
Finishing Touches for a Professional Look
The finishing touches are what set a professional nail technician apart from an amateur. To achieve a high-quality finish, it's essential to pay attention to the smallest details. A well-groomed nail is not just about the color or design, but also about the overall shape, health, and appearance of the nail. To achieve a professional look, it's crucial to focus on three key areas: shaping and filing the nails for a natural fit, applying cuticle oil for hydration and shine, and touching up any imperfections for a flawless finish. By paying attention to these details, you can take your nail game to the next level and leave a lasting impression on your clients. So, let's start with the first step: shaping and filing the nails for a natural fit.
Shape and File the Nails for a Natural Fit
To achieve a natural fit, it's essential to shape and file the nails to complement the shape of your natural nail bed. Start by gently shaping the press-on nail to match the curve of your natural nail, using nail clippers or a nail file. Be cautious not to cut or file too much, as this can weaken the nail. Next, use a nail file to smooth out any ridges or imperfections, working from the cuticle to the tip of the nail. Focus on creating a seamless blend between the press-on nail and your natural nail, ensuring a comfortable and natural-looking fit. To achieve a more realistic appearance, use a nail buffer to gently buff the surface of the nail, removing any excess glue or ridges. This will help create a smooth, even finish that looks and feels like your natural nail. By taking the time to shape and file the nails, you'll be able to achieve a professional-looking finish that lasts.
Apply Cuticle Oil for Hydration and Shine
Apply cuticle oil for hydration and shine to give your press-on nails a professional finish. Cuticle oil is a nourishing treatment that not only moisturizes the cuticles but also adds a glossy finish to the nail. To apply, gently rub a small amount of oil onto the cuticles and nail bed, making sure to cover the entire area. This will help to hydrate the skin and nail, leaving them feeling soft and supple. As the oil absorbs, it will also add a subtle shine to the nail, giving it a healthy and vibrant appearance. For an extra glossy finish, apply a small amount of oil to the nail surface and gently buff it in with a lint-free wipe or cotton ball. This will help to distribute the oil evenly and create a high-shine finish. Regular use of cuticle oil can also help to promote healthy nail growth and prevent dryness and brittleness. By incorporating cuticle oil into your press-on nail routine, you can achieve a salon-quality finish that looks and feels great.
Touch Up Any Imperfections for a Flawless Finish
The final step in achieving a flawless finish is to touch up any imperfections. This involves carefully inspecting the nails for any ridges, bubbles, or uneven edges, and making the necessary adjustments. To do this, use a nail file to gently smooth out any ridges or bumps, and a lint-free wipe to remove any excess glue or oils. If there are any bubbles, use a pin or a needle to carefully pop them, and then smooth out the area with a nail file. For uneven edges, use a nail clipper to trim the nail to the desired shape, and then file the edge to smooth it out. Finally, apply a top coat to seal in the design and add a glossy finish. By taking the time to touch up any imperfections, you can ensure a professional-looking finish that will last for weeks to come.