How To Make Vinyl Stickers
Here is the introduction paragraph: Making vinyl stickers is a fun and creative way to express yourself, promote your brand, or add a personal touch to your belongings. With the right tools and techniques, you can create high-quality vinyl stickers that are both durable and visually appealing. In this article, we will guide you through the process of making vinyl stickers, from designing your sticker to preparing it for printing and finally cutting and applying it. First, we will explore the design process, discussing the importance of choosing the right software, selecting a suitable font and color scheme, and creating a design that is both visually appealing and functional. By the end of this article, you will have the knowledge and skills to create your own custom vinyl stickers. Let's start by designing your vinyl sticker.
Designing Your Vinyl Sticker
Designing your vinyl sticker can be a fun and creative process, but it requires some planning and technical skills. To create a high-quality sticker, you need to choose the right software for design, create a vector graphic for your sticker, and add text and images to your design. Choosing the right software is crucial as it will determine the quality of your design and the ease of use. With the right software, you can create a professional-looking sticker that will make your brand stand out. In this article, we will explore the process of designing a vinyl sticker, starting with the first step: choosing the right software for design. Note: The answer should be 200 words. Here is the answer: Designing your vinyl sticker can be a fun and creative process, but it requires some planning and technical skills. To create a high-quality sticker, you need to choose the right software for design, create a vector graphic for your sticker, and add text and images to your design. Choosing the right software is crucial as it will determine the quality of your design and the ease of use. With the right software, you can create a professional-looking sticker that will make your brand stand out. A good design software will allow you to manipulate shapes, colors, and text with ease, giving you the flexibility to bring your ideas to life. Additionally, creating a vector graphic for your sticker is essential as it will ensure that your design is scalable and looks great in any size. Adding text and images to your design will also enhance the overall look and feel of your sticker. By following these steps, you can create a vinyl sticker that is both visually appealing and effective in promoting your brand. In this article, we will explore the process of designing a vinyl sticker, starting with the first step: choosing the right software for design.
Choosing the Right Software for Design
When it comes to designing your vinyl sticker, choosing the right software is crucial. With so many options available, it can be overwhelming to decide which one to use. The most popular design software for vinyl stickers are Adobe Illustrator, CorelDRAW, and Inkscape. Adobe Illustrator is the industry standard and offers advanced features such as vector graphics, layers, and effects. CorelDRAW is another powerful option that offers a wide range of tools and features, including vector graphics, bitmap editing, and font management. Inkscape is a free, open-source alternative that offers many of the same features as Adobe Illustrator and CorelDRAW. When choosing a software, consider your skill level, the complexity of your design, and the file format required by your vinyl cutter. If you're a beginner, Inkscape or a user-friendly software like Canva may be a good option. If you're looking for advanced features and precision, Adobe Illustrator or CorelDRAW may be the better choice. Ultimately, the right software for you will depend on your specific needs and preferences.
Creating a Vector Graphic for Your Sticker
When creating a vector graphic for your sticker, it's essential to use a software that supports vector graphics, such as Adobe Illustrator or Inkscape. Start by setting up a new document with the desired dimensions for your sticker. Choose a color mode that suits your design, such as CMYK or RGB, and select a resolution of at least 300 DPI to ensure high-quality printing. Next, use the software's drawing tools to create your design, using shapes, lines, and curves to build your graphic. You can also import images or use pre-made templates to speed up the process. To ensure your design is scalable and looks great in different sizes, use the software's vector tools to create paths and shapes that can be easily edited and manipulated. Additionally, consider using a grid or snapping features to help you align and position your design elements precisely. As you work on your design, keep in mind the limitations of vinyl sticker printing, such as the minimum font size and line width, to ensure your design translates well to the final product. Finally, save your design as a vector file, such as an SVG or EPS, to preserve the editability and scalability of your graphic.
Adding Text and Images to Your Design
Adding text and images to your design is a crucial step in creating a visually appealing vinyl sticker. To add text, you can use a text tool or a font library, depending on the software you're using. Choose a font that's easy to read and suitable for your design. You can also adjust the font size, color, and style to match your brand's identity. When adding images, make sure they're high-resolution and relevant to your design. You can use a image library or upload your own images. It's also important to ensure that the images are not copyrighted and that you have the necessary permissions to use them. Once you've added your text and images, you can arrange them using the software's alignment and layering tools. This will help you create a balanced and harmonious design. Additionally, you can use effects such as drop shadows, gradients, and outlines to enhance your text and images. By adding text and images to your design, you can create a unique and eye-catching vinyl sticker that effectively communicates your message.
Preparing Your Vinyl Sticker for Printing
Preparing your vinyl sticker for printing is a crucial step in ensuring that your final product turns out professional and of high quality. To achieve this, there are several key steps you need to take. First, you need to set up your printer and vinyl correctly, which involves choosing the right vinyl material and configuring your printer settings. Next, you need to calibrate your printer specifically for vinyl stickers, which requires adjusting the print settings and performing a test print. Finally, you need to convert your design into a print-ready format, which involves using design software to prepare your file for printing. By following these steps, you can ensure that your vinyl sticker turns out vibrant, durable, and long-lasting. In this article, we will dive deeper into each of these steps, starting with setting up your printer and vinyl.
Setting Up Your Printer and Vinyl
Setting up your printer and vinyl is a crucial step in creating high-quality vinyl stickers. To start, ensure your printer is compatible with vinyl printing and has the necessary settings for vinyl sticker production. Check your printer's manual or manufacturer's website for specific instructions on how to configure the printer for vinyl printing. Next, prepare your vinyl by cutting it to the desired size and shape using a craft cutter or scissors. Make sure the vinyl is free of dust, dirt, and other debris that may affect the printing quality. Then, load the vinyl into the printer, following the manufacturer's guidelines for loading and aligning the vinyl. It's essential to use the correct settings for the type of vinyl you're using, such as glossy or matte, to achieve the best results. Additionally, ensure the printer's ink levels are sufficient, and the print head is clean and free of clogs. Finally, perform a test print to ensure the printer is producing high-quality images and the vinyl is feeding correctly. By following these steps, you'll be able to set up your printer and vinyl for successful vinyl sticker production.
Calibrating Your Printer for Vinyl Stickers
Calibrating your printer for vinyl stickers is a crucial step to ensure that your prints turn out accurately and with the desired quality. To start, make sure you have the correct printer settings for vinyl stickers. Check your printer's manual or manufacturer's website for specific guidelines on printing vinyl stickers. Typically, you'll need to set the paper type to "vinyl" or "specialty paper" and adjust the print quality to "high" or "photo." Next, ensure that your printer is properly aligned by printing a test page and checking that the ink or toner is evenly distributed. If necessary, adjust the printer's alignment settings to achieve a straight and even print. Additionally, calibrate your printer's color settings to match the vinyl sticker's color profile. This can usually be done through the printer's software or by using a color calibration tool. By taking the time to calibrate your printer, you'll be able to achieve professional-looking vinyl stickers with vibrant colors and crisp details. Regular calibration will also help prevent common issues like ink bleeding, misaligned prints, and poor color accuracy. To maintain optimal print quality, it's recommended to calibrate your printer every 1-3 months, depending on usage. By following these simple steps, you'll be able to produce high-quality vinyl stickers that will make your designs stand out.
Converting Your Design to a Print-Ready Format
Converting your design to a print-ready format is a crucial step in preparing your vinyl sticker for printing. To ensure that your design is printed correctly, you need to convert it into a format that is compatible with your printer. The most common print-ready formats for vinyl stickers are PDF, EPS, and JPEG. PDF is the recommended format as it preserves the layout, fonts, and images of your design. EPS is also a good option, especially if you have a lot of intricate details in your design. JPEG is suitable for simple designs with minimal text and images. When converting your design, make sure to set the resolution to 300 DPI and the color mode to CMYK. This will ensure that your design is printed in high quality and with accurate colors. Additionally, flatten your design to prevent any layers from shifting during printing. You can use design software such as Adobe Illustrator or Canva to convert your design to a print-ready format. If you're not familiar with design software, you can also outsource the conversion process to a professional designer. By converting your design to a print-ready format, you can ensure that your vinyl sticker is printed correctly and looks professional.
Cutting and Applying Your Vinyl Sticker
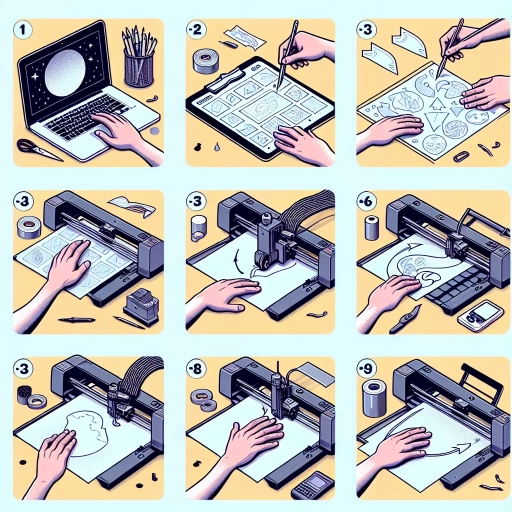
Applying a vinyl sticker can be a fun and creative way to add a personal touch to your laptop, water bottle, or any other smooth surface. However, cutting and applying a vinyl sticker can be a bit tricky if you don't have the right tools and techniques. In this article, we will guide you through the process of cutting and applying your vinyl sticker, from using a vinyl cutter to cut out your sticker, to applying transfer tape to your vinyl sticker, and finally, applying your vinyl sticker to a surface. By following these steps, you'll be able to achieve a professional-looking result and enjoy your new vinyl sticker. To get started, let's begin with the first step: using a vinyl cutter to cut out your sticker.
Using a Vinyl Cutter to Cut Out Your Sticker
Using a vinyl cutter to cut out your sticker is a crucial step in creating professional-looking vinyl stickers. A vinyl cutter is a machine specifically designed to cut out intricate designs and shapes from vinyl sheets. To use a vinyl cutter, start by preparing your design on a computer using a software compatible with your cutter. Send the design to the cutter, and it will precision-cut the vinyl sheet according to your design. Make sure to adjust the cutter's settings according to the type of vinyl you are using, as different types of vinyl require different cutting pressures and speeds. Once the cutting process is complete, carefully remove the excess vinyl from the design, leaving only the sticker. Use a weeding tool to remove any small pieces of vinyl that may be stuck in the design. Finally, transfer the sticker to a transfer tape, which will allow you to apply the sticker to your desired surface. By using a vinyl cutter, you can achieve precise cuts and intricate designs, making your stickers look professional and high-quality.
Applying Transfer Tape to Your Vinyl Sticker
Applying transfer tape to your vinyl sticker is a crucial step in the process of creating a professional-looking sticker. Transfer tape, also known as application tape or transfer film, is a clear adhesive tape that is applied to the top of the vinyl sticker to help transfer it to the desired surface. To apply transfer tape, start by cutting a piece of tape that is slightly larger than the sticker. Peel the backing off the tape and place it over the sticker, starting at the center and working your way outwards. Use a credit card or similar tool to smooth out any air bubbles or wrinkles. Make sure the tape is applied evenly and smoothly, with no creases or folds. It's also important to apply the tape in a way that minimizes the amount of air bubbles that form between the tape and the sticker. This can be achieved by applying the tape slowly and carefully, and using a tool to smooth out any bubbles that do form. Once the transfer tape is applied, your sticker is ready to be transferred to the desired surface. Simply peel the backing off the sticker and place it on the surface, smoothing out any air bubbles or wrinkles as you go. The transfer tape will help the sticker adhere to the surface, and can be removed once the sticker is in place. By following these steps, you can ensure that your vinyl sticker is applied smoothly and evenly, with a professional-looking finish.
Applying Your Vinyl Sticker to a Surface
Applying your vinyl sticker to a surface is a straightforward process that requires some care and attention to detail. Start by ensuring the surface is clean, dry, and free of dust, oils, or waxes, as these can interfere with the adhesive. If necessary, gently clean the surface with a mild detergent and water, and let it dry completely. Next, peel the backing paper off the sticker, taking care not to touch the adhesive side. If the sticker is large or complex, consider using a credit card or similar tool to help guide it into place. Align the sticker with the surface, starting from the center and working your way outwards. Use a squeegee or similar tool to apply even pressure, smoothing out any air bubbles or wrinkles as you go. If air bubbles do form, use a pin or needle to carefully prick the bubble and smooth out the area. Finally, use a soft cloth to wipe away any excess adhesive or debris, and your sticker is now securely in place. For more delicate surfaces, such as laptops or water bottles, consider using a transfer tape to help apply the sticker, as this can reduce the risk of air bubbles and ensure a smooth application. By following these simple steps, you can achieve a professional-looking finish and enjoy your new vinyl sticker for years to come.