How To Draw A Pokemon
Pokémon has been a beloved franchise for decades, captivating the hearts of millions of fans worldwide. One of the most exciting aspects of the Pokémon universe is the incredible diversity of its creatures, each with its unique design and characteristics. For many fans, drawing their favorite Pokémon is a fun and creative way to express their passion. However, for those who are new to drawing or unsure where to start, creating a Pokémon can seem like a daunting task. In this article, we will guide you through the process of drawing a Pokémon, from understanding the basics of drawing a Pokémon to sketching and refining your design, and finally, bringing your Pokémon to life with color and shading. By the end of this article, you will have the skills and confidence to create your very own Pokémon masterpiece. To begin, let's start with the foundation of drawing a Pokémon: understanding the basics.
Understanding the Basics of Drawing a Pokémon
Drawing a Pokémon can be a fun and creative activity, but it requires some basic knowledge and skills. To get started, it's essential to familiarize yourself with the anatomy of Pokémon, including their body proportions, facial features, and other distinctive characteristics. This will help you to accurately depict your chosen Pokémon and bring it to life on paper. In addition to understanding Pokémon anatomy, it's also crucial to choose the right drawing tools and materials, such as pencils, markers, or digital drawing software, to achieve the desired look and feel. Furthermore, setting up your drawing space for efficiency can help you to stay focused and productive, allowing you to fully express your creativity. By mastering these fundamental aspects of drawing a Pokémon, you'll be well on your way to creating amazing artwork. Let's start by taking a closer look at the anatomy of Pokémon and how to accurately depict their unique features.
Familiarizing Yourself with Pokémon Anatomy
Familiarizing yourself with Pokémon anatomy is a crucial step in drawing a Pokémon. Start by studying the different body parts of various Pokémon, such as the head, body, limbs, and tail. Notice the proportions and shapes of each part, as well as how they relate to each other. For example, some Pokémon have large heads and small bodies, while others have long tails and short legs. Understanding these proportions will help you draw your Pokémon accurately. Next, observe the textures and patterns on a Pokémon's body, such as scales, fur, or feathers. These details can add depth and realism to your drawing. Additionally, consider the Pokémon's pose and movement, as this can affect the overall shape and proportions of its body. By studying and understanding Pokémon anatomy, you'll be able to create more realistic and detailed drawings of your favorite Pokémon.
Choosing the Right Drawing Tools and Materials
When it comes to drawing a Pokémon, having the right tools and materials can make all the difference in achieving a high-quality and visually appealing artwork. The first and most essential tool for drawing is a pencil, specifically a graphite pencil with a range of hardness levels (HB, 2B, 4B, 6B). A sharpener is also necessary to keep the pencil sharp and ready for use. For creating bold lines and adding details, a set of fine-tip pens or markers, such as Micron or Copic, is recommended. Additionally, a sketchbook or drawing paper with a smooth finish is ideal for creating a Pokémon drawing. Erasers, such as a kneaded eraser or a white vinegar eraser, are also essential for correcting mistakes and creating highlights. For adding color, a set of colored pencils, markers, or paints can be used, depending on the desired effect. It's also important to have a reference image of the Pokémon being drawn to ensure accuracy and attention to detail. By having the right tools and materials, artists can focus on bringing their Pokémon drawing to life and creating a unique and captivating artwork.
Setting Up Your Drawing Space for Efficiency
Setting up your drawing space for efficiency is crucial when it comes to drawing a Pokémon. A cluttered and disorganized workspace can lead to distractions, mistakes, and frustration. To create an efficient drawing space, start by clearing a flat surface, such as a desk or table, of any unnecessary items. This will give you a clean slate to work on and help you focus on your drawing. Next, gather all the necessary tools and materials, including pencils, erasers, paper, and any reference images you may need. Organize these items in a way that makes sense to you, such as grouping similar items together or placing frequently used items within easy reach. Consider investing in a drawing board or lap desk to provide a comfortable and stable surface for drawing. Additionally, good lighting is essential for drawing, so position your workspace near a natural light source or invest in a high-quality desk lamp. Finally, minimize distractions by turning off electronic devices, finding a quiet workspace, or using noise-cancelling headphones. By setting up your drawing space for efficiency, you'll be able to focus on bringing your Pokémon to life and create a high-quality drawing.
Sketching and Refining Your Pokémon Design
Sketching and refining your Pokémon design is a crucial step in creating a believable and engaging character. To achieve this, it's essential to break down the process into manageable stages. First, you'll need to create a rough sketch of your Pokémon's pose and proportions, considering the overall shape and structure of the character. Next, you'll add details and textures to enhance realism, making sure to balance complexity with simplicity. Finally, you'll refine your sketch to achieve a balanced composition, ensuring that all elements work together harmoniously. By following these steps, you'll be able to create a well-designed Pokémon that will capture the imagination of fans. In this article, we'll explore each of these stages in more detail, starting with the foundation of your design: creating a rough sketch of your Pokémon's pose and proportions.
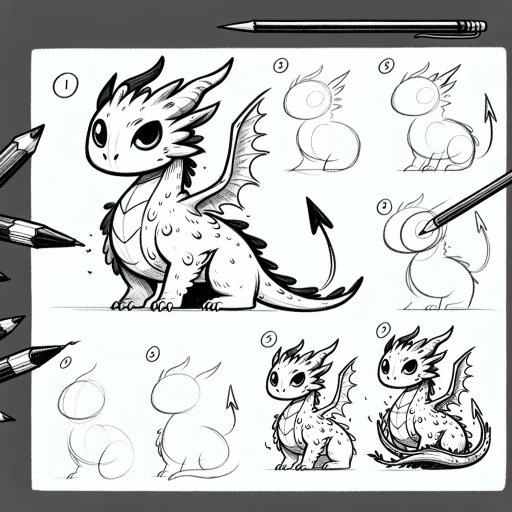
Creating a Rough Sketch of Your Pokémon's Pose and Proportions
When creating a rough sketch of your Pokémon's pose and proportions, start by considering the overall shape and structure of your design. Think about the type of Pokémon you're drawing and how its body would be proportioned. For example, a flying Pokémon would likely have larger wings and a smaller body, while a ground-type Pokémon would have a more robust body and shorter legs. Use simple shapes to block out the main features of your Pokémon, such as circles for the head and body, and rectangles for the limbs. Don't worry too much about the details at this stage, focus on getting the overall proportions and pose right. Consider the Pokémon's stance and movement, are they standing, sitting, or in mid-air? Are they facing forward, sideways, or at an angle? Use a pencil to lightly sketch out the rough shape of your Pokémon, paying attention to the proportions and balance of the design. You can also use reference images of real-life animals or other Pokémon to help inspire your design. As you sketch, think about the personality and characteristics of your Pokémon, how do they move and interact with their environment? This will help you to create a more dynamic and engaging pose. Remember, this is just a rough sketch, so don't be afraid to make mistakes and try out different ideas. The goal is to get a sense of the overall shape and proportions of your Pokémon, which will serve as a foundation for the rest of your design.
Adding Details and Textures to Enhance Realism
When adding details and textures to enhance realism in your Pokémon design, it's essential to consider the creature's environment, habits, and characteristics. For instance, if your Pokémon lives in a desert, you may want to add sandy or dusty textures to its skin or fur, while a Pokémon that dwells in the ocean might have glistening, iridescent scales. Think about the materials and substances your Pokémon would naturally interact with and incorporate those into your design. You can also use reference images of real-world animals to get inspiration for textures and patterns. For example, if you're designing a Pokémon with a reptilian skin, you could look at pictures of snakes or lizards to get an idea of the scaly texture and pattern. Additionally, consider the age and wear of your Pokémon - an older Pokémon might have more weathered or worn textures, while a younger one might have smoother, more vibrant ones. By adding these details and textures, you can create a more immersive and believable world for your Pokémon to inhabit.
Refining Your Sketch to Achieve a Balanced Composition
Refining your sketch to achieve a balanced composition is a crucial step in creating a visually appealing Pokémon design. A balanced composition refers to the arrangement of visual elements in a way that creates a sense of harmony and stability. To achieve this, consider the principles of balance, proportion, and emphasis. Start by evaluating the placement of your Pokémon's features, such as its eyes, nose, and mouth, to ensure they are in proportion to each other and the overall body. Pay attention to the negative space around your Pokémon, as it can greatly impact the overall balance of the composition. Consider using symmetry, asymmetry, or the rule of thirds to create a sense of balance. Symmetry involves placing identical elements on either side of a central axis, while asymmetry involves placing elements in a way that creates a sense of tension. The rule of thirds involves dividing the composition into thirds both horizontally and vertically, and placing important elements along those lines. Additionally, consider the visual weight of different elements, such as the size, color, and texture, to create a sense of balance. By refining your sketch to achieve a balanced composition, you can create a Pokémon design that is visually appealing and engaging.
Bringing Your Pokémon to Life with Color and Shading
Pokémon have been a beloved part of many people's lives for decades, and one of the most exciting ways to engage with these iconic characters is through art. Bringing your Pokémon to life with color and shading is a fun and creative way to express your passion for these lovable creatures. To achieve this, it's essential to consider several key elements, including selecting a color scheme that reflects your Pokémon's personality, applying shading techniques to create depth and dimension, and adding final touches with highlights and special effects. By mastering these techniques, you can create stunning artwork that showcases your favorite Pokémon in a whole new light. In this article, we'll explore these essential elements in more detail, starting with the crucial step of selecting a color scheme that reflects your Pokémon's personality.
Selecting a Color Scheme that Reflects Your Pokémon's Personality
When it comes to selecting a color scheme for your Pokémon, it's essential to consider its personality, habits, and characteristics. A well-chosen color scheme can help bring your Pokémon to life and make it more relatable to its trainers and the Pokémon world. For example, a Fire-type Pokémon like Charmander would look great with a bold and vibrant color scheme featuring shades of orange, red, and yellow, which reflect its fiery personality and abilities. On the other hand, a Water-type Pokémon like Squirtle would be better suited with a calming and soothing color scheme featuring shades of blue, green, and purple, which reflect its aquatic nature and gentle personality. Additionally, you can also consider the Pokémon's environment and habitat when selecting a color scheme. For instance, a Pokémon that lives in a desert environment would look great with a color scheme featuring shades of brown, beige, and tan, which reflect its surroundings. By carefully selecting a color scheme that reflects your Pokémon's personality, habits, and characteristics, you can create a more authentic and engaging character that will capture the hearts of Pokémon trainers and fans alike.
Applying Shading Techniques to Create Depth and Dimension
Applying shading techniques is a crucial step in creating a visually appealing and realistic Pokémon drawing. Shading helps to create depth and dimension by defining the contours and shapes of the Pokémon's body. To apply shading techniques, start by identifying the light source in your drawing. This will help you determine where the shadows will fall and how dark they should be. Next, use a range of shading tools, such as pencils, markers, or digital brushes, to create different levels of shading. Hatching and cross-hatching are two common techniques used to create texture and depth. Hatching involves creating parallel lines that follow the contours of the Pokémon's body, while cross-hatching involves layering lines at different angles to create a more textured look. Stippling is another technique that involves creating patterns of small dots to create shading and texture. By applying these shading techniques, you can create a sense of volume and depth in your Pokémon drawing, making it look more realistic and engaging. Additionally, shading can also be used to create mood and atmosphere in your drawing, such as creating a dramatic or eerie effect. By experimenting with different shading techniques and tools, you can add an extra layer of depth and dimension to your Pokémon drawing, bringing it to life and making it more visually appealing.
Adding Final Touches with Highlights and Special Effects
Adding the final touches to your Pokémon drawing involves incorporating highlights and special effects to give it a more dynamic and eye-catching appearance. To start, use a small brush or a fine-tip pen to add highlights to areas where light would naturally reflect, such as the eyes, teeth, and any metallic or shiny parts. Apply gentle, soft strokes to suggest the subtle play of light on these surfaces. For a more dramatic effect, you can also add highlights to the edges of the Pokémon's body, creating a sense of depth and dimensionality. Next, consider adding special effects to enhance the overall visual impact of your drawing. This could include things like sparks, flames, or electricity, which can be achieved using a range of techniques, from loose, expressive brushstrokes to intricate, detailed patterns. When adding special effects, be mindful of the Pokémon's type and personality, as these elements should be consistent with its overall character. For example, a fire-type Pokémon might be surrounded by flames or sparks, while a water-type Pokémon might be depicted with rippling waves or mist. By carefully balancing highlights and special effects, you can create a drawing that is not only visually striking but also true to the spirit of the Pokémon.