How To Remove Flat Back Earrings
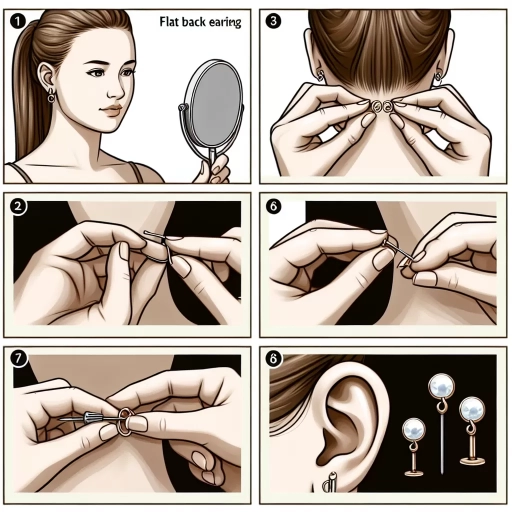
Flat back earrings have become a popular choice for many due to their sleek design and comfort. However, removing them can be a daunting task, especially for those who are new to this type of earring. The process of removing flat back earrings requires some knowledge and preparation to avoid any complications or discomfort. To ensure a smooth and safe removal, it is essential to understand the steps involved and take necessary precautions. In this article, we will guide you through the process of removing flat back earrings, starting with the importance of preparation, followed by the various removal methods, and finally, the aftercare and precautions to take after removal. By following these steps, you can safely and easily remove your flat back earrings. Preparation is key to a successful removal, and in the next section, we will discuss the necessary steps to take before attempting to remove your earrings.
Preparation is Key
When it comes to changing earring backs, preparation is key to a successful and stress-free experience. To ensure a smooth process, it's essential to understand the type of earring back you're working with, gather the necessary tools, and prepare your ears. By taking the time to prepare, you'll avoid any potential complications and be able to change your earring backs with confidence. Understanding the type of earring back is crucial, as different types require different approaches. For instance, some earring backs may require a specific tool to remove, while others may be more straightforward. By knowing what type of earring back you have, you'll be able to take the necessary steps to change it successfully. So, let's start by understanding the type of earring back you're working with.
Understand the Type of Earring Back
When it comes to removing flat back earrings, understanding the type of earring back is crucial. There are several types of earring backs, and each requires a different approach for removal. The most common types of earring backs are friction backs, screw backs, and push backs. Friction backs are the most common type and are held in place by a small metal or plastic piece that grips the post. Screw backs, on the other hand, have a small screw that secures the earring to the post. Push backs are similar to friction backs but have a small metal or plastic piece that is pushed onto the post to secure the earring. Knowing the type of earring back you have will help you determine the best method for removal. For example, if you have a screw back earring, you will need to use a small screwdriver to remove the screw before you can take out the earring. If you have a friction back or push back earring, you can simply pull the earring back off the post. Understanding the type of earring back you have will make the removal process much easier and less frustrating.
Gather the Necessary Tools
To remove flat back earrings, it's essential to gather the necessary tools to ensure a safe and successful process. You'll need a few simple items that can be easily found at home or purchased at a local craft store. First, you'll need a pair of flat-nose pliers, which are ideal for gripping the earring back. Next, you'll require a small, flat tool, such as a credit card or a similar plastic card, to help pry the earring back off the ear. Additionally, you may need a small amount of lubricant, like petroleum jelly or coconut oil, to help loosen the earring back and reduce friction. It's also a good idea to have a small bowl or container nearby to catch the earring back as it comes off. Having all these tools at hand will make the process much easier and less frustrating, allowing you to focus on safely removing the earring.
Prepare Your Ears
Here is the paragraphy: When it comes to removing flat back earrings, it's essential to prepare your ears for the process. This means taking a few simple steps to ensure a smooth and painless experience. First, make sure your ears are clean and dry. Wash your ears with soap and water, and dry them thoroughly with a clean towel. This will help prevent any bacteria or dirt from getting in the way of the removal process. Next, gently massage the area around the earring to loosen any adhesions or tightness. This will help the earring come out more easily and reduce the risk of discomfort or pain. Finally, take a few deep breaths and relax. Removing flat back earrings can be a bit uncomfortable, but it's a quick and easy process. By preparing your ears and taking a few simple precautions, you can ensure a successful and stress-free removal.
Removal Methods
Removing earrings can be a daunting task, especially if you have sensitive ears or are unsure of the best method to use. Fortunately, there are several effective removal methods that can make the process easier and less painful. Three popular methods include using an earring back remover tool, tweezers and a mirror, and a flathead screwdriver. Each of these methods has its own advantages and can be used depending on the type of earring and personal preference. For instance, using an earring back remover tool is a great option for those with sensitive ears, as it provides a gentle and controlled way to remove the earring back. This method is particularly useful for earrings with small or delicate backs that can be easily lost or damaged. By using an earring back remover tool, individuals can ensure a safe and successful removal process.
Using Earring Back Remover Tool
Using an earring back remover tool is a simple and effective method to remove flat back earrings. This tool is specifically designed to safely and easily remove the earring back without causing any damage to the earring or the earlobe. To use the remover tool, start by holding the earring in one hand and the tool in the other. Gently slide the tool under the earring back and twist it slightly until the back comes loose. Once the back is removed, you can carefully slide the earring out of your ear. The remover tool is especially useful for earrings with tight backs or for those who have trouble removing their earrings due to arthritis or limited dexterity. Additionally, using a remover tool can help prevent accidental drops or losses, as it provides a secure grip on the earring back. Overall, an earring back remover tool is a handy accessory to have in your jewelry box, making it easy to remove and store your flat back earrings with confidence.
Using Tweezers and a Mirror
Using tweezers and a mirror is a simple and effective method for removing flat back earrings. To start, you'll need a good pair of tweezers and a mirror that allows you to see the back of your ear clearly. It's best to use a magnifying mirror or a mirror with a built-in light to help you see the earring and the back of your ear more clearly. Once you have your tools, gently grasp the earring with the tweezers, making sure to get a good grip on the flat back of the earring. You may need to wiggle the earring slightly to loosen it from your earlobe. Once the earring is loose, you can carefully pull it out of your ear. If the earring is stuck, you can try gently rocking it back and forth while pulling it out. Be careful not to pull too hard, as this can cause discomfort or even injury. If you're having trouble removing the earring, you can try using a little bit of lubricant, such as coconut oil or petroleum jelly, to help it come out more easily. With a little patience and care, you should be able to remove your flat back earrings using tweezers and a mirror.
Using a Flathead Screwdriver
Using a flathead screwdriver is a common method for removing flat back earrings, but it requires caution and precision. To use a flathead screwdriver, start by locating the small notch or groove on the back of the earring post. This notch is usually where the screwdriver will fit, allowing you to pry the earring out. Gently insert the flathead screwdriver into the notch, making sure not to push too hard, which can damage the earring or the surrounding skin. Once the screwdriver is in place, carefully twist it back and forth while pulling the earring away from the ear. This should help loosen the earring and allow it to be removed. It's essential to be gentle and patient when using a flathead screwdriver, as excessive force can cause the earring to break or the skin to become irritated. If the earring is particularly stubborn, you may need to repeat the process several times before it comes loose. Additionally, be aware that using a flathead screwdriver can scratch the earring or the surrounding skin, so it's crucial to be careful and take your time.
Aftercare and Precautions
After getting a new piercing, it's essential to take good care of the area to ensure proper healing and minimize the risk of complications. Aftercare and precautions are crucial in maintaining the health and appearance of your piercing. To achieve this, there are several steps you can take. Firstly, cleaning the earring hole regularly is vital in removing dirt and bacteria that can cause infection. Additionally, applying antibiotic ointment can help to prevent infection and promote healing. Lastly, avoiding infection and irritation by being mindful of your daily activities and avoiding certain products can also contribute to a smooth recovery. By following these simple steps, you can ensure that your piercing heals quickly and looks great. One of the most critical steps in aftercare is cleaning the earring hole, which we will discuss in more detail below.
Cleaning the Earring Hole
Cleaning the earring hole is a crucial step in the aftercare process, especially after removing flat back earrings. To clean the earring hole, start by washing your hands thoroughly with soap and water. Then, gently clean the earring hole with a saline solution or a mixture of equal parts water and white vinegar using a cotton swab. Avoid using harsh chemicals, hydrogen peroxide, or tight cotton balls, as they can irritate the skin and push bacteria further into the hole. Instead, opt for a gentle, fragrance-free soap and lukewarm water to clean the area around the earring hole. For more thorough cleaning, you can soak the earring hole in a saline solution for 5-10 minutes, 2-3 times a week. After cleaning, dry the area with a clean towel and apply a thin layer of petroleum jelly or a fragrance-free lotion to keep the skin moisturized and promote healing. Regular cleaning and aftercare can help prevent infection, promote healing, and keep the earring hole clean and healthy.
Applying Antibiotic Ointment
Applying antibiotic ointment is a crucial step in the aftercare process of removing flat back earrings. This helps to prevent infection and promote healing. To apply antibiotic ointment, start by gently cleaning the affected area with mild soap and water. Then, using a cotton swab or clean finger, apply a thin layer of antibiotic ointment to the pierced area. Make sure to cover the entire area, but avoid applying too much ointment, as this can cause irritation. It's also essential to choose an ointment that is fragrance-free and hypoallergenic to minimize the risk of allergic reactions. Some popular antibiotic ointments for piercings include Neosporin and Bacitracin. Apply the ointment 2-3 times a day, or as directed by your piercer or healthcare professional. By following these simple steps, you can help to keep your piercing clean and promote healthy healing.
Avoiding Infection and Irritation
To avoid infection and irritation when removing flat back earrings, it's essential to follow proper aftercare and precautions. First, ensure your hands are clean and dry before touching the earrings or the piercing site. Wash your hands thoroughly with soap and warm water, and dry them completely with a clean towel. Next, clean the earrings and the piercing site with saline solution or mild soap and water. Gently rotate the earrings while cleaning to help loosen any debris or bacteria that may have accumulated. After cleaning, dry the area thoroughly with a clean towel to prevent bacterial growth. Additionally, avoid playing with or touching the earrings excessively, as this can introduce bacteria and cause irritation. It's also crucial to avoid submerging the piercing in water, such as taking a bath or swimming, until it's fully healed. If you experience any signs of infection, such as redness, swelling, or discharge, seek medical attention immediately. By following these simple steps, you can minimize the risk of infection and irritation and ensure a smooth and safe removal process for your flat back earrings.