How To Draw A Chair
Drawing a chair may seem like a simple task, but it requires attention to detail and a solid understanding of its basic components. To create a realistic and visually appealing chair drawing, you need to start with the fundamentals. In this article, we will guide you through the process of drawing a chair, from understanding the basics of chair drawing to adding the finer details. First, we will explore the essential elements that make up a chair, including its shape, proportions, and features. Next, we will show you how to sketch the chair's basic shape, using simple lines and curves to create a solid foundation. Finally, we will demonstrate how to add details and refine your drawing, including textures, patterns, and shading. By following these steps, you will be able to create a beautiful and realistic chair drawing. So, let's start by understanding the basics of chair drawing.
Understanding the Basics of Chair Drawing
Drawing a chair can seem like a daunting task, but with a solid understanding of the basics, you can create a realistic and detailed piece of art. To get started, it's essential to familiarize yourself with the anatomy of a chair, including its various components and how they relate to each other. This knowledge will serve as the foundation for your drawing, allowing you to accurately depict the chair's shape, proportions, and details. In addition to understanding chair anatomy, it's also crucial to choose the right drawing tools, such as pencils, paper, and erasers, to ensure that your drawing is precise and refined. Furthermore, setting up your drawing space in a way that promotes comfort and focus is vital for producing a high-quality piece of art. By mastering these fundamental aspects of chair drawing, you'll be well on your way to creating a stunning and realistic piece of art. Let's start by taking a closer look at the anatomy of a chair.
Familiarizing with Chair Anatomy
Choosing the Right Drawing Tools
When it comes to drawing a chair, having the right tools can make all the difference in achieving a precise and detailed representation. The first and most essential tool is a pencil, preferably a graphite pencil with a range of hardness levels (HB, 2B, 4B, 6B) to create varying line weights and shading. A sharpener is also necessary to keep the pencil point sharp and ready for use. For creating smooth lines and curves, a fine-tip pen or a technical pen with archival-quality ink is ideal. Additionally, a ruler or straightedge can help with drawing straight lines and measuring proportions. An eraser, such as a kneaded eraser or a white vinegar eraser, is also crucial for correcting mistakes and creating highlights. A sketchbook or drawing paper with a smooth finish is also recommended to prevent the pencil or pen from skipping or bleeding. Optional tools include a blending stump for creating subtle shading transitions, a tortillon for smoothing out graphite, and a drawing board for providing a stable and comfortable drawing surface. By investing in these essential drawing tools, you'll be well-equipped to create a detailed and accurate chair drawing.
Setting Up Your Drawing Space
Setting up your drawing space is a crucial step in creating an accurate and detailed drawing of a chair. To start, choose a quiet and comfortable workspace with good lighting. Natural light is ideal, but if that's not possible, invest in a good desk lamp to illuminate your paper. Next, gather all the necessary tools, including a pencil, eraser, sharpener, and paper. It's also a good idea to have a reference image of a chair nearby to study its shape, proportions, and details. Consider investing in a drawing board or a lap desk to provide a stable surface for your paper. This will help prevent your paper from moving around while you draw, allowing you to focus on creating a precise and accurate drawing. Additionally, keep your workspace organized and clutter-free to minimize distractions and ensure a smooth drawing process. By setting up your drawing space properly, you'll be able to focus on the task at hand and produce a high-quality drawing of a chair.
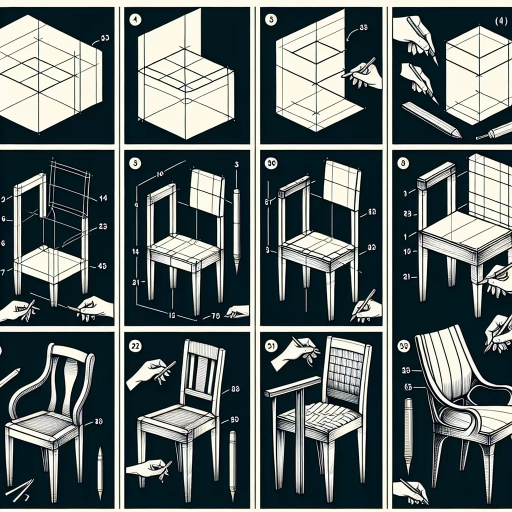
Sketching the Chair's Basic Shape
When it comes to sketching a chair, it's essential to start with the basics. The chair's overall shape is the foundation of your drawing, and getting it right will make all the difference in the end. To create a realistic and proportionate chair, you'll need to focus on three key elements: the seat and backrest, the armrests and legs, and the overall proportions of the chair. By breaking down the chair into these components, you'll be able to create a detailed and accurate drawing. In this article, we'll explore each of these elements in depth, starting with the seat and backrest. By understanding how to draw these fundamental parts of the chair, you'll be well on your way to creating a beautiful and realistic sketch. So, let's begin by drawing the seat and backrest, the foundation of your chair's basic shape.
Drawing the Seat and Backrest
Drawing the seat and backrest of a chair requires attention to detail and a clear understanding of the chair's overall design. Start by sketching the seat, which is typically a flat or slightly curved surface that provides support for the user. The seat should be positioned at a comfortable height, usually around 16-18 inches from the floor, and should be wide enough to accommodate the user's thighs. The backrest, on the other hand, should be designed to provide support for the user's back and should be positioned at a comfortable angle, usually around 100-110 degrees. When drawing the backrest, consider the type of chair you are drawing, as some chairs have a more upright backrest while others have a more reclined one. Additionally, pay attention to the shape and design of the backrest, as some chairs have a curved or rounded backrest while others have a flat or angular one. To draw the seat and backrest accurately, use a ruler or straightedge to draw the edges and a pencil to sketch the curves and contours. You can also use reference images or real-life observations to get a better understanding of the chair's design and proportions. By carefully drawing the seat and backrest, you can create a realistic and detailed drawing of a chair that accurately captures its design and functionality.
Adding the Armrests and Legs
Adding the armrests and legs to your chair drawing is a crucial step in bringing your design to life. Start by sketching the armrests, which are typically curved or angled to provide comfort and support for the user. The armrests should be positioned at a height that allows the user to rest their arms comfortably, usually around the same height as the seat. You can add some gentle curves or lines to indicate the shape and texture of the armrests. Next, move on to the legs, which can be straight, tapered, or curved, depending on the style of the chair. Make sure to space the legs evenly apart to create a stable base for the chair. You can also add some details such as feet or floor glides to prevent the chair from scratching the floor. As you add the armrests and legs, pay attention to the proportions and balance of the chair, making sure that it looks sturdy and comfortable. By adding these final details, you'll be able to visualize your chair design in a more complete and realistic way.
Defining the Chair's Overall Proportions
When defining the chair's overall proportions, it's essential to consider the relationship between its various components. Start by determining the chair's height, which is typically between 30 to 40 inches. The seat height should be around 18 to 20 inches, with the backrest extending upwards to create a comfortable sitting position. The armrests should be positioned about 2 to 3 inches below the top of the backrest, and the chair's width should be roughly 20 to 25 inches. The depth of the chair will depend on the design, but a general rule of thumb is to make it about 20 to 25 inches deep. When sketching the chair's proportions, use simple shapes and lines to block out the overall form, paying attention to the relationships between the different parts. Use a pencil to lightly draw a rectangle for the seat, a trapezoid for the backrest, and curved lines for the armrests. Refine the proportions as needed, ensuring that the chair looks balanced and visually appealing. By establishing a clear understanding of the chair's overall proportions, you'll be able to create a more accurate and detailed drawing.
Adding Details and Refining Your Drawing
Adding details and refining your drawing is a crucial step in creating a visually appealing and realistic piece of art. This process involves incorporating various elements that enhance the overall look and feel of your drawing. Three key aspects to focus on when adding details and refining your drawing are incorporating textures and patterns, adding shadows and depth, and refining lines and shapes. By incorporating these elements, you can add depth, dimension, and visual interest to your drawing. Incorporating textures and patterns, for instance, can help create a more realistic and engaging drawing by adding tactile and visual elements that draw the viewer's eye. This can be achieved through various techniques, such as hatching, cross-hatching, and stippling, which can be used to create a range of textures and patterns. By incorporating these techniques into your drawing, you can add a new level of depth and visual interest, making your drawing more engaging and realistic.
Incorporating Textures and Patterns
Incorporating textures and patterns can add depth and visual interest to your chair drawing. To incorporate textures, start by identifying the different materials that make up the chair, such as wood, metal, or fabric. Then, use a range of lines and shading techniques to suggest the texture of each material. For example, you can use hatching and cross-hatching to create a smooth, even texture for wood, or use stippling to create a more rough, tactile texture for metal. To incorporate patterns, look for opportunities to add visual interest to your chair drawing. For example, you can add a pattern to the upholstery, such as stripes or florals, or add a decorative pattern to the wood or metal components. Use a range of lines and shapes to create the pattern, and pay attention to the scale and proportion of the pattern in relation to the rest of the chair. By incorporating textures and patterns, you can add a new level of depth and visual interest to your chair drawing, and create a more engaging and realistic image. Additionally, you can also experiment with different techniques such as layering, blending, and smudging to achieve unique textures and patterns. It's also important to consider the style and period of the chair you are drawing, as different styles and periods often have distinct textures and patterns associated with them. By paying attention to these details, you can create a more accurate and authentic representation of the chair.
Adding Shadows and Depth
Refining Lines and Shapes
Refining lines and shapes is a crucial step in the drawing process, particularly when it comes to drawing a chair. This stage involves reviewing and revising the overall structure and proportions of your chair, ensuring that all the lines and shapes are accurate and well-defined. To refine your lines and shapes, start by taking a step back and evaluating your drawing as a whole. Look for any areas where the lines may be wobbly, uneven, or inconsistent, and make adjustments as needed. Pay particular attention to the chair's legs, seat, and backrest, as these are the most critical components of the chair's structure. Use a ruler or other straightedge to help you draw straight lines and smooth curves, and don't be afraid to erase and re-draw any lines that aren't quite right. As you refine your lines and shapes, also consider the chair's proportions and overall balance. Make sure that the chair's various components are in harmony with one another, and that the chair looks stable and visually appealing. By taking the time to refine your lines and shapes, you'll be able to create a more polished and professional-looking drawing of a chair.