How To Draw An Octopus
Here is the introduction paragraph: Drawing an octopus can be a fun and creative activity, but it requires some understanding of its unique anatomy and some artistic skills. To create a realistic and detailed drawing of an octopus, you need to start by understanding its body structure, including its eight arms, bulbous body, and distinctive head. Once you have a good grasp of the octopus's anatomy, you can begin sketching its basic shapes and lines, using simple forms to capture its overall shape and proportions. From there, you can refine your drawing by adding texture, shading, and color to bring your octopus to life. In this article, we will explore these three key steps in detail, starting with the foundation of any successful drawing: understanding the anatomy of an octopus.
Understanding the Anatomy of an Octopus
The octopus is a fascinating and highly complex creature, with a unique anatomy that has captivated the imagination of scientists and marine enthusiasts alike. To truly understand the octopus, it is essential to delve into its intricate body structure, identifying the key features that set it apart from other marine animals. By observing the texture and patterns of its skin, we can gain a deeper appreciation for the remarkable adaptability of this cephalopod. In this article, we will explore the anatomy of the octopus, starting with a closer look at its body structure, which is comprised of a soft, boneless body, a large head, and eight flexible arms. By familiarizing ourselves with the body structure of the octopus, we can begin to appreciate the remarkable complexity and diversity of this incredible creature.
Familiarizing with the Body Structure
Familiarizing with the body structure of an octopus is essential to draw it accurately. An octopus has a unique body shape, consisting of a soft, boneless body that can change shape to fit through narrow spaces. The body is divided into three main parts: the mantle, the head, and the arms. The mantle is the largest part of the body, making up about two-thirds of the octopus's total length. It is a muscular, sac-like structure that contains the octopus's internal organs, including the gills, heart, and digestive system. The head is located at the top of the mantle and contains the octopus's brain, eyes, and mouth. The arms, also known as tentacles, are long, flexible, and covered with suckers that help the octopus crawl, swim, and grasp objects. Each arm has hundreds of suckers, which are lined with tiny teeth that help the octopus grip and crawl. The arms are also highly flexible, allowing the octopus to twist and turn them in any direction. Understanding the body structure of an octopus is crucial to drawing it accurately, as it will help you capture its unique shape and movements. By familiarizing yourself with the different parts of the octopus's body, you can create a more realistic and detailed drawing.
Identifying the Key Features
When it comes to drawing an octopus, identifying the key features is crucial to creating a realistic and detailed representation. The octopus's body is typically divided into three main parts: the mantle, the arms, and the head. The mantle is the main body of the octopus, which contains the internal organs and is usually rounded or oval in shape. The arms, also known as tentacles, are long, flexible, and covered with suckers, which the octopus uses to crawl, grasp, and manipulate objects. The head is the front part of the octopus, which contains the eyes, mouth, and brain. Other key features to note include the eyes, which are usually large and expressive, and the siphon, a tube-like structure that the octopus uses to expel water and move through the water. Additionally, the texture and pattern of the octopus's skin, which can vary depending on the species, should also be taken into account when drawing. By accurately depicting these key features, artists can create a detailed and realistic drawing of an octopus.
Observing the Texture and Patterns
Observing the texture and patterns of an octopus is a crucial step in accurately drawing one. The texture of an octopus's skin is often described as smooth and slightly rubbery, with a subtle sheen to it. However, this can vary depending on the species and the individual octopus. Some octopuses have a more mottled or bumpy texture, while others may have a more uniform, velvety appearance. In addition to the overall texture, octopuses also have a range of patterns and markings on their skin, including stripes, spots, and swirling shapes. These patterns can be used for camouflage, communication, and even to express the octopus's mood. When drawing an octopus, it's essential to observe and replicate these patterns and textures as accurately as possible, using a range of techniques such as hatching, cross-hatching, and stippling to create a realistic and detailed representation. By paying close attention to the texture and patterns of an octopus, artists can create a drawing that is not only visually striking but also informative and engaging.
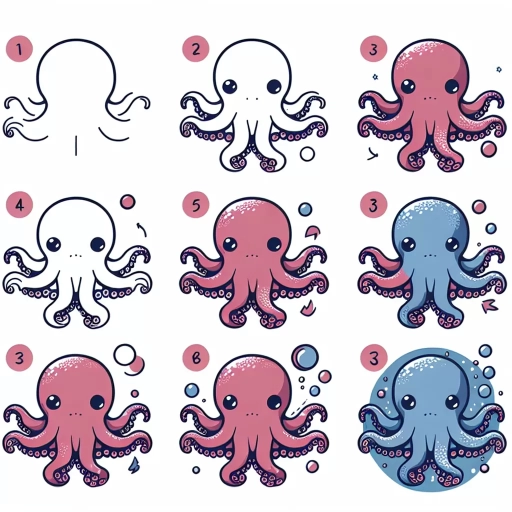
Sketching the Octopus: Basic Shapes and Lines
Sketching the octopus can be a fun and creative activity, but it can also be intimidating, especially for beginners. To make it easier, it's essential to break down the octopus's body into basic shapes and lines. By doing so, you'll be able to create a more accurate and proportionate drawing. In this article, we'll explore the basics of sketching an octopus, including breaking down the body into basic shapes, creating the tentacles with smooth lines, and adding the suckers and other details. By following these steps, you'll be able to create a beautiful and realistic octopus drawing. So, let's start by breaking down the body into basic shapes, which will provide the foundation for our entire drawing.
Breaking Down the Body into Basic Shapes
When drawing an octopus, it's essential to break down the body into basic shapes to simplify the process and achieve a more accurate representation. Start by visualizing the octopus's body as a combination of simple forms, such as spheres, cylinders, and rectangles. The mantle, which is the main body of the octopus, can be represented as a large, rounded rectangle or a slightly flattened sphere. The arms, on the other hand, can be broken down into long, curved cylinders, with each segment tapering slightly towards the tip. The suckers on the arms can be represented as small, rounded rectangles or ovals. By breaking down the body into these basic shapes, you can more easily capture the overall proportions and structure of the octopus, making it easier to add details and textures later on. Additionally, using basic shapes can help you achieve a more symmetrical and balanced drawing, which is particularly important when drawing an octopus with its many arms and suckers. By simplifying the body into basic shapes, you can create a solid foundation for your drawing and ensure that your octopus looks realistic and visually appealing.
Creating the Tentacles with Smooth Lines
To create the tentacles with smooth lines, start by sketching a long, curved line that extends from the body of the octopus. Imagine a gentle, flowing motion as you draw the line, keeping it smooth and continuous. As you add more tentacles, vary the length and curvature of each one to create a sense of movement and fluidity. Use a range of gentle, sweeping motions to suggest the soft, boneless texture of the tentacles. To add depth and dimension, use a range of line weights, with thicker lines at the base of the tentacles and thinner lines towards the tips. You can also use hatching and cross-hatching techniques to create texture and shading, giving the tentacles a sense of volume and tactility. As you work, pay attention to the way the tentacles interact with each other, overlapping and entwining to create a sense of dynamic movement. By focusing on smooth, flowing lines and gentle, organic shapes, you can create tentacles that seem to pulse with life and energy.
Adding the Suckers and Other Details
Adding suckers and other details to your octopus drawing can bring it to life and make it more realistic. To add suckers, start by drawing small, rounded shapes along the arms of the octopus, making sure to space them out evenly. You can also add a slight curve to each sucker to give it a more natural appearance. For a more detailed look, you can add a small circle in the center of each sucker to represent the mouth. Additionally, you can add some texture to the suckers by drawing short, curved lines that radiate from the center of each one. To add other details, such as eyes, a mouth, and texture to the body, you can use a range of lines and shapes. For the eyes, use a small oval shape and add a dot in the center to represent the pupil. For the mouth, use a small, curved line that follows the shape of the body. To add texture to the body, use short, curved lines that follow the shape of the body, creating a soft, rounded appearance. You can also add some shading to your drawing to give it depth and dimension. By adding these details, you can create a realistic and engaging octopus drawing that showcases your artistic skills.
Refining the Drawing: Texture, Shading, and Color
Refining the drawing requires attention to detail and a focus on creating a realistic representation of the subject. To achieve this, artists must consider three key elements: texture, shading, and color. By incorporating these elements, artists can add depth, dimension, and visual interest to their drawings. In this article, we will explore how to refine a drawing by adding texture to the skin and suckers, creating depth with shading and shadows, and choosing the right colors for a realistic look. By mastering these techniques, artists can take their drawings to the next level and create stunning, lifelike representations of their subjects. Let's start by examining how to add texture to the skin and suckers, a crucial step in creating a realistic and engaging drawing.
Adding Texture to the Skin and Suckers
Adding texture to the skin and suckers of your octopus drawing can bring a new level of realism and depth to your artwork. To start, use a range of hatching and cross-hatching techniques to create a mottled, uneven texture on the skin. Vary the density and direction of your lines to suggest the soft, boneless flesh of the octopus. Pay particular attention to the areas around the suckers, where the skin tends to be thicker and more wrinkled. Use short, curved lines to indicate the edges of the suckers, and add a series of concentric circles to suggest the suckers' rounded shape. To add further texture, use a fine-tip pen or pencil to draw a series of tiny, branching lines that radiate from the center of each sucker. These lines should be delicate and feathery, suggesting the soft, flexible texture of the sucker's rim. Finally, use a range of shading techniques to add depth and dimension to your octopus's skin and suckers. Pay particular attention to the areas where the skin folds and creases, using darker shading to suggest the shadows that form in these areas. By adding texture and shading to your octopus drawing, you can create a rich, detailed, and highly realistic portrait of this fascinating creature.
Creating Depth with Shading and Shadows
Creating depth with shading and shadows is a crucial step in bringing your octopus drawing to life. Shading and shadows can create the illusion of three-dimensionality, making your octopus appear more realistic and engaging. To achieve this, start by identifying the light source in your drawing. This will help you determine where the shadows will fall and how intense they will be. Next, use a range of shading techniques, such as hatching, cross-hatching, and stippling, to create different levels of shading. Hatching involves creating parallel lines that follow the contours of the octopus's body, while cross-hatching involves layering lines at different angles to create deeper shadows. Stippling involves creating patterns of small dots to create texture and shading. By varying the density and pattern of your shading, you can create a range of values, from light to dark, that will add depth and dimension to your drawing. Additionally, pay attention to the edges of your shading, as soft edges can create a sense of subtlety and nuance, while hard edges can create a sense of definition and clarity. By carefully balancing light and dark, you can create a sense of volume and depth in your octopus drawing, drawing the viewer's eye into the image and creating a sense of engagement and wonder.
Choosing the Right Colors for a Realistic Look
When it comes to creating a realistic octopus drawing, choosing the right colors is crucial. A realistic octopus should have a mottled, camouflage-like appearance, with a mix of browns, tans, and grays. Start by selecting a base color that matches the octopus's surroundings, such as a sandy beige or a rocky gray. Then, add layers of color to create depth and dimension. Use a range of earth tones, including sienna, umber, and ochre, to create a warm, natural look. To add a pop of color, incorporate subtle hints of blue or green, which can be found in the suckers or the edges of the tentacles. Avoid using bright, bold colors, as they can detract from the realism of the drawing. Instead, focus on creating a subtle, nuanced color palette that captures the octopus's unique texture and pattern. By carefully selecting and blending colors, you can create a realistic octopus drawing that looks like it's about to crawl off the page.