How To Remove Gpu
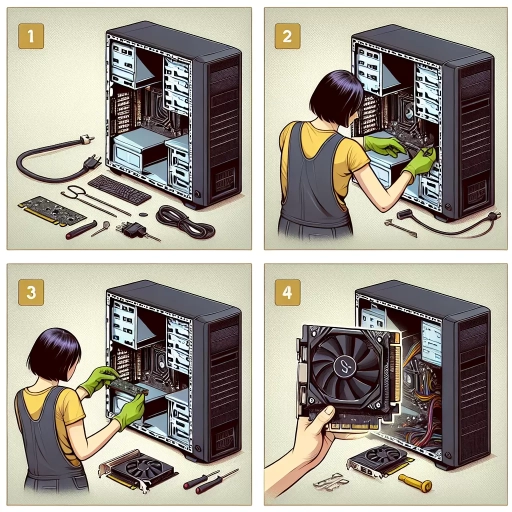
Removing a graphics processing unit (GPU) from a computer can be a daunting task, especially for those who are new to computer hardware. However, with the right guidance, it can be done safely and efficiently. In this article, we will walk you through the step-by-step process of removing a GPU, covering essential preparation, the actual removal process, and the final cleaning and component removal. To begin, it's crucial to prepare your system before removing the GPU, ensuring that you have the necessary tools and have taken the required safety precautions. This preparation phase is critical in preventing damage to your computer's components and ensuring a smooth removal process. In the following sections, we will delve into the preparation process, followed by the removal of the GPU from the motherboard, and finally, the removal of additional components and cleaning. By the end of this article, you will be equipped with the knowledge and confidence to remove your GPU safely and efficiently. To get started, let's begin with the preparation phase.
Preparation Before Removing the GPU
Before removing the GPU, it is essential to take several precautions to ensure a safe and successful process. First, it is crucial to shut down the computer and unplug the power cord to prevent any accidental power-ons or electrical shocks. Additionally, grounding yourself to prevent static electricity damage is vital to protect the sensitive components of the GPU and other computer parts. Furthermore, removing any external cables and peripherals connected to the GPU will provide clear access and prevent any damage to these components during the removal process. By following these steps, you can ensure a smooth and safe removal of the GPU. To begin, let's start with the first step: shutting down the computer and unplugging the power cord.
Shut Down the Computer and Unplug the Power Cord
When removing a GPU, it's essential to take the necessary precautions to ensure a safe and successful process. Before you start, shut down the computer and unplug the power cord. This step is crucial in preventing any accidental power-ons or electrical shocks. Shutting down the computer will also help prevent any data loss or corruption. Once the computer is off, unplug the power cord from the back of the computer case. This will ensure that the system is completely powered down and safe to work on. Additionally, unplug any other cables connected to the computer, such as the keyboard, mouse, and monitor. This will give you clear access to the interior of the computer case and prevent any accidental connections or disconnections. By shutting down the computer and unplugging the power cord, you'll be able to work on the GPU removal process with confidence and safety.
Ground Yourself to Prevent Static Electricity Damage
Grounding yourself is a crucial step to prevent static electricity damage when working with sensitive computer components like graphics cards. Static electricity can be generated by friction between clothing and other materials, and can reach voltages of up to 1,500 volts. This can be enough to damage the sensitive electronics on a graphics card, causing it to malfunction or fail completely. To ground yourself, touch a grounded metal object such as a tap or door handle, or wear an anti-static wrist strap connected to a grounded object. This will discharge any static electricity from your body, preventing it from coming into contact with the graphics card. It's also a good idea to work on an anti-static mat or surface, which can help to dissipate any static electricity that may still be present. By taking these simple precautions, you can ensure that your graphics card is protected from static electricity damage, and that it continues to function properly.
Remove Any External Cables and Peripherals
Before removing the GPU, it is essential to disconnect any external cables and peripherals connected to it. This includes HDMI, DisplayPort, DVI, and power cables. Start by locating the cables connected to the GPU and gently pull them out from the ports. Be careful not to touch any of the internal components or the GPU itself to prevent static electricity damage. If you have any external devices such as a graphics tablet or a capture card connected to the GPU, disconnect them as well. Additionally, if you have any peripherals like a keyboard or mouse connected to the computer, it's a good idea to disconnect them to prevent any accidental keyboard or mouse inputs during the removal process. Once all the external cables and peripherals are disconnected, you can proceed with removing the screws that hold the GPU in place.
Removing the GPU from the Motherboard
Removing a GPU from a motherboard can be a delicate process, but with the right steps, it can be done safely and efficiently. To start, it's essential to locate the GPU slot on the motherboard, which is usually a PCIe slot. Once you've identified the slot, you'll need to release the GPU from the slot by removing the screws that hold it in place. After that, you can gently pull the GPU out of the slot, taking care not to touch any of the electrical components. In this article, we'll walk you through each of these steps in detail, starting with locating the GPU slot on the motherboard.
Locate the GPU Slot on the Motherboard
To locate the GPU slot on the motherboard, start by identifying the PCIe slots, which are usually located on the right-hand side of the motherboard, near the CPU socket. The PCIe slots are typically labeled as x1, x4, x8, or x16, with the x16 slot being the most common for graphics cards. Look for the slot that matches the key on your graphics card, which is usually a gold-colored tab on the card's connector. The GPU slot may also be labeled as "PCIe x16" or "GPU" on the motherboard. If you're still unsure, consult your motherboard manual or online documentation for specific instructions. Additionally, you can also look for the GPU slot by searching for the slot that is closest to the CPU and has a retention clip or screw that holds the graphics card in place. Once you've located the GPU slot, you can proceed to remove the GPU from the motherboard.
Release the GPU from the Slot by Removing the Screws
Here is the paragraphy: To release the GPU from the slot, you'll need to remove the screws that hold it in place. These screws are usually located at the back of the computer case, near the PCIe slot where the GPU is installed. You'll need a screwdriver, preferably a Phillips head screwdriver, to remove these screws. Gently turn the screws counterclockwise until they are completely removed. Be careful not to strip the screws or damage the surrounding material. Once the screws are removed, you should be able to gently pull the GPU out of the slot. If it doesn't come out easily, you may need to wiggle it back and forth slightly to dislodge it from the slot. Be careful not to touch any of the electrical components on the GPU or the motherboard, as this can cause damage or static electricity. With the screws removed, you should now be able to safely remove the GPU from the slot and proceed with the next steps to completely remove it from the motherboard.
Gently Pull the GPU Out of the Slot
When removing the GPU from the motherboard, it's essential to handle the component with care to avoid damaging the card, the slot, or the motherboard itself. To gently pull the GPU out of the slot, start by locating the screws that hold the GPU in place. These screws are usually located at the rear of the PCIe slot and may be hidden by a small plastic or metal clip. Remove the screws by turning them counterclockwise, and then carefully lift the clip or release the latch that secures the GPU. With the screws and clip removed, you should be able to gently rock the GPU back and forth while pulling it out of the slot. Be careful not to apply too much force, as this can damage the PCIe slot or the GPU's gold contacts. Instead, use a gentle prying motion to coax the GPU out of the slot. If the GPU is stuck, you can try wiggling it from side to side or using a plastic spudger to carefully pry it loose. Once the GPU is removed, inspect the PCIe slot and the GPU's gold contacts for any signs of damage or debris. Clean the slot and the contacts with compressed air or a soft brush to ensure a secure connection when reinstalling the GPU.
Removing Additional Components and Cleaning
When it comes to removing additional components and cleaning, it's essential to take a thorough approach to ensure your system runs smoothly and efficiently. This process involves removing any additional cooling systems or brackets that may be obstructing the GPU, disconnecting any power cables from the GPU, and cleaning the area around the GPU slot to prevent dust buildup. By taking these steps, you can prevent overheating, improve airflow, and maintain the overall health of your system. To begin, it's crucial to remove any additional cooling systems or brackets that may be hindering the GPU's performance.
Remove Any Additional Cooling Systems or Brackets
When removing a GPU, it's essential to take out any additional cooling systems or brackets that may be attached to the card. These components can include heat sinks, fans, and shrouds, which are designed to improve airflow and reduce temperatures. To remove these components, start by locating the screws that hold them in place. These screws are usually located on the back or top of the GPU and may be hidden by a plastic or metal cover. Once you've found the screws, use a screwdriver to remove them, taking care not to strip the screws or damage the surrounding components. With the screws removed, gently pry the cooling system or bracket away from the GPU, taking care not to touch any of the electrical components. If the cooling system is stuck, you can use a plastic spudger or a similar tool to carefully pry it loose. Once the cooling system or bracket is removed, set it aside and proceed with removing any additional components, such as the GPU's power connectors or data cables. By removing these additional components, you'll be able to access the GPU's mounting bracket and remove the card from the system.
Disconnect Any Power Cables from the GPU
When removing a GPU, it's essential to disconnect any power cables from the graphics card to prevent any accidental power-ons or electrical shocks. Start by locating the power connectors on the GPU, which are usually 6-pin or 8-pin PCIe power connectors. Gently grasp the connector and pull it straight out of the GPU's power port. Be careful not to touch any of the internal components or wires, as this can cause damage to the GPU or other components. If the power cable is stuck, do not force it, as this can cause damage to the connector or the GPU. Instead, try wiggling the connector gently back and forth while pulling it out. Once the power cable is removed, set it aside and repeat the process for any additional power cables connected to the GPU. It's also a good idea to label the power cables so you can easily identify which one goes where when reassembling the system. By disconnecting the power cables, you'll be able to safely remove the GPU and prevent any potential electrical hazards.
Clean the Area Around the GPU Slot to Prevent Dust Buildup
Cleaning the area around the GPU slot is a crucial step in preventing dust buildup and ensuring optimal performance. Dust accumulation in this area can cause overheating, reduced airflow, and even damage to the GPU. To clean the area, start by using compressed air to gently blow away any loose dust particles. Be careful not to spray the can too closely to the components, as the forceful air stream can damage the delicate parts. Next, use a soft-bristled brush or a small, dry paintbrush to gently sweep away any remaining dust or debris from the GPU slot and surrounding areas. Avoid using liquids or chemicals, as they can damage the components or leave residue. For more stubborn dust buildup, you can use a can of compressed air with a narrow nozzle to target the specific area. Hold the can upright and spray the air in short bursts, moving the can around the area to loosen the dust. Once you've removed the dust, use a soft cloth to wipe down the area and remove any remaining particles. Regular cleaning of the area around the GPU slot can help prevent dust buildup and ensure your computer runs smoothly and efficiently.