How To Sew A Dress
Sewing a dress can be a fun and rewarding experience, allowing you to create a unique and personalized garment that reflects your style and creativity. With the right guidance and techniques, anyone can learn to sew a dress, regardless of their skill level or experience. To get started, it's essential to understand the basics of sewing a dress, including the fundamental techniques and tools required. Before diving into the project, you'll also need to prepare your pattern and fabric, selecting the right materials and making any necessary adjustments. Finally, once you've completed the initial steps, you'll be ready to assemble and finish your dress, adding the final touches to create a beautiful and professional-looking garment. In this article, we'll take a closer look at the process of sewing a dress, starting with the basics.
Understanding the Basics of Sewing a Dress
Sewing a dress can be a fun and rewarding experience, but it requires some basic knowledge and skills. To get started, it's essential to understand the fundamentals of sewing a dress, including choosing the right fabric, understanding dress patterns and measurements, and having the necessary tools and equipment. Choosing the right fabric is crucial, as it can make or break the overall look and feel of your dress. With so many different types of fabrics available, it can be overwhelming to decide which one to use. In this article, we will explore the basics of sewing a dress, starting with the first step: choosing the right fabric for your dress. By understanding the different types of fabrics and their characteristics, you can make an informed decision and set yourself up for success in creating a beautiful and well-made dress.
Choosing the Right Fabric for Your Dress
When it comes to sewing a dress, choosing the right fabric is crucial. The type of fabric you select will not only affect the overall look and feel of your dress but also its durability and comfort. With so many fabrics to choose from, it can be overwhelming to decide which one is right for your project. To make the process easier, consider the season, occasion, and style of your dress. For example, if you're making a summer dress, lightweight fabrics like cotton, linen, or rayon are ideal. For a formal event, consider luxurious fabrics like silk, satin, or velvet. If you're making a casual, everyday dress, cotton, polyester, or blends are great options. Additionally, think about the drape and texture of the fabric. Do you want a flowy, loose-fitting dress or a more structured, fitted one? Consider the weight and thickness of the fabric as well. Heavier fabrics like denim or canvas are perfect for a more structured dress, while lighter fabrics like chiffon or organza are better suited for a flowy, ethereal look. It's also essential to consider the care and maintenance of the fabric. Some fabrics, like silk or wool, require dry cleaning, while others, like cotton or polyester, can be machine washed and dried. By taking the time to choose the right fabric for your dress, you'll ensure that your finished project is not only beautiful but also comfortable and long-lasting.
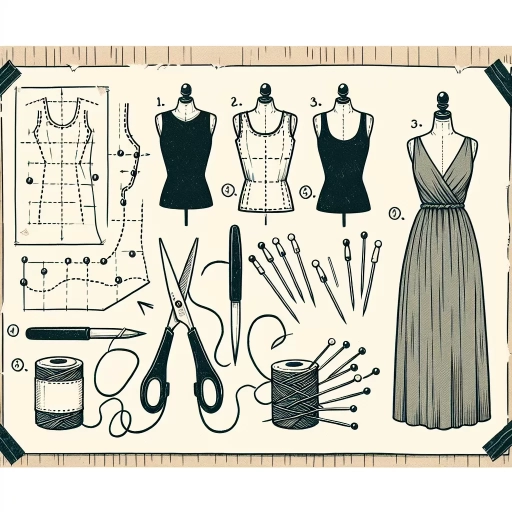
Understanding Dress Patterns and Measurements
Understanding dress patterns and measurements is a crucial step in sewing a dress that fits well and looks great. A dress pattern is a template or blueprint that guides you in cutting and sewing your fabric to create a specific style of dress. Patterns usually come with a set of measurements and instructions that help you achieve a perfect fit. To start, you need to take your body measurements, including your bust, waist, hips, and length, to determine your size and ensure that the pattern you choose will fit you well. You should also consider the type of fabric you will be using, as different fabrics have different stretch and drape properties that can affect the fit of your dress. Once you have your measurements and have chosen a pattern, you can begin to adjust the pattern to fit your body perfectly. This may involve lengthening or shortening the pattern, adjusting the bust or waistline, or adding darts to create a more fitted silhouette. By understanding dress patterns and measurements, you can create a dress that not only looks great but also fits you perfectly, making you feel confident and beautiful.
Essential Tools and Equipment for Sewing
Sewing a dress requires a variety of essential tools and equipment to ensure a professional-looking finish. A sewing machine is the most critical tool, and it's recommended to invest in a good-quality machine that can handle various fabrics and stitches. A serger or overlock machine is also necessary for finishing seams and preventing fraying. Other essential tools include a sewing gauge, seam ripper, scissors, pins, and a tape measure. A rotary cutter and mat are also useful for cutting fabric accurately and efficiently. Additionally, a iron and ironing board are necessary for pressing seams and fabrics, while a sewing box or basket can help keep all the tools and supplies organized. Furthermore, a dress form or mannequin can be helpful in fitting and adjusting the dress as you sew. Other useful equipment includes a walking foot or even feed foot for sewing thick or slippery fabrics, and a blind hem foot for creating a nearly invisible hem. By having these essential tools and equipment, you'll be well-equipped to tackle any sewing project, including sewing a dress.
Preparing Your Pattern and Fabric
Preparing your pattern and fabric is a crucial step in the dress-making process. It requires attention to detail, patience, and a clear understanding of the pattern instructions. To ensure a successful outcome, it's essential to read and interpret your dress pattern accurately, cut out your fabric with precision, and mark and label your fabric pieces correctly. By doing so, you'll be able to create a beautiful and well-fitting dress that meets your expectations. In this article, we'll explore these three essential steps in more detail, starting with the importance of reading and interpreting your dress pattern. By understanding the pattern instructions, you'll be able to identify the different components of the dress, such as the bodice, skirt, and sleeves, and ensure that you have all the necessary pieces to complete the project. This will set the foundation for accurate cutting and marking, ultimately leading to a professional-looking finish. Let's dive into the first step: reading and interpreting your dress pattern.
Reading and Interpreting Your Dress Pattern
When it comes to sewing a dress, understanding your dress pattern is crucial to achieving a professional-looking result. A dress pattern typically consists of several components, including the front and back bodice pieces, skirt pieces, sleeves, and any additional details such as pockets or a zipper. To read and interpret your pattern, start by examining the envelope or packaging that it came in. This will usually include a diagram of the finished garment, as well as a list of the pieces included in the pattern. Next, look at the pattern pieces themselves, which will be labeled with letters or numbers. These labels correspond to the diagram on the envelope, and will help you identify which piece is which. The pattern pieces will also include markings such as grain lines, fold lines, and notches, which are essential for ensuring that your fabric is cut and sewn correctly. Grain lines indicate the direction of the fabric's warp threads, and should always be parallel to the selvage edge. Fold lines indicate where the fabric should be folded, and notches indicate where the fabric should be matched up with other pieces. By carefully reading and interpreting your dress pattern, you can ensure that your finished garment is accurate, well-fitting, and professional-looking.
Cutting Out Your Fabric Accurately
Cutting out your fabric accurately is a crucial step in the dress-making process. To ensure a professional finish, it's essential to take your time and follow a few simple steps. Start by laying out your fabric on a flat surface, smoothing out any wrinkles or creases. Next, place your pattern pieces on the fabric, making sure to align them with the grain line, which is indicated by a series of parallel lines on the pattern. Use weights or pins to hold the pattern pieces in place, ensuring they don't shift or move during the cutting process. When cutting, use sharp scissors or a rotary cutter and mat to prevent fraying and ensure clean, straight edges. Cut slowly and carefully, following the pattern lines precisely, and make sure to cut on the correct side of the fabric, as indicated by the pattern. If you're using a printed fabric, make sure to cut with the right side facing up to avoid any mistakes. To add an extra layer of accuracy, consider using a cutting mat and ruler to help guide your scissors or rotary cutter. By taking the time to cut out your fabric accurately, you'll be rewarded with a dress that fits perfectly and looks professional.
Marking and Labeling Your Fabric Pieces
Marking and labeling your fabric pieces is a crucial step in the sewing process, especially when working with a pattern. It ensures that you cut out the correct pieces and assemble them in the right order. To start, carefully read through your pattern instructions and identify the different fabric pieces required. Use a ruler or measuring tape to measure and mark the grain line, fold lines, and any other relevant markings on each piece. You can use a variety of tools to mark your fabric, including tailor's chalk, marking pens, or even a tracing wheel and paper. When labeling your pieces, use a permanent marker to write the piece number, name, and any relevant notations, such as "right side up" or "wrong side up." It's also a good idea to label the grain line and any other important markings. Consider using a labeling system, such as using different colors for different pieces or using a specific symbol to indicate the right side of the fabric. By taking the time to accurately mark and label your fabric pieces, you'll avoid mistakes and ensure a professional-looking finish. Additionally, consider using a cutting mat and rotary cutter to cut out your fabric pieces, as this will help prevent errors and make the process more efficient. By following these steps, you'll be able to accurately cut out and assemble your fabric pieces, setting yourself up for success in the sewing process.
Assembling and Finishing Your Dress
Assembling and finishing your dress is a crucial step in the garment construction process. It requires attention to detail, patience, and practice to achieve a professional-looking finish. In this article, we will guide you through the process of assembling and finishing your dress, covering essential techniques such as sewing your dress pieces together, adding zippers, buttons, and other fasteners, and finishing seams and hemming your dress. By following these steps, you will be able to create a beautiful and well-made dress that you can wear with confidence. To start, let's begin with the first step: sewing your dress pieces together.
Sewing Your Dress Pieces Together
Sewing your dress pieces together is a crucial step in the dress-making process. To start, make sure you have all the necessary pieces cut out and ready to go. Begin by sewing the bodice pieces together, starting with the front and back pieces. Place the right sides together and sew along the sides and shoulders, leaving a small opening for turning the bodice right side out. Next, sew the skirt pieces together, starting with the front and back pieces, and then attaching the sides. Make sure to match the seams carefully and press them as you go to create a crisp fold. Once the bodice and skirt are complete, it's time to attach them together. Place the bodice on top of the skirt, right sides together, and sew along the waistline. Make sure to leave a small opening for turning the dress right side out. Finally, turn the dress right side out and press the seams to create a professional finish. Topstitching can also be added to give the dress a decorative touch. It's essential to take your time and be patient when sewing your dress pieces together, as this step can make or break the overall look of your finished dress.
Adding Zippers, Buttons, and Other Fasteners
Adding zippers, buttons, and other fasteners is a crucial step in assembling and finishing your dress. To add a zipper, start by pinning the zipper to the seam allowance, making sure it is centered and even. Then, sew the zipper in place using a zipper foot or a regular sewing foot, depending on the type of zipper you are using. For buttons, mark the placement of the buttons on the dress, then sew them in place using a needle and thread. Make sure to leave a small space between each button to allow for easy fastening. Other fasteners, such as snaps or hooks and eyes, can be added in a similar way. It's also important to consider the type of fabric you are working with and choose fasteners that are suitable for it. For example, delicate fabrics may require smaller or more discreet fasteners, while thicker fabrics may require larger or more robust ones. Additionally, make sure to follow the manufacturer's instructions for the specific type of fastener you are using, as different types may have different installation requirements. By adding the right fasteners to your dress, you can ensure a professional-looking finish and a secure and comfortable fit.
Finishing Seams and Hemming Your Dress
Finishing seams and hemming are crucial steps in completing your dress. To finish seams, you can use a serger or a zigzag stitch on your sewing machine to prevent fraying. Alternatively, you can use a seam finisher or a binding technique to enclose the seam allowance. For a professional finish, you can also use a French seam or a Hong Kong seam. When it comes to hemming, you can use a blind hem stitch or a narrow hem foot to create a nearly invisible hem. You can also use a serger or a coverstitch machine to finish the hem allowance. To hem your dress, start by folding the raw edge of the hem allowance up by the desired amount, then press. Fold the hem allowance up again by the same amount, and press. Place the hem allowance under the narrow hem foot or use a blind hem stitch to sew in place. Make sure to backstitch at the beginning and end of the seam to secure it. For a more polished finish, you can also add a hem facing or a hem tape to the inside of the hem allowance. By taking the time to finish your seams and hem your dress properly, you can ensure a professional-looking finish that will make your dress look and feel great.