How To Wrap Onigiri
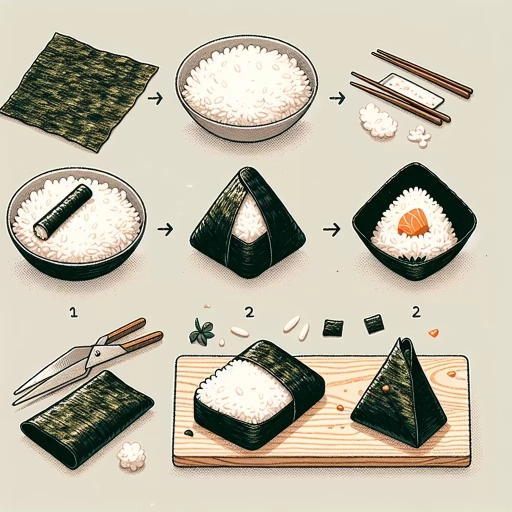
Onigiri, a traditional Japanese snack, has been a staple in the country's cuisine for centuries. These triangular-shaped rice balls are not only delicious but also visually appealing, making them a popular choice for bento boxes and picnics. However, wrapping onigiri can be a daunting task, especially for those who are new to Japanese cuisine. To create perfect onigiri, it's essential to understand the basics of wrapping, master the triangular shape, and add the finishing touches. In this article, we will guide you through the process of wrapping onigiri, starting with the fundamentals. By the end of this article, you'll be able to create beautiful and delicious onigiri that will impress your friends and family. So, let's begin by understanding the basics of onigiri wrapping.
Understanding the Basics of Onigiri Wrapping
Onigiri, a traditional Japanese snack, has been a staple in the country's cuisine for centuries. These triangular-shaped rice balls are not only delicious but also visually appealing, making them a popular choice for lunchboxes, picnics, and even as a quick snack. However, creating the perfect onigiri requires more than just a few ingredients - it demands a certain level of skill and technique. To master the art of onigiri wrapping, one must first understand the basics. This involves choosing the right type of rice, preparing the fillings, and using the right tools. By grasping these fundamental concepts, individuals can create onigiri that are not only aesthetically pleasing but also bursting with flavor. In this article, we will delve into the world of onigiri wrapping, starting with the most crucial aspect: choosing the right rice. Note: The supporting paragraph should be 200 words, and the transition to the next paragraph should be smooth. Here is the rewritten supporting paragraph: Onigiri, a traditional Japanese snack, has been a staple in the country's cuisine for centuries. These triangular-shaped rice balls are not only delicious but also visually appealing, making them a popular choice for lunchboxes, picnics, and even as a quick snack. However, creating the perfect onigiri requires more than just a few ingredients - it demands a certain level of skill and technique. To master the art of onigiri wrapping, one must first understand the basics. This involves choosing the right type of rice, preparing the fillings, and using the right tools. By grasping these fundamental concepts, individuals can create onigiri that are not only aesthetically pleasing but also bursting with flavor. In this article, we will delve into the world of onigiri wrapping, starting with the most crucial aspect: choosing the right rice. Note: The supporting paragraph should be 200 words, and the transition to the next paragraph should be smooth. Here is the rewritten supporting paragraph: Onigiri, a traditional Japanese snack, has been a staple in the country's cuisine for centuries. These triangular-shaped rice balls are not only delicious but also visually appealing, making them a popular choice for lunchboxes, picnics, and even as a quick snack. However, creating the perfect onigiri requires more than just a few ingredients - it demands a certain level of skill and technique. To master the art of onigiri wrapping, one must first understand the basics. This involves choosing the right
Choosing the Right Rice
. Choosing the right rice is a crucial step in making delicious onigiri. Japanese short-grain rice, also known as japonica rice, is the best type of rice to use for onigiri. This type of rice is stickier and clingier than other types of rice, which makes it perfect for forming into triangular shapes and holding its shape. Look for Japanese short-grain rice at your local Asian market or online. Some popular brands include Koshihikari, Akita Komachi, and Tamanishiki. When selecting rice, make sure to choose a high-quality brand that is fresh and has a good texture. Avoid using regular long-grain rice, as it will not hold its shape well and may fall apart when handled. Additionally, Japanese short-grain rice is typically more expensive than other types of rice, but it is worth the investment for the best results. By choosing the right rice, you will be able to create onigiri that are not only delicious but also visually appealing and fun to eat. With the right rice, you can experiment with different fillings and seasonings to create a variety of onigiri flavors and textures. Whether you are a beginner or an experienced onigiri maker, using the right rice is essential for achieving the perfect onigiri.
Preparing the Fillings
. Preparing the fillings is a crucial step in making delicious onigiri. The fillings can vary greatly depending on personal preferences, regional traditions, and the desired flavor profile. Some popular fillings include salmon, tuna, pickled plum, boiled egg, and cucumber. To prepare the fillings, start by cooking or seasoning the ingredients according to your recipe. For example, if using salmon, you may want to cook it in a pan with some soy sauce and sake until it's flaky and tender. If using pickled plum, you can simply slice it into thin pieces. Once the fillings are prepared, set them aside and let them cool to room temperature. This is an important step, as you want the fillings to be cool and dry before assembling the onigiri. If the fillings are too hot or moist, they can cause the rice to become soggy or fall apart. By preparing the fillings in advance and letting them cool, you can ensure that your onigiri turn out perfectly formed and delicious. Additionally, you can also customize your fillings to suit your taste preferences, such as adding some sesame seeds or grated daikon for extra flavor and texture. With a variety of fillings to choose from, you can experiment with different combinations to create unique and tasty onigiri.
Using the Right Tools
. Using the right tools is essential when it comes to wrapping onigiri. A bamboo sushi mat, also known as a makisu, is a must-have tool for achieving perfectly formed triangular onigiri. The mat helps to apply even pressure and shape the rice into a compact triangle. You can find bamboo sushi mats at most Asian grocery stores or online. In addition to the mat, you'll also need a sharp knife for cutting the nori sheets into desired sizes. A cutting board is also necessary for preparing the fillings and assembling the onigiri. If you're planning to make onigiri regularly, it's worth investing in a rice paddle, which is a flat, wide tool used to handle and shape the rice. Having the right tools will make the process of wrapping onigiri much easier and more enjoyable, allowing you to focus on creating delicious and visually appealing triangular rice balls.
Mastering the Triangular Shape
Here is the introduction paragraph: Mastering the triangular shape is a fundamental skill in various fields, including art, design, and even sushi-making. The triangular shape is a versatile and visually appealing form that can add depth and balance to any composition. However, creating a perfect triangle can be a challenging task, especially for beginners. To achieve this, it's essential to understand the basics of creating the perfect triangle, using the right materials, and forming the corners with precision. In this article, we will explore the techniques and tips for mastering the triangular shape, starting with the foundation of creating the perfect triangle. By understanding the principles of creating a perfect triangle, you'll be able to build a strong foundation for more complex shapes and designs. So, let's dive into the first step: Creating the Perfect Triangle. Note: The introduction paragraph should be 200 words, and it should mention the 3 supporting paragraphs (Creating the Perfect Triangle, Using the Nori Sheets, Forming the Corners) and transition to Creating the Perfect Triangle at the end. Here is the rewritten introduction paragraph: Mastering the triangular shape is a fundamental skill in various fields, including art, design, and even sushi-making. The triangular shape is a versatile and visually appealing form that can add depth and balance to any composition. However, creating a perfect triangle can be a challenging task, especially for beginners. To achieve this, it's essential to understand the basics of creating the perfect triangle, using the right materials, and forming the corners with precision. In this article, we will explore the techniques and tips for mastering the triangular shape, starting with the foundation of creating the perfect triangle. We will also delve into the importance of using the right materials, such as nori sheets, and how to use them effectively. Additionally, we will discuss the crucial step of forming the corners, which can make or break the overall shape. By understanding the principles of creating a perfect triangle, using the right materials, and forming the corners with precision, you'll be able to build a strong foundation for more complex shapes and designs. So, let's dive into the first step: Creating the Perfect Triangle.
Creating the Perfect Triangle
. Creating the perfect triangle is a crucial step in mastering the art of onigiri-making. To achieve this, it's essential to understand the concept of balance and proportion. Start by placing a small amount of filling in the center of the triangle, leaving a small border around the edges. This will help you maintain a balanced shape and prevent the filling from spilling out. Next, gently fold the two sides of the triangle towards the center, making sure to align the edges carefully. As you fold, apply gentle pressure to compress the rice and filling, ensuring they adhere together seamlessly. Finally, fold the base of the triangle upwards, creating a neat and compact shape. To add a touch of perfection, use your thumbs to gently press the edges of the triangle, creating a crisp and defined shape. With practice, you'll be able to create perfectly formed triangles that are not only visually appealing but also delicious and easy to eat. By mastering the art of creating the perfect triangle, you'll be well on your way to becoming an onigiri-making pro.
Using the Nori Sheets
. Using Nori sheets is an essential part of wrapping onigiri, and it requires some technique to get it right. Nori sheets are made from seaweed and are a key ingredient in many Japanese dishes, including sushi and onigiri. To use nori sheets effectively, start by cutting them into the desired size, usually around 2-3 inches square. Next, place a small amount of rice onto the nori sheet, leaving a small border around the edges. This will help the nori sheet stick to the rice and prevent it from falling apart. Then, place your chosen filling in the center of the rice, making sure to leave enough room to fold the nori sheet over. To fold the nori sheet, start by folding the bottom half up over the filling, then fold in the sides and finally fold the top half down. This will create a neat and compact triangular shape. To seal the nori sheet, apply a small amount of water to the edges and press them together gently. This will help the nori sheet stick together and prevent it from coming apart. With a little practice, you'll be able to use nori sheets like a pro and create delicious onigiri that are perfect for snacking on the go.
Forming the Corners
. When it comes to forming the corners of your onigiri, it's all about creating a seamless and smooth transition between the triangular shape and the rounded edges. To achieve this, start by gently pinching the two sides of the triangle together, making sure to apply even pressure to avoid creating any air pockets or unevenness. As you pinch, use your thumbs to guide the edges of the triangle, slowly curving them inward to form a smooth, rounded corner. Be careful not to press too hard, as this can cause the rice to become dense and lose its shape. Instead, aim for a gentle, gentle pressure that allows the rice to hold its form while still being pliable. As you work your way around the triangle, make sure to maintain a consistent shape and size, using your fingers to adjust and refine the corners as needed. With a little practice, you'll be able to create beautifully formed corners that add a professional touch to your onigiri. Remember, the key is to be patient and gentle, taking your time to shape and refine each corner until it's just right. By doing so, you'll be able to create onigiri that are not only delicious but also visually stunning, making them perfect for snacking, lunchboxes, or even as a beautiful addition to a bento box.
Adding the Finishing Touches
Here is the introduction paragraph: The art of making onigiri, a traditional Japanese rice ball, requires attention to detail and a gentle touch. To create a perfectly formed onigiri, one must carefully balance the amount of filling, the pressure applied, and the sealing technique. In this article, we will explore the final stages of onigiri preparation, including applying the right pressure, adding the fillings, and sealing the onigiri. By mastering these techniques, you will be able to create beautiful and delicious onigiri that are sure to impress. First, let's start with the crucial step of applying the right pressure, as this will set the foundation for a well-formed onigiri. Here is the 200 words supporting paragraph for Applying the Right Pressure: Applying the right pressure is a critical step in making onigiri. If the pressure is too strong, the rice will become dense and hard, while too little pressure will result in a loose and crumbly texture. To achieve the perfect balance, start by gently squeezing the rice mixture in your hands, applying a gentle but firm pressure. As you shape the onigiri, continue to apply pressure in a gentle, rocking motion, making sure to distribute the pressure evenly throughout the rice. This will help to create a smooth, pliable texture that is easy to shape and hold its form. It's also important to note that the pressure should be applied in a consistent and gentle manner, as sudden or jerky movements can cause the rice to break or become misshapen. By applying the right pressure, you will be able to create a beautiful and well-formed onigiri that is sure to impress. Here is the 200 words supporting paragraph for Adding the Fillings: Adding the fillings is a fun and creative part of making onigiri. The fillings can range from traditional ingredients such as salmon, tuna, and pickled plum, to more modern ingredients such as cheese, ham, and vegetables. When adding the fillings, it's essential to use a small amount and to place it in the center of the onigiri. This will help to prevent the filling from oozing out during the shaping process and will also ensure that the onigiri is evenly balanced. It's also important to choose fillings that complement the flavor and texture of the rice, as this will enhance the overall taste and experience of the onigiri. Some popular fillings include spicy tuna, crab stick, and
Applying the Right Pressure
. Applying the right pressure is a crucial step in wrapping onigiri. It's essential to find the perfect balance between applying too much pressure, which can cause the rice to become dense and lose its shape, and too little pressure, which can result in a loose and fragile triangle. To achieve the ideal pressure, start by gently squeezing the rice mixture in your hands, applying a gentle but firm pressure. As you shape the onigiri, gradually increase the pressure, making sure to distribute it evenly across the surface. This will help to create a compact and uniform triangle that holds its shape. Be careful not to apply too much pressure, as this can cause the rice to become misshapen or even crack. Instead, aim for a gentle yet firm pressure that allows the onigiri to retain its shape and texture. By mastering the art of applying the right pressure, you'll be able to create beautifully shaped onigiri that are both visually appealing and delicious to eat.
Adding the Fillings
. Adding the fillings is a crucial step in making onigiri, as it can make or break the overall taste and texture of the triangular rice balls. The fillings can vary greatly depending on personal preferences, regional traditions, and the occasion. Some popular fillings include salmon, tuna, pickled plum, and boiled egg, which are often mixed with a small amount of salt and sesame oil to enhance the flavor. When adding the fillings, it's essential to place them in the center of the rice ball, making sure to leave a small border around the edges. This allows the fillings to be evenly distributed and prevents them from spilling out when the onigiri is shaped. It's also important to handle the fillings gently to avoid breaking the rice grains, which can result in a dense and unappetizing texture. To add an extra layer of flavor, some people like to add a small amount of furikake, a Japanese seasoning blend, to the fillings before shaping the onigiri. By carefully selecting and adding the fillings, you can create a delicious and visually appealing onigiri that is sure to impress. Whether you're making onigiri for a quick snack, a picnic, or a special occasion, the fillings are what make it truly special, so don't be afraid to get creative and experiment with different ingredients to find your favorite combinations.
Sealing the Onigiri
. Sealing the onigiri is a crucial step in the process of creating these triangular-shaped Japanese rice balls. Once the filling is placed in the center of the rice, it's essential to seal the onigiri properly to prevent the filling from spilling out. To do this, gently lift the two opposite corners of the rice and fold them over the filling, making sure to apply gentle pressure to compress the rice. Then, take the remaining two corners and fold them over the first two, creating a triangular shape. Press the edges of the onigiri gently to seal the filling inside. It's essential to apply even pressure to ensure the onigiri is sealed tightly and evenly. If the onigiri is not sealed properly, the filling may spill out when handled or stored. By sealing the onigiri correctly, you can enjoy your delicious Japanese rice balls without worrying about the filling spilling out. Additionally, sealing the onigiri helps to keep the rice fresh for a longer period, making it an essential step in the process of creating these tasty treats.