How To Draw Angel Wings
Here is the introduction paragraph: Drawing angel wings can be a fun and creative activity, whether you're an experienced artist or just starting out. With a few simple steps and some practice, you can create beautiful and realistic angel wings that will add a touch of magic to any drawing or painting. To get started, it's essential to understand the basics of angel wings, including their shape, structure, and proportions. Once you have a solid foundation, you can move on to sketching and refining your angel wings, paying attention to details such as feathers, texture, and movement. Finally, adding final touches and details, such as shading, highlights, and patterns, can bring your angel wings to life. In this article, we'll take you through each of these steps, starting with the basics of angel wings.
Understanding the Basics of Angel Wings
Angel wings have been a symbol of divine intervention, guidance, and protection for centuries, transcending cultures and religions. Understanding the basics of angel wings involves recognizing the different types of angel wings, understanding the symbolism and meaning behind them, and knowing the basic shapes and forms used in drawing angel wings. While the concept of angel wings is deeply rooted in spirituality, its representation in art and design has evolved over time, making it a popular motif in various forms of creative expression. The versatility of angel wings as a design element has led to numerous interpretations and adaptations, but what sets one type of wing apart from another? Let's start by exploring the various types of angel wings and their distinctive characteristics.
Recognizing the Different Types of Angel Wings
Recognizing the different types of angel wings is essential to accurately depict them in art. There are several types of angel wings, each with its unique characteristics, symbolism, and significance. The most common types of angel wings include feathered wings, which are often depicted as soft, fluffy, and layered, resembling those of birds. These wings are typically associated with protection, guidance, and healing. Another type of angel wing is the wing of light, which is often depicted as a radiant, glowing, and ethereal wing that symbolizes spiritual growth, enlightenment, and divine connection. Some angel wings are also depicted as having a more rigid or armored structure, often associated with strength, courage, and protection. In some cases, angel wings may be depicted as being made of pure energy or mist, symbolizing the angel's connection to the spiritual realm. Additionally, some angel wings may have unique features such as intricate patterns, symbols, or markings that hold specific meanings and significance. By recognizing and understanding the different types of angel wings, artists can create more accurate and meaningful depictions of these celestial beings.
Understanding the Symbolism and Meaning Behind Angel Wings
Angel wings are a universal symbol that transcends cultures and religions, representing protection, guidance, and divine intervention. The symbolism behind angel wings is deeply rooted in their association with angels, who are believed to be messengers of God, carrying prayers to heaven and bringing divine messages to humanity. The wings themselves are often seen as a representation of the soul's journey, with the left wing symbolizing the subconscious and the right wing representing the conscious. The shape and structure of the wings can also hold meaning, with feathers often representing the gentle touch of divine guidance, while the wing's span can signify the breadth of protection and care. In art and literature, angel wings are frequently depicted as a symbol of hope, comfort, and inspiration, reminding us of the presence of a higher power in our lives. By understanding the symbolism and meaning behind angel wings, we can tap into their spiritual significance and find solace in their representation of divine love and care.
Basic Shapes and Forms Used in Drawing Angel Wings
The basic shapes and forms used in drawing angel wings are essential to creating a realistic and visually appealing representation. The foundation of angel wings is typically composed of a combination of curved and straight lines, which can be broken down into simpler shapes. The overall shape of the wing can be envisioned as a large teardrop or a curved triangle, with the rounded end at the top and the pointed end at the bottom. The wing's curvature can be achieved by using a series of connected arcs or gentle "S" curves, which give the wing its smooth, flowing appearance. The wing's shape can also be divided into three main sections: the upper wing, the lower wing, and the wing tip. The upper wing is typically wider and more curved, while the lower wing is narrower and more angular. The wing tip is usually pointed and tapered, giving the wing its distinctive shape. By using these basic shapes and forms, artists can create a realistic and detailed representation of angel wings that capture their beauty and elegance.
Sketching and Refining Your Angel Wings
Sketching and refining your angel wings can be a fun and creative process, but it requires some planning and attention to detail to get it right. To start, it's essential to have a clear idea of what you want your angel wings to look like, and this is where reference images come in handy. By collecting and studying reference images, you can get inspiration and accuracy in your sketch. Additionally, sketching the overall shape and structure of the wings is crucial in creating a believable and proportionate design. Finally, adding feathers and details can enhance the realism of your angel wings and make them look more lifelike. In this article, we will explore these three key aspects of sketching and refining your angel wings, starting with the importance of using reference images to get inspiration and accuracy.
Using Reference Images to Get Inspiration and Accuracy
Using reference images is a crucial step in drawing angel wings, as it allows you to get inspiration and accuracy. By collecting and studying reference images, you can gain a deeper understanding of the shape, structure, and details of angel wings. This can help you to create more realistic and detailed drawings. Reference images can also provide inspiration for your drawings, helping you to come up with unique and creative ideas. For example, you can look at pictures of birds, insects, or even sculptures to get inspiration for the shape and structure of your angel wings. Additionally, reference images can help you to get the proportions and anatomy of the wings correct, which is essential for creating a believable and realistic drawing. By using reference images, you can ensure that your angel wings are accurate, detailed, and visually appealing.
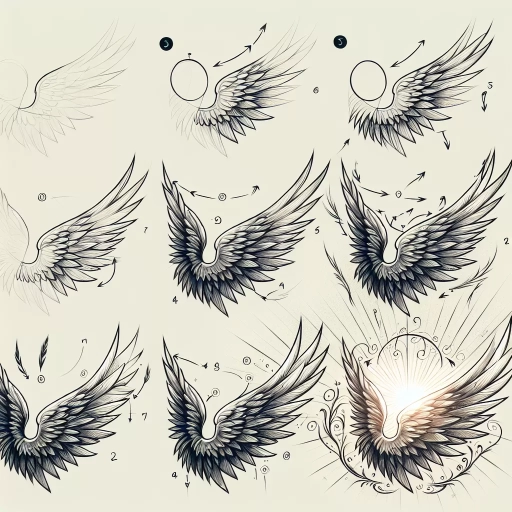
Sketching the Overall Shape and Structure of the Wings
When sketching the overall shape and structure of the wings, start by visualizing the wings as a whole, considering their size, shape, and proportions in relation to the body. Begin by lightly sketching a large oval or teardrop shape for the overall wing shape, making sure to capture the gentle curves and contours. Divide the wing into three main sections: the root, where the wing meets the body; the midsection, which is the widest part of the wing; and the tip, which is the narrowest part. Sketch the wing's skeletal structure, including the humerus, radius, and ulna, which will help guide the placement of feathers and other details. Pay attention to the wing's curvature, as it should be more pronounced at the root and gradually decrease towards the tip. Consider the wing's movement and flexibility, as this will affect the overall shape and structure. For example, if the wing is in a downward position, the curvature will be more pronounced, while an upward position will result in a more relaxed curve. By capturing the overall shape and structure of the wings, you'll be able to add depth, dimension, and realism to your angel wings.
Adding Feathers and Details to Enhance Realism
Adding feathers and details is a crucial step in creating realistic angel wings. To start, use a range of pencils, from 2H to 6B, to create soft, layered feathers. Begin by sketching the overall shape of the wing, using gentle, flowing lines to suggest the softness of the feathers. Then, use a sharp pencil to add individual feathers, starting at the base of the wing and working your way outwards. Vary the length and thickness of the feathers to create a natural, layered look. To add texture and depth, use a range of hatching and cross-hatching techniques, applying gentle pressure to suggest the softness of the feathers. For a more realistic look, pay attention to the way the feathers overlap and curve around the wing's shape. You can also add a few loose, stray feathers to give the wing a sense of movement and energy. To enhance the realism of your angel wings, consider adding a few subtle details, such as the delicate veins that run through the feathers or the soft, downy texture of the wing's base. By taking the time to add these details, you can create a truly breathtaking and realistic pair of angel wings that will add a touch of magic to any drawing or painting.
Adding Final Touches and Details to Your Angel Wings
Adding the final touches and details to your angel wings can elevate your art from good to great. To take your angel wings to the next level, you'll want to focus on adding depth, dimension, and a touch of magic. This can be achieved through various techniques, including shading and texturing to create a realistic and three-dimensional appearance, adding highlights and sparkles to give your wings a heavenly glow, and experimenting with different mediums and techniques to enhance your art. By incorporating these elements, you'll be able to create a pair of angel wings that are not only visually stunning but also captivating and immersive. In this article, we'll explore each of these techniques in more detail, starting with the importance of shading and texturing to create depth and dimension.
Shading and Texturing to Create Depth and Dimension
To create depth and dimension in your angel wings, shading and texturing are essential techniques to master. Shading involves adding different values of light and dark to your drawing to create the illusion of three-dimensionality, while texturing adds a tactile quality to your wings, making them appear more realistic. To shade your wings, start by identifying the light source and determining where the shadows will fall. Use a range of pencils or markers to create gradual transitions from light to dark, with the darkest shadows typically found in the crevices and folds of the wings. For texturing, consider the type of feathers you want to depict - are they soft and fluffy, or long and sleek? Use short, gentle strokes to suggest soft feathers, or longer, more confident strokes to indicate longer feathers. You can also add texture to the wings by incorporating subtle patterns, such as the soft, downy texture of the wing's underside or the intricate, branching patterns of the wing's veins. By combining shading and texturing techniques, you can create a sense of depth and dimension in your angel wings that draws the viewer's eye and invites them to explore the intricate details of your drawing.
Adding Highlights and Sparkles to Give Your Wings a Heavenly Glow
Adding highlights and sparkles to your angel wings can elevate them from a beautiful, yet ordinary, design to a truly heavenly masterpiece. To start, use a small brush and a light shade of white or cream-colored paint to add subtle highlights along the edges of the wings, following the natural curves and contours of the feathers. This will give the illusion of soft, ethereal light dancing across the surface of the wings. Next, use a fine-tip pen or a small brush to add delicate sparkles and glittering accents to the wings, scattering them randomly across the surface to create a sense of movement and energy. You can also use a light gray or silver marker to add a subtle sheen to the feathers, giving them a soft, luminous quality. To take your highlights and sparkles to the next level, try using a range of different materials and techniques, such as adding iridescent glitter, holographic stickers, or even intricate, hand-drawn patterns using a metallic pen. By experimenting with different textures and effects, you can create a truly one-of-a-kind design that shines with a heavenly glow.
Experimenting with Different Mediums and Techniques to Enhance Your Art
Experimenting with different mediums and techniques can elevate your angel wings drawing to new heights. Consider combining traditional media like graphite, charcoal, or ink with digital tools to create a unique hybrid look. For a more ethereal effect, try layering transparent washes of watercolor or gouache over a pencil or ink underdrawing. Alternatively, experiment with textured mediums like pastels, colored pencils, or even fabric paint to add depth and visual interest to your wings. Don't be afraid to push the boundaries of traditional drawing techniques by incorporating collage elements, like paper or fabric scraps, to create intricate, layered designs. By embracing experimentation and taking risks, you can unlock new creative possibilities and develop a distinctive style that sets your angel wings apart.