How To Get Crayon Out Of Fabric
Here is the introduction paragraph: Removing crayon stains from fabric can be a daunting task, but with the right techniques and strategies, it's definitely possible. Whether it's a favorite t-shirt, a couch cushion, or a delicate tablecloth, crayon stains can be a real nuisance. To effectively remove crayon from fabric, it's essential to understand the different methods and approaches that can be employed. In this article, we'll explore the various pre-treatment methods that can help loosen and break down the crayon stain, making it easier to remove. We'll also discuss the different removal techniques that can be used, including some unconventional methods that may surprise you. Finally, we'll provide guidance on laundry and post-treatment care to ensure that the fabric is restored to its original condition. By following these steps, you'll be able to successfully remove crayon stains from fabric and prevent them from setting in. Let's start by exploring the pre-treatment methods that can help you get started.
Pre-treatment Methods
When it comes to removing tough stains from clothing, upholstery, and carpets, pre-treatment methods can make all the difference. The key to successful stain removal is to act quickly, as the sooner you treat the stain, the better chance you have of removing it completely. In addition to prompt action, it's also essential to use the right techniques and products to pre-treat the stain. This includes blotting the stain instead of rubbing it, which can damage the fabric and push the stain deeper. Furthermore, pre-treating with a stain remover or detergent can help break down the stain and make it easier to remove. By following these simple steps, you can increase the chances of removing even the toughest stains. Act quickly to prevent stains from setting, and you'll be well on your way to a successful stain removal process.
Act Quickly to Prevent Stains from Setting
When it comes to removing crayon stains from fabric, timing is everything. The sooner you act, the better your chances of preventing the stain from setting. Crayon wax can permanently bind to fabric fibers if it's allowed to sit for too long, making it much more difficult to remove. To prevent this from happening, it's essential to act quickly and treat the stain as soon as possible. The longer you wait, the more time the wax has to penetrate the fabric, making it harder to remove. By acting fast, you can prevent the stain from setting and increase the chances of completely removing the crayon mark. This is especially important for delicate or sensitive fabrics, as they can be easily damaged by the wax. So, if you notice a crayon stain on your fabric, don't delay - act quickly to prevent the stain from setting and make the removal process much easier.
Blot the Stain Instead of Rubbing
When it comes to removing crayon stains from fabric, one of the most important techniques to master is blotting the stain instead of rubbing it. Rubbing the stain can push it deeper into the fabric, making it more difficult to remove and potentially damaging the material. Blotting, on the other hand, allows you to gently lift the stain off the surface of the fabric without pushing it further in. To blot the stain, start by applying a small amount of cleaning solution or stain remover to the affected area. Then, use a clean cloth or paper towel to gently blot the stain, working from the outside in. Be careful not to rub or scrub the stain, as this can damage the fabric. Instead, focus on applying gentle pressure and allowing the cleaning solution to do its job. By blotting the stain instead of rubbing it, you can help to remove the crayon mark without damaging the fabric or pushing the stain deeper into the material. This technique is especially effective when combined with other pre-treatment methods, such as applying heat or using a stain-removing product. By taking the time to blot the stain carefully, you can increase your chances of removing the crayon mark completely and restoring your fabric to its original condition.
Pre-treat with a Stain Remover or Detergent
Pre-treating with a stain remover or detergent is a crucial step in removing crayon stains from fabric. Before applying any cleaning solution, gently scrape off any excess crayon marks from the fabric using a blunt object like a butter knife or a spoon. Then, apply a stain remover or a laundry detergent directly to the stained area. You can use a stain stick, a spray, or a liquid detergent, depending on the type of fabric and the severity of the stain. Gently rub the stain remover or detergent into the fabric using a soft-bristled brush or a clean cloth, working from the outside inwards. Make sure to saturate the stained area thoroughly, but avoid over-saturating the surrounding fabric. Allow the stain remover or detergent to sit on the stain for 5-10 minutes, giving it time to penetrate and break down the wax-based crayon stain. After the pre-treatment, wash the fabric in cold water using a mild laundry detergent. It's essential to check the care label of the fabric before applying any cleaning solution to ensure you're using the right method. By pre-treating the stain with a stain remover or detergent, you can increase the chances of removing the crayon stain completely and prevent it from setting into the fabric.
Removal Techniques
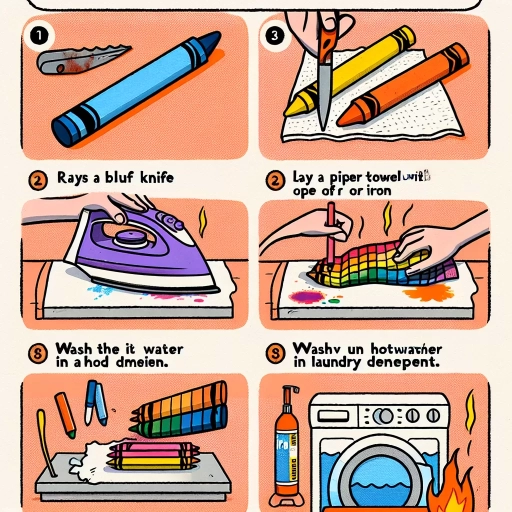
When it comes to removing crayon marks from surfaces, there are several techniques that can be employed to achieve the desired results. For tough stains, using a solvent-based cleaner can be an effective solution. However, for more delicate surfaces, applying heat to melt the crayon wax can be a gentler approach. Alternatively, a homemade solution made from baking soda and water can also be used to remove crayon marks. In this article, we will explore these removal techniques in more detail, starting with the use of a solvent-based cleaner for tough stains.
Use a Solvent-based Cleaner for Tough Stains
When dealing with particularly stubborn stains, a solvent-based cleaner can be an effective solution. These types of cleaners are specifically designed to break down and dissolve tough stains, making them easier to remove. Solvent-based cleaners typically contain chemicals such as mineral spirits, turpentine, or naphtha, which are capable of dissolving and lifting away stubborn stains. To use a solvent-based cleaner, start by applying a small amount directly to the stain and gently working it in with a soft-bristled brush or clean cloth. Allow the cleaner to sit on the stain for a few minutes to give it time to penetrate and break down the stain. Then, use a clean cloth or paper towel to blot the stain, working from the outside inwards. Repeat this process as needed until the stain is removed. It's essential to test a small, inconspicuous area of the fabric first to ensure the solvent-based cleaner doesn't damage the material. Additionally, be sure to follow the manufacturer's instructions and take necessary safety precautions when using solvent-based cleaners, as they can be hazardous to your health and the environment.
Apply Heat to Melt the Crayon Wax
Applying heat to melt the crayon wax is a common method for removing crayon stains from fabric. This technique involves using a heat source, such as a hair dryer or iron, to melt the wax, making it easier to remove. To apply heat, start by placing a paper towel or cloth over the stained area to protect the fabric from direct heat. Then, use a hair dryer or iron on a low setting to heat the area for a few minutes. The heat will cause the wax to melt and soften, allowing you to gently scrape it off with a blunt object, such as a credit card or spoon. Be careful not to apply too much heat, as this can damage the fabric or cause the wax to spread. Once the wax is removed, wash the fabric as usual to remove any remaining residue. This method is most effective for removing crayon stains from synthetic fabrics, such as polyester or nylon, but can also be used on natural fibers like cotton or wool. However, be cautious when using heat on delicate or sensitive fabrics, as it can cause damage or discoloration.
Try a Homemade Solution with Baking Soda and Water
If you're looking for a gentle and non-toxic approach to remove crayon stains from fabric, try a homemade solution with baking soda and water. This method is particularly effective for removing crayon marks from delicate or sensitive fabrics that may be damaged by harsh chemicals or abrasive cleaners. To create the solution, mix 1 tablespoon of baking soda with 2 tablespoons of cold water to form a smooth paste. Apply the paste directly to the crayon stain and gently rub it in with a soft-bristled toothbrush or a clean cloth. Let the solution sit on the stain for about 15-20 minutes, allowing the baking soda to penetrate and break down the wax. Then, rinse the garment with cold water and check if the stain is removed. If the stain persists, you can repeat the process a few times until the crayon mark is completely gone. This homemade solution is not only effective but also eco-friendly and budget-friendly, making it a great alternative to commercial stain removers.
Laundry and Post-treatment Care
When it comes to laundry and post-treatment care, there are several steps you can take to ensure your clothes look their best and last longer. To prevent color bleeding, it's essential to wash the fabric in cold water, as hot water can cause the colors to run and fade. Additionally, soaking the fabric in a solution of equal parts water and white vinegar can help to remove any tough stains and odors. Before putting the fabric in the dryer, it's also crucial to check the stain to ensure it's completely gone, as the heat from the dryer can set the stain and make it difficult to remove. By following these simple steps, you can keep your clothes looking vibrant and fresh. To start, let's take a closer look at the importance of washing the fabric in cold water to prevent color bleeding.
Wash the Fabric in Cold Water to Prevent Color Bleeding
Washing the fabric in cold water is a crucial step in preventing color bleeding, especially when dealing with vibrant or sensitive colors. When you wash fabrics in hot water, the heat can cause the colors to bleed or run, resulting in an uneven and faded appearance. Cold water, on the other hand, helps to preserve the colors and prevent them from bleeding. This is because cold water does not penetrate the fabric as deeply as hot water, reducing the risk of color migration. Additionally, cold water is gentler on fabrics, which means it can help to prevent shrinkage and damage to the fabric. To wash your fabric in cold water, simply set your washing machine to the cold water cycle and use a mild detergent that is specifically designed for washing colors. It's also a good idea to test a small, inconspicuous area of the fabric first to ensure that the colors won't bleed or run. By washing your fabric in cold water, you can help to preserve the colors and keep your fabric looking its best.
Soak the Fabric in a Solution of Equal Parts Water and White Vinegar
Soak the fabric in a solution of equal parts water and white vinegar. This method is effective in removing crayon stains from fabric. The acid in the vinegar helps break down the wax, making it easier to remove. To do this, mix equal parts of water and white vinegar in a bowl or sink. Submerge the stained fabric in the solution and let it soak for about an hour. After soaking, gently scrub the stain with a soft-bristled brush or a clean cloth. Rinse the fabric with cold water and check if the stain is still visible. If the stain persists, repeat the soaking and scrubbing process until the stain is completely gone. This method is gentle on most fabrics and can be used on a variety of materials, including cotton, polyester, and linen. However, it's always a good idea to test a small, inconspicuous area of the fabric first to ensure the vinegar solution doesn't damage the material.
Check the Stain Before Putting the Fabric in the Dryer
Before putting the fabric in the dryer, it's essential to check the stain to ensure it's completely gone. If the stain is still visible, it's best to repeat the stain removal process until the stain is no longer visible. This is because the heat from the dryer can set the stain, making it more challenging to remove later on. Additionally, if the stain is still present, it may transfer to other clothes in the dryer, causing further damage. To check the stain, hold the fabric up to a light source and inspect the area carefully. If the stain is still visible, repeat the stain removal process and recheck the stain before putting the fabric in the dryer. It's also a good idea to test a small, inconspicuous area of the fabric to ensure the stain removal method won't damage the fabric. By taking the time to check the stain before putting the fabric in the dryer, you can ensure the stain is completely gone and prevent any further damage to the fabric.