How To Fray Jeans
Frayed jeans have become a timeless fashion statement, offering a rugged and casual look that appeals to many. Whether you're looking to breathe new life into an old pair of jeans or add a personalized touch to a recent purchase, learning how to fray jeans can be a fun and rewarding DIY project. This article will guide you through the process of creating perfectly frayed jeans, covering everything from preparation to finishing touches. We'll start by exploring how to prepare your jeans for fraying, ensuring you have the right tools and materials at hand. Next, we'll delve into various methods to achieve different fraying effects, allowing you to customize your jeans to your desired style. Finally, we'll discuss the finishing touches and maintenance tips to keep your frayed jeans looking great for years to come. By following these steps, you'll be able to transform your ordinary denim into a unique fashion piece that reflects your personal style. So, let's begin by learning how to prepare your jeans for the fraying process, setting the stage for a successful DIY project.
Preparing Your Jeans for Fraying
Frayed jeans have become a staple in contemporary fashion, offering a casual, lived-in look that appeals to many. While you can purchase pre-frayed jeans, creating your own allows for a personalized touch and can breathe new life into old denim. The process of preparing your jeans for fraying is an art form that requires attention to detail and a bit of creativity. This article will guide you through the essential steps to achieve that perfect worn-in aesthetic. We'll explore three crucial aspects of the fraying process: choosing the right pair of jeans, employing specific washing and drying techniques to enhance fraying, and accurately marking and measuring areas to fray. By carefully selecting your denim, understanding how to manipulate the fabric through washing, and precisely planning where to create distress, you'll be well on your way to mastering the art of frayed jeans. Whether you're looking to update your wardrobe or simply enjoy a DIY fashion project, preparing your jeans for fraying is a rewarding endeavor that allows you to express your unique style.
Choosing the right pair of jeans
Choosing the right pair of jeans is a crucial first step in the process of creating the perfect frayed look. When selecting jeans for fraying, it's essential to consider factors such as fabric composition, fit, and style to ensure the best results. Denim with a high percentage of cotton is ideal for fraying, as it naturally produces a more authentic and textured appearance when distressed. Look for jeans made from 100% cotton or those with at least 98% cotton content, as these will fray more easily and yield a more desirable outcome. The weight of the denim also plays a significant role in how well the jeans will fray. Heavier denim, typically measured in ounces, tends to fray more robustly and create a more dramatic effect. Opt for jeans with a weight of 12 ounces or higher for the best results. However, keep in mind that heavier denim may be more challenging to work with and require more effort to achieve the desired frayed look. Consider the fit and style of the jeans as well. While personal preference plays a role, certain cuts lend themselves better to fraying than others. Straight-leg or bootcut jeans often provide a more balanced canvas for fraying, as they allow for even distribution of the distressed areas. Skinny jeans can also be frayed effectively, but keep in mind that the tighter fit may limit the areas where fraying can be applied without compromising the overall structure of the garment. Color is another factor to consider when choosing jeans for fraying. While any color can be frayed, lighter washes tend to showcase the distressed areas more prominently. Medium to light blue jeans are popular choices for fraying, as they provide a classic denim look that complements the raw, edgy aesthetic of frayed edges. However, don't be afraid to experiment with darker washes or even colored denim if you're looking for a unique and eye-catching result. When selecting jeans for fraying, pay attention to any existing details or embellishments. Avoid jeans with extensive embroidery, rhinestones, or other decorative elements near the areas you plan to fray, as these can interfere with the distressing process and may not yield the desired outcome. Additionally, consider the placement of pockets, seams, and other structural elements when planning your fraying design to ensure a cohesive and balanced look. Lastly, don't overlook the importance of quality when choosing jeans for fraying. While it may be tempting to opt for a cheaper pair, investing in well-made jeans will result in a more durable and long-lasting frayed look. Quality denim will hold up better to the distressing process and maintain its shape and integrity even after repeated wear and washing. By carefully selecting the right pair of jeans, you'll set yourself up for success in creating a stunning frayed look that perfectly captures your personal style and aesthetic preferences.
Washing and drying techniques to enhance fraying
Washing and drying techniques play a crucial role in enhancing the fraying process of your jeans, helping you achieve that perfect distressed look. The way you treat your denim before and during the fraying process can significantly impact the final result, making it essential to understand and implement these techniques effectively. To begin, it's important to note that washing your jeans before fraying can soften the fabric and make it more susceptible to fraying. Start by washing your jeans in hot water, which helps to break down the fibers and loosen the weave. Add a cup of white vinegar to the wash cycle, as this natural fabric softener can further weaken the denim fibers without causing damage to the overall structure of the jeans. Avoid using fabric softeners or harsh detergents, as these can coat the fibers and make them more resistant to fraying. Once the wash cycle is complete, consider putting your jeans through an extra spin cycle to remove excess water. This step is crucial because it helps to create more stress on the fabric, which can enhance the fraying process. Next, toss your jeans into the dryer on the highest heat setting. The heat and tumbling action work together to further weaken the fibers and create micro-tears in the denim, making it more prone to fraying when you begin the manual distressing process. For an even more pronounced effect, try repeating this wash and dry cycle multiple times before you start fraying. Each cycle will progressively soften and weaken the denim, making it easier to achieve the desired frayed look. However, be cautious not to overdo it, as excessive washing and drying can lead to premature wear and tear in areas you don't intend to fray. Another technique to consider is freezing your jeans after washing them. Once they're damp from the wash, fold them neatly and place them in a plastic bag in the freezer overnight. The freezing process can cause the fibers to become more brittle, making them easier to fray when you begin the distressing process. After removing them from the freezer, allow the jeans to thaw completely before proceeding with your fraying technique. It's worth noting that different types of denim may respond differently to these washing and drying techniques. Raw denim, for instance, may require more aggressive treatment to achieve the desired fraying effect, while pre-washed or softer denim may fray more easily. Experiment with these techniques on a small, inconspicuous area of your jeans first to gauge how your specific denim responds before applying them to the entire garment. By implementing these washing and drying techniques, you'll be setting the stage for a successful fraying process, ensuring that your jeans are primed and ready for distressing. Remember that patience is key, and taking the time to properly prepare your denim will result in a more authentic and long-lasting frayed look.
Marking and measuring areas to fray
Marking and measuring areas to fray is a crucial step in the process of preparing your jeans for fraying. This stage requires precision and attention to detail to ensure that the final result meets your desired aesthetic. To begin, carefully examine your jeans and decide which areas you want to fray. Common locations include the hem, pockets, knees, and thighs, but don't be afraid to get creative with your choices. Once you've determined where you want to fray, it's time to mark these areas. Use a fabric chalk or washable marker to draw clear, precise lines indicating the regions you plan to distress. Be sure to use a light touch to avoid damaging the fabric or leaving permanent marks. If you're aiming for a symmetrical look, measure the distance from seams or other reference points to ensure consistency on both legs. When marking areas for fraying, consider the overall balance and aesthetics of your jeans. Think about how the frayed sections will complement each other and the existing style of the garment. For example, if you're working with skinny jeans, you might opt for smaller, more subtle frayed areas, while wider-leg styles can handle larger distressed sections. It's also important to take into account the natural wear patterns of jeans when deciding where to fray. Areas that typically experience more friction, such as the knees and thighs, are ideal candidates for fraying as they mimic natural wear and tear. However, don't feel limited by these conventions – experimenting with unexpected fray locations can lead to unique and personalized results. When measuring the areas to fray, use a ruler or measuring tape to ensure consistency in the size and shape of your distressed sections. This is particularly important if you're creating multiple frayed areas or working on a pair of jeans for someone else. For a more organic look, vary the sizes and shapes of your frayed sections slightly, but maintain a cohesive overall appearance. Remember that fraying will cause the fabric to unravel slightly, so it's wise to mark your areas slightly smaller than your intended final result. This allows for some expansion as the fibers come loose during the fraying process. Additionally, consider the direction of the fabric weave when marking your fray areas, as this can affect how the denim unravels. By taking the time to carefully mark and measure the areas you plan to fray, you set yourself up for success in the subsequent steps of the fraying process. This attention to detail ensures that your finished jeans will have a polished, intentional look rather than appearing haphazardly distressed. With precise marking and measuring, you'll be well-prepared to move on to the next stages of fraying your jeans and creating a unique, personalized garment that reflects your style and creativity.
Different Methods to Fray Jeans
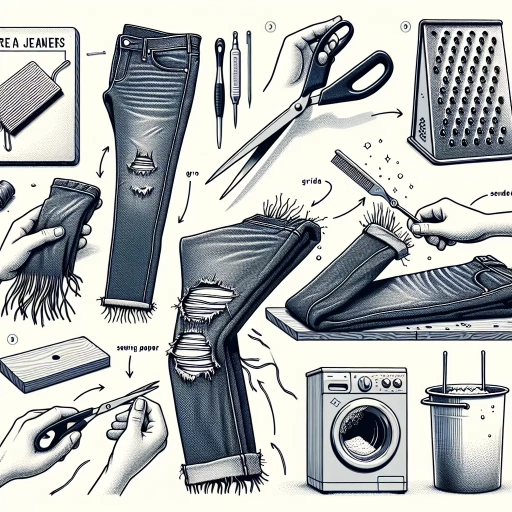
Frayed jeans have become a timeless fashion staple, offering a casual, lived-in look that appeals to many. Whether you're looking to breathe new life into an old pair of jeans or customize a new purchase, there are several methods to achieve that perfect frayed appearance. This article will explore three effective techniques for fraying jeans: using sandpaper and scissors for controlled fraying, employing a cheese grater for textured fraying, and utilizing a razor blade for precise detailing. Each method offers unique advantages and can be tailored to suit your desired style and level of distressing. By mastering these techniques, you'll be able to transform plain denim into personalized, fashion-forward pieces that reflect your individual taste. From subtle frays along the hemline to more dramatic distressing throughout the garment, these methods provide a range of options for creating your ideal frayed jeans. Before diving into the specific techniques, it's essential to properly prepare your jeans for the fraying process, ensuring the best possible results and longevity of your newly customized denim.
Using sandpaper and scissors for controlled fraying
Using sandpaper and scissors for controlled fraying is a popular and effective method to achieve a distressed look on your jeans. This technique allows for precise manipulation of the fabric, giving you greater control over the final appearance of your frayed denim. By combining the abrasive qualities of sandpaper with the cutting precision of scissors, you can create a variety of frayed effects, from subtle wear to more dramatic distressing. To begin, select a piece of medium-grit sandpaper, typically ranging from 80 to 120 grit. This grade of sandpaper is coarse enough to effectively rough up the denim fibers without being too aggressive. Start by laying your jeans flat on a hard surface and identify the areas you want to fray. Common locations include the hem, pockets, and knee areas, but feel free to experiment with other spots for a unique look. Gently rub the sandpaper over the chosen areas using circular motions. This action will start to break down the denim fibers, creating a worn appearance. Be sure to apply consistent pressure to achieve an even distressed effect. As you work, periodically check your progress to ensure you're not over-fraying the fabric. Remember, it's always easier to add more distressing later than to undo excessive fraying. Once you've achieved the desired level of wear with the sandpaper, it's time to introduce scissors for more defined fraying. Using sharp fabric scissors, carefully snip small, horizontal cuts along the edges of the areas you've sanded. These cuts will serve as starting points for the fraying process. Be cautious not to cut too deeply into the fabric, as this can compromise the structural integrity of your jeans. After making the small cuts, use your fingers or a pair of tweezers to gently pull at the loose threads. This will encourage the fraying process and create a more natural-looking distressed effect. For a more pronounced frayed look, you can use a seam ripper to carefully remove some of the horizontal threads between the cuts you've made. To enhance the frayed appearance further, you can alternately use the sandpaper and scissors. This combination allows you to create layers of distressing, mimicking the natural wear patterns that occur over time. Pay attention to the direction of the fabric weave as you work, as fraying along the grain will produce a different effect than fraying against it. Remember that the key to successful controlled fraying is patience and attention to detail. Take your time and periodically step back to assess your progress. It's often better to work in stages, allowing you to achieve the perfect balance of distressing without overdoing it. Additionally, consider washing your jeans after fraying to soften the edges and give the distressed areas a more lived-in appearance. By mastering the technique of using sandpaper and scissors for controlled fraying, you can transform your plain jeans into personalized, fashion-forward pieces that reflect your unique style. This method offers endless possibilities for customization, allowing you to create everything from subtle, worn-in looks to boldly distressed statement pieces.
Employing a cheese grater for textured fraying
Employing a cheese grater for textured fraying is an innovative and unconventional method that can add a unique touch to your DIY jean fraying project. This technique offers a distinct advantage over traditional fraying methods by creating a more controlled and textured appearance, allowing you to achieve a rugged yet deliberate look. The small, sharp blades of a cheese grater can effectively break down denim fibers in a way that mimics natural wear and tear, but with a more intentional pattern. To begin, select a cheese grater with medium to large-sized holes, as these will provide the best results for denim fraying. Ensure that the grater is clean and free from any food residue to avoid staining your jeans. Before starting, it's crucial to place a piece of cardboard or a thin wooden board inside the pant leg to prevent accidental damage to the opposite side of the fabric. When using the cheese grater, apply gentle pressure and work in short, controlled strokes along the areas you wish to fray. The key is to start with light pressure and gradually increase it as needed, being careful not to create holes or overly thin spots in the denim. Focus on areas that would naturally experience wear, such as the knee, thigh, or hem, to maintain an authentic appearance. One of the advantages of using a cheese grater is the ability to create varying textures and patterns. By adjusting the angle and pressure of the grater, you can achieve different effects, from subtle distressing to more pronounced fraying. Experiment with vertical, horizontal, and diagonal strokes to add depth and interest to your design. It's important to note that the cheese grater method works best on thicker denim fabrics, as thinner materials may tear too easily under the grater's sharp edges. Additionally, this technique is particularly effective for creating frayed patches or accent areas rather than all-over distressing. After grating, gently brush the frayed areas with a wire brush or sandpaper to further soften the edges and remove any loose fibers. This step helps blend the frayed sections with the rest of the denim, creating a more cohesive and natural look. While using a cheese grater for fraying jeans may seem unconventional, it offers a level of control and texture that can be difficult to achieve with other methods. This technique allows for creative expression and personalization, enabling you to craft jeans that are truly unique and tailored to your style preferences. As with any DIY denim distressing method, practice on a small, inconspicuous area first to perfect your technique before tackling more visible sections of your jeans.
Utilizing a razor blade for precise detailing
Utilizing a razor blade for precise detailing is an advanced technique that allows for intricate and controlled fraying of jeans. This method requires a steady hand and careful attention to detail, but it can yield stunning results when executed properly. A razor blade offers unparalleled precision, enabling you to create delicate distressed patterns, intricate designs, and subtle wear marks that mimic natural denim aging. To begin, lay your jeans flat on a sturdy surface and insert a small piece of cardboard or a cutting mat inside the leg to prevent accidental cuts through both layers. Choose a sharp, clean razor blade and hold it at a slight angle to the fabric. Gently scrape the surface of the denim in short, controlled strokes, gradually removing thin layers of fibers. This technique allows you to create whiskers, honeycombs, or other distressed patterns with remarkable accuracy. When working with a razor blade, it's crucial to exercise caution and maintain a light touch. Apply minimal pressure at first, gradually increasing as needed to achieve the desired effect. This approach helps prevent accidental tears or cuts in the fabric while giving you greater control over the fraying process. As you work, periodically brush away loose fibers and assess your progress to ensure you're achieving the desired look. One of the advantages of using a razor blade is the ability to create highly detailed and customized distressing. You can use the blade to carefully fray specific areas, such as pocket edges, seams, or hem lines, adding an authentic worn appearance to your jeans. Additionally, this method allows you to create subtle gradients in the fraying, transitioning from heavily distressed areas to more intact sections of the denim seamlessly. For those seeking to add artistic flair to their jeans, a razor blade can be used to etch intricate designs or patterns into the denim surface. By carefully scraping away the top layer of fibers in specific shapes or motifs, you can create unique, personalized details that set your jeans apart from mass-produced distressed denim. While the razor blade technique offers unparalleled precision, it's important to note that it requires patience and practice to master. Start with small, inconspicuous areas to hone your skills before tackling more visible sections of your jeans. Remember that the goal is to create a naturally worn appearance, so avoid overly symmetrical or uniform distressing patterns. As you become more comfortable with this method, you can combine it with other fraying techniques to achieve a multi-dimensional distressed look. For example, use the razor blade for fine details and precision work, then supplement with sandpaper or a cheese grater for larger areas of wear. This combination of techniques can result in a beautifully textured and authentically distressed pair of jeans that look as though they've been worn and loved for years.
Finishing Touches and Maintenance
Achieving the perfect frayed denim look is an art form that combines creativity, patience, and a touch of rebellious style. As fashion trends continue to embrace the distressed aesthetic, mastering the techniques to fray your jeans can elevate your wardrobe and personal expression. This article delves into the essential finishing touches and maintenance practices that will take your frayed jeans from ordinary to extraordinary. We'll explore three key aspects of perfecting your denim: the crucial process of washing and drying frayed jeans to enhance the desired effect, innovative methods for adding distressed details using bleach or dye, and expert tips for preserving and maintaining the frayed look over time. By understanding these techniques, you'll be able to create and maintain a pair of perfectly frayed jeans that reflect your unique style and stand the test of time. Before we dive into these finishing touches, it's important to start with the basics of preparing your jeans for fraying, ensuring you have the ideal foundation for your distressed denim masterpiece.
Washing and drying frayed jeans to enhance the effect
Washing and drying frayed jeans plays a crucial role in enhancing and maintaining the desired distressed look. The process not only cleans your jeans but also helps to further develop and soften the frayed areas, giving them a more natural and lived-in appearance. When it comes to washing your newly frayed jeans, it's essential to strike a balance between preserving the distressed effect and ensuring proper care for the fabric. To begin, turn your frayed jeans inside out before washing. This simple step helps protect the frayed edges from excessive wear during the wash cycle while still allowing for gentle agitation that can enhance the frayed look. Opt for a cold water wash, as hot water can cause the denim fibers to shrink and potentially alter the frayed areas. Use a mild detergent specifically designed for denim or dark clothes to prevent fading and maintain the jeans' color integrity. For the first few washes, it's advisable to wash your frayed jeans separately from other garments. This precaution prevents loose threads and indigo dye from transferring onto other clothes. As an alternative to machine washing, you can also consider hand washing your frayed jeans in a basin with cold water and mild detergent. This method allows for greater control over the agitation and helps preserve the frayed areas more precisely. When it comes to drying, air-drying is the gentlest method and helps maintain the integrity of the frayed edges. Hang your jeans by the waistband in a well-ventilated area, away from direct sunlight to prevent fading. If you're short on time, you can use a dryer on a low heat setting, but be sure to remove the jeans while they're still slightly damp to avoid over-drying, which can lead to stiffness and potential damage to the frayed areas. For those looking to further enhance the frayed effect, you can employ a few tricks during the drying process. While the jeans are still damp, gently rub the frayed areas with a pumice stone or a clean toothbrush to encourage more fraying and create a softer, more worn-in look. Additionally, you can twist and scrunch the frayed areas while they're damp to create more texture and dimension as they dry. It's important to note that each wash and dry cycle will continue to affect the frayed areas, gradually softening and expanding them over time. This natural evolution of the distressed look adds to the authentic, vintage appeal of your frayed jeans. However, if you want to maintain a specific level of fraying, you may need to occasionally trim loose threads or reinforce certain areas with a few stitches to prevent excessive unraveling. By following these washing and drying techniques, you can not only keep your frayed jeans clean but also enhance and maintain their distressed aesthetic, ensuring they remain a stylish and personalized staple in your wardrobe for years to come.
Adding distressed details with bleach or dye
Adding distressed details with bleach or dye is an advanced technique that can elevate your frayed jeans to the next level of personalization and style. This method allows you to create unique patterns, faded areas, and artistic designs that complement the frayed edges and worn-in look of your denim. When done correctly, bleaching or dyeing can add depth and character to your jeans, making them truly one-of-a-kind. To begin, it's essential to choose the right products for the job. For bleaching, opt for a chlorine-based bleach solution, which is effective in removing color from denim. If you prefer dyeing, select fabric dyes specifically formulated for use on denim. Always work in a well-ventilated area and wear protective gloves to safeguard your skin from harsh chemicals. Before applying bleach or dye, plan your design carefully. You can use stencils, freehand patterns, or even create a splatter effect for a more organic look. For bleaching, dilute the solution with water to achieve varying degrees of color removal. Apply the bleach mixture using a spray bottle, sponge, or brush, depending on the desired effect. Remember that bleach works quickly, so monitor the process closely and rinse the jeans thoroughly once you've achieved the desired level of distressing. When dyeing, you have the option to create ombré effects, tie-dye patterns, or even paint intricate designs. Prepare the dye according to the manufacturer's instructions and apply it using brushes, sponges, or by dipping sections of the jeans into the dye bath. For a more subtle effect, consider using fabric markers or chalks to add pops of color or intricate details. After applying bleach or dye, it's crucial to properly rinse and wash your jeans to set the color and remove any excess chemicals. This step also helps to soften any harsh lines or transitions between the treated and untreated areas of the denim. Once dry, you may want to distress the newly bleached or dyed areas further by sanding, scraping, or even adding small holes to enhance the worn-in appearance. Keep in mind that bleaching and dyeing can weaken the fabric, so be mindful not to overwork any single area. It's also important to note that these techniques may affect the overall durability of your jeans, so treat them with care during future wear and washing. By incorporating bleaching or dyeing techniques into your jean fraying project, you can create a truly customized piece that reflects your personal style and creativity. These distressed details add depth, visual interest, and a touch of artistry to your frayed jeans, making them stand out from mass-produced distressed denim. With practice and experimentation, you'll develop your own signature style of distressing, allowing you to transform ordinary jeans into extraordinary, wearable works of art.
Preserving and maintaining the frayed look over time
Preserving and maintaining the frayed look of your jeans over time requires a combination of careful handling and strategic care techniques. While the appeal of frayed jeans lies in their worn-in, casual appearance, it's important to strike a balance between maintaining the desired look and preventing excessive deterioration that could render the jeans unwearable. One key aspect of preserving frayed jeans is to be mindful of how you wash them. Opt for cold water cycles and gentle detergents to minimize further breakdown of the fabric. Turn the jeans inside out before washing to protect the frayed areas from excessive agitation. Avoid using fabric softeners, as they can weaken the fibers and accelerate wear. Instead, consider adding a cup of white vinegar to the rinse cycle, which can help soften the fabric naturally without compromising its integrity. When it comes to drying, air-drying is the gentlest method for frayed jeans. Hang them in a well-ventilated area, away from direct sunlight to prevent fading. If you must use a dryer, choose a low heat setting and remove the jeans while they're still slightly damp to reduce stress on the fabric. Gently reshape the frayed areas with your fingers while the jeans are damp to maintain their desired appearance. Regular maintenance is crucial for preserving the frayed look. Periodically trim any loose threads that become excessively long or tangled. Use sharp scissors to carefully snip these threads close to the fabric surface, being cautious not to cut into the main denim material. This not only keeps the frayed areas looking neat but also prevents further unraveling. To reinforce frayed areas and prevent them from expanding beyond your desired boundaries, consider using a fabric stabilizer or fray check product. Apply a small amount along the inner edge of the frayed area to help hold the threads in place without altering the outward appearance. As your frayed jeans age, you may notice that the frayed areas become less pronounced. To rejuvenate the look, gently use a wire brush or sandpaper on the frayed edges. This technique can help bring back some of the texture and volume to the frayed areas. However, exercise caution and use a light touch to avoid creating holes or weakening the fabric excessively. Lastly, be mindful of how you wear and store your frayed jeans. Avoid excessive friction in the frayed areas by being cautious when sitting on rough surfaces or engaging in activities that could cause rapid wear. When storing, hang the jeans or fold them carefully to prevent the frayed areas from catching on other clothing items. By following these preservation and maintenance techniques, you can enjoy your frayed jeans for an extended period, allowing them to age gracefully while maintaining their stylish, lived-in appearance. Remember, the key is to embrace the natural evolution of the frayed look while taking steps to ensure the longevity of your favorite pair of jeans.