How To Tape Wrist
Taping your wrist can be a simple yet effective way to provide support and stability to the joint, especially for athletes or individuals who engage in activities that involve repetitive wrist movements. However, improper taping techniques can lead to reduced mobility, discomfort, and even injury. To ensure you get the most out of wrist taping, it's essential to understand the proper methods and precautions. In this article, we'll guide you through the process, starting with the importance of preparation, followed by a step-by-step taping process, and finally, highlighting common mistakes to avoid. By mastering these key aspects, you'll be able to tape your wrist effectively and safely. Preparation is Key, as it lays the foundation for a successful taping experience, and we'll explore this crucial step in more detail next.
Preparation is Key
When it comes to taping your wrist for support and injury prevention, preparation is key. To ensure that you get the most out of your wrist tape, it's essential to take the time to prepare properly. This involves choosing the right tape for your specific needs, preparing your wrist for the taping process, and understanding the taping technique itself. By taking these steps, you can ensure that your wrist tape is applied correctly and provides the support and protection you need. In this article, we'll explore each of these steps in more detail, starting with the importance of choosing the right tape.
Choose the Right Tape
When it comes to taping your wrist, choosing the right tape is crucial. There are several types of tapes available, each with its own unique characteristics, advantages, and disadvantages. The most common types of tapes used for wrist taping are athletic tape, kinesiology tape, and pre-wrap tape. Athletic tape is the most traditional and widely used type of tape, providing support and stability to the wrist joint. It is usually made of a rigid material that helps to restrict movement and provide compression. Kinesiology tape, on the other hand, is a more flexible and elastic tape that is designed to mimic the movement of the skin. It is often used to provide support and stability while still allowing for a full range of motion. Pre-wrap tape is a type of tape that is used to protect the skin from the adhesive of the athletic tape. It is usually made of a soft, foam-like material that is gentle on the skin. When choosing the right tape, consider the level of support and stability you need, as well as your skin type and sensitivity. If you have sensitive skin, you may want to opt for a hypoallergenic tape or a pre-wrap tape to protect your skin. Additionally, consider the activity or sport you will be participating in, as different tapes may be more suitable for different activities. For example, athletic tape may be more suitable for high-impact activities such as football or basketball, while kinesiology tape may be more suitable for low-impact activities such as yoga or Pilates. Ultimately, the right tape for you will depend on your individual needs and preferences.
Prepare Your Wrist
When it comes to taping your wrist, preparation is key. Before you start wrapping your wrist with tape, it's essential to prepare your wrist properly. This involves cleaning and drying the area thoroughly. Remove any dirt, sweat, or lotion from your wrist, as these can interfere with the adhesive properties of the tape. Use soap and water to clean the area, and then dry it completely with a towel. This will ensure that the tape adheres properly to your skin and stays in place. Additionally, if you have any hair on your wrist, consider shaving it off or trimming it short to prevent the tape from catching on it. This will also help the tape to lie flat against your skin, providing a more secure and comfortable fit. By taking the time to prepare your wrist, you'll be able to apply the tape more effectively and get the support and protection you need.
Understand the Taping Technique
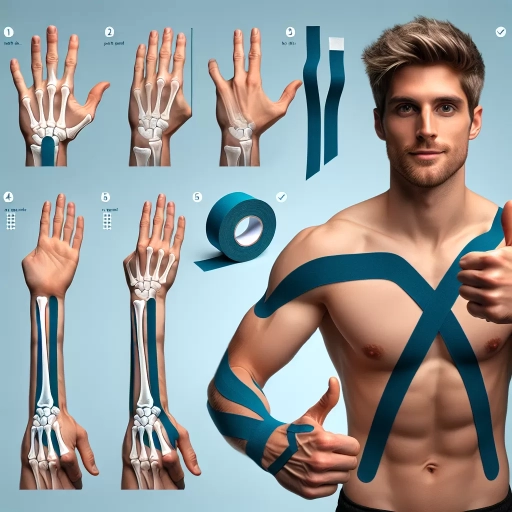
The taping technique is a crucial aspect of wrist taping, and understanding it is essential to achieve the desired support and stability. The technique involves applying the tape in a specific pattern to provide optimal support to the wrist joint. The most common technique used is the "X" pattern, where the tape is applied in a diagonal direction, forming an "X" shape across the wrist. This pattern helps to provide support to the wrist joint by limiting excessive movement and providing stability to the surrounding ligaments and tendons. Another technique used is the "figure-eight" pattern, which involves applying the tape in a circular motion around the wrist, forming a figure-eight shape. This pattern helps to provide additional support to the wrist joint by compressing the surrounding tissues and providing stability to the joint. It's essential to note that the taping technique may vary depending on the individual's specific needs and the type of injury or condition being treated. A healthcare professional or athletic trainer can provide guidance on the most effective taping technique for a particular individual.
Step-by-Step Taping Process
The taping process is a crucial step in various applications, including athletic training, physical therapy, and even crafting. It requires attention to detail and a systematic approach to ensure effective results. To achieve this, it's essential to break down the taping process into manageable steps. In this article, we will explore the step-by-step taping process, covering the application of the anchor strip, support strips, and securing the tape. By following these steps, individuals can ensure a successful taping outcome. First, we will start with the foundation of the taping process: applying the anchor strip.
Apply the Anchor Strip
Apply the anchor strip by placing it on the back of the wrist, about 1-2 inches above the crease of the wrist. The anchor strip should be centered and smooth out any wrinkles or air pockets. Make sure it is not twisted or bunched up, as this can cause discomfort and affect the overall support of the tape job. The anchor strip serves as the foundation of the tape job, providing a secure base for the rest of the tape to adhere to. It's essential to apply the anchor strip correctly to ensure a comfortable and effective taping experience.
Apply the Support Strips
Apply the support strips by placing them along the wrist, starting from the base of the wrist and working your way up towards the forearm. Make sure to apply even pressure to avoid wrinkles or air pockets. The support strips should be applied in a smooth, continuous motion, overlapping each strip by about half the width of the strip. This will ensure a secure and comfortable fit. As you apply the support strips, make sure to keep the wrist in a neutral position, avoiding any twisting or bending. This will help prevent any discomfort or restricted movement. Once you have applied the support strips, use your fingers to smooth out any wrinkles or air pockets, ensuring a snug and comfortable fit.
Secure the Tape
Secure the tape by applying gentle pressure to ensure it adheres to the skin. Start at the center of the wrist and work your way outward, smoothing out any wrinkles or air pockets as you go. Make sure to cover the entire area, but avoid overlapping the tape or applying too much tension, which can cause discomfort or skin irritation. Use your fingers to press the tape firmly onto the skin, making sure it is securely in place. If necessary, use a small piece of tape to anchor the end of the strip, preventing it from coming loose during activity. By securing the tape properly, you can ensure a comfortable and supportive fit that will help to reduce pain and inflammation in the wrist.
Common Mistakes to Avoid
When it comes to taping, it's easy to get it wrong, especially for beginners. However, making mistakes can lead to reduced effectiveness, discomfort, and even injury. To help you avoid these pitfalls, we'll explore three common mistakes to watch out for: insufficient tension, incorrect tape placement, and over-taping. By understanding these errors, you can ensure a safe and successful taping experience. One of the most critical aspects of taping is achieving the right amount of tension. If the tape is too loose, it won't provide the necessary support, while too much tension can cause discomfort and restrict movement. Let's take a closer look at the first mistake: insufficient tension.
Insufficient Tension
When taping your wrist, insufficient tension is a common mistake that can lead to ineffective support and potential injury. If the tape is applied too loosely, it will not provide the necessary stability and compression to the wrist joint, allowing for excessive movement and strain on the ligaments and tendons. This can exacerbate existing injuries or even cause new ones, particularly if you're engaging in high-impact activities or repetitive motions. Furthermore, insufficient tension can also lead to the tape shifting or coming undone during activity, rendering it useless and potentially causing more harm than good. To avoid this mistake, it's essential to apply the tape with moderate to firm tension, making sure to compress the soft tissues and provide a snug fit around the wrist. This will help to restrict excessive movement, reduce pain and inflammation, and promote healing and recovery. By applying the right amount of tension, you can ensure that your wrist tape provides the necessary support and protection to keep you performing at your best.
Incorrect Tape Placement
Incorrect tape placement is a common mistake that can lead to ineffective support, discomfort, and even injury. When applying tape to the wrist, it's essential to place it in the correct position to ensure optimal support and stability. The most common incorrect placements include taping too far up the forearm, which can restrict movement and cause discomfort, or taping too far down the hand, which can put pressure on the fingers and wrist joint. Additionally, taping the wrist too tightly can cut off circulation and cause numbness or tingling in the hand. To avoid these mistakes, it's crucial to follow proper taping techniques and take the time to ensure the tape is placed correctly. This includes identifying the correct anatomical landmarks, such as the styloid process and the wrist crease, and applying the tape in a way that provides support without restricting movement. By taking the time to learn proper taping techniques and avoiding common mistakes, individuals can ensure effective support and prevent injuries.
Over-Taping
Over-taping is a common mistake that can lead to reduced mobility, skin irritation, and even injury. When too much tape is applied, it can restrict movement and cause the wrist to feel stiff and uncomfortable. This can be particularly problematic for athletes who require a full range of motion to perform their sport. Furthermore, over-taping can also lead to skin irritation, such as redness, itching, and blistering, especially if the tape is left on for an extended period. In severe cases, over-taping can even cause nerve damage or circulatory problems, which can have long-term consequences. To avoid over-taping, it's essential to use the right amount of tape and apply it correctly, taking care not to wrap the tape too tightly or overlap it excessively. By being mindful of the amount of tape used and applying it with care, individuals can minimize the risk of over-taping and ensure a safe and effective taping experience.