How To Draw A Pine Tree
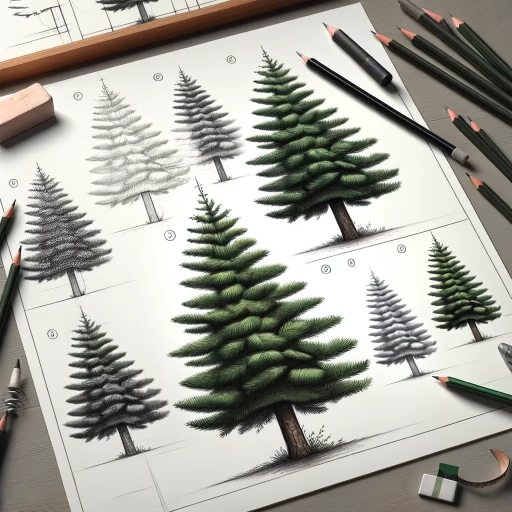
Drawing a pine tree can be a fun and rewarding experience, especially when you have a clear understanding of its basic structure and the techniques involved in capturing its unique features. To create a realistic and visually appealing pine tree, it's essential to start with the basics, including the tree's shape, size, and proportions. From there, you can focus on sketching the pine tree's foliage and needles, which are a distinctive characteristic of this type of tree. Finally, adding depth and dimension to the pine tree will help bring it to life and create a sense of texture and realism. In this article, we'll explore these three key aspects of drawing a pine tree, starting with the foundation of it all: understanding the basic structure of a pine tree.
Understanding the Basic Structure of a Pine Tree
Pine trees are one of the most recognizable and iconic tree species, with their tall, columnar shape and distinctive evergreen foliage. To truly understand and appreciate these magnificent trees, it's essential to grasp their basic structure. A pine tree's structure can be broken down into several key components, including the trunk, branches, and roots, which work together to support the tree's growth and development. By recognizing the shape and size of the tree, you can gain insight into its age, health, and environmental conditions. Additionally, the texture and patterns of the bark can provide valuable information about the tree's species, age, and growth patterns. In this article, we'll delve into the basic structure of a pine tree, starting with the foundation of the tree: the trunk, branches, and roots.
Identifying the Trunk, Branches, and Roots
The trunk, branches, and roots are the three main components of a pine tree's structure. The trunk is the main vertical stem of the tree, providing support and connecting the roots to the branches. It is typically straight and columnar, with a smooth, grayish-brown bark that becomes increasingly rugged with age. The branches, on the other hand, are the horizontal or slightly angled limbs that grow out from the trunk, forming the tree's canopy. They are usually covered in needles and cones, and can be further divided into smaller twigs and shoots. The roots, which are often hidden from view, are the underground structures that anchor the tree and absorb water and nutrients from the soil. They can be shallow and spreading, or deep and taproot-like, depending on the species and growing conditions. When drawing a pine tree, it's essential to accurately depict the relationships between these three components, with the trunk providing a sturdy base for the branching canopy and the roots providing stability and nourishment. By understanding the basic structure of a pine tree, artists can create more realistic and detailed drawings that capture the unique characteristics of these majestic trees.
Recognizing the Shape and Size of the Tree
Recognizing the shape and size of the tree is a crucial step in drawing a realistic pine tree. Pine trees are known for their distinctive conical shape, with a broad base and a narrow top. The trunk of the tree is typically straight and columnar, with a slight tapering towards the top. The branches of a pine tree are usually horizontal or slightly ascending, and are often covered in a dense layer of needles. The size of a pine tree can vary greatly, from small shrub-like trees to towering giants that can reach heights of over 100 feet. When drawing a pine tree, it's essential to capture the proportions of the tree accurately, taking into account the relationship between the trunk, branches, and needles. A good rule of thumb is to divide the tree into thirds, with the trunk making up the bottom third, the branches the middle third, and the needles the top third. By paying attention to the shape and size of the tree, you can create a drawing that is both visually appealing and botanically accurate.
Noticing the Texture and Patterns of the Bark
The texture and patterns of the bark are essential elements to consider when drawing a pine tree. The bark of a pine tree is typically rough and scaly, with a reddish-brown color that darkens with age. The scales are often irregularly shaped and overlap each other, creating a layered, mosaic-like pattern. To accurately depict the bark, observe how the scales are arranged in a spiral pattern, following the natural curve of the trunk. Notice how the scales are thicker and more rugged at the base of the trunk, gradually becoming thinner and smoother towards the top. The texture of the bark can be achieved by using a range of techniques, such as hatching, cross-hatching, and stippling, to create a tactile, three-dimensional effect. Pay attention to the way the light catches the ridges and grooves of the bark, creating a sense of depth and dimensionality. By carefully observing and rendering the texture and patterns of the bark, you can add a level of realism and authenticity to your drawing of a pine tree.
Sketching the Pine Tree's Foliage and Needles
Sketching the pine tree's foliage and needles requires attention to detail and a range of techniques to capture their unique texture and movement. To accurately depict the foliage, it's essential to start by drawing the overall shape and density of the foliage, taking into account the way the needles are clustered together. This will provide a foundation for adding texture and pattern to the needles, which can be achieved through a range of hatching and stippling techniques. Additionally, capturing the movement and flow of the branches is crucial in conveying the dynamic nature of the tree. By mastering these three key elements, artists can create a realistic and engaging representation of the pine tree's foliage and needles. By starting with the overall shape and density of the foliage, artists can establish a solid foundation for their sketch and set themselves up for success in capturing the intricate details of the pine tree's foliage.
Drawing the Overall Shape and Density of the Foliage
To draw the overall shape and density of the foliage, start by visualizing the pine tree's canopy as a series of interconnected, rounded masses. Consider the tree's age, species, and environmental conditions, as these factors can influence the shape and fullness of the foliage. Use gentle, sweeping strokes to block in the overall shape of the canopy, working from the top down. Pay attention to the way the foliage tapers towards the top of the tree, with the branches becoming thinner and more sparse. As you work, focus on capturing the soft, feathery texture of the pine needles, using short, curved lines to suggest the layered, dimensional quality of the foliage. To convey density, vary the spacing and thickness of your lines, with more closely packed lines indicating areas of greater foliage density. Don't be afraid to leave some areas of the paper blank, as this will help create a sense of depth and atmosphere in your drawing. By carefully balancing shape, texture, and density, you can create a convincing and visually appealing representation of the pine tree's foliage.
Rendering the Texture and Pattern of the Needles
When rendering the texture and pattern of the needles, it's essential to capture their unique characteristics. Pine tree needles are typically long and slender, with a waxy texture that gives them a slightly shiny appearance. To convey this texture, use short, curved strokes with a range of values, from light to dark, to suggest the subtle play of light on the needles' surface. Vary the length and thickness of your strokes to indicate the varying lengths and densities of the needles, with shorter, thicker strokes for the denser areas and longer, thinner strokes for the more sparse regions. Pay attention to the pattern of the needles, which often grow in clusters or bundles, with each needle slightly overlapping the next. Use gentle, sweeping motions to suggest the soft, feathery texture of the needles, and be mindful of the negative space between the needles to create a sense of depth and dimensionality. By carefully observing and rendering the texture and pattern of the needles, you can add a level of realism and authenticity to your drawing of the pine tree's foliage.
Capturing the Movement and Flow of the Branches
Capturing the movement and flow of the branches is a crucial aspect of drawing a realistic pine tree. To achieve this, start by observing the natural curves and twists of the branches, taking note of how they grow outward and upward from the trunk. Use gentle, flowing lines to suggest the movement of the branches, varying the thickness and texture of the lines to convey the different ages and textures of the wood. Pay attention to the way the branches intersect and overlap, creating a sense of depth and dimensionality. As you draw, imagine the branches swaying gently in the breeze, and try to capture the sense of movement and energy that this conveys. To add more detail and interest, you can also suggest the smaller twigs and shoots that grow from the branches, using short, delicate lines to create a sense of texture and complexity. By capturing the movement and flow of the branches, you can create a pine tree drawing that feels dynamic and alive, and that effectively conveys the beauty and character of this iconic tree.
Adding Depth and Dimension to the Pine Tree
When it comes to adding depth and dimension to a pine tree, there are several techniques that can be employed to create a more realistic and engaging image. One of the most effective ways to achieve this is by creating contrast and shading to define the form of the tree. By using a range of values and shading techniques, artists can create a sense of volume and depth, drawing the viewer's eye into the image. Additionally, incorporating atmospheric perspective can help to create a sense of distance and depth, while adding background elements can enhance the overall scene and provide context for the tree. By combining these techniques, artists can create a rich and immersive image that invites the viewer to explore. In this article, we will explore these techniques in more detail, starting with the importance of creating contrast and shading to define the form of the pine tree.
Creating Contrast and Shading to Define the Form
Creating contrast and shading to define the form of a pine tree is a crucial step in adding depth and dimension to the drawing. To achieve this, artists can use a range of techniques, including hatching, cross-hatching, and stippling. Hatching involves creating parallel lines that follow the contours of the tree, with the density and thickness of the lines varying to suggest texture and volume. Cross-hatching involves layering hatching lines at different angles to create a more nuanced and detailed representation of the tree's form. Stippling, on the other hand, involves creating patterns of small dots to suggest texture and shading. By carefully controlling the density and placement of these dots, artists can create a range of subtle, nuanced effects that add depth and dimension to the tree. In addition to these techniques, artists can also use a range of shading tools, including pencils, charcoal, and ink, to create a range of tonal values that help to define the form of the tree. By carefully balancing light and dark values, artists can create a sense of volume and three-dimensionality that draws the viewer's eye into the drawing. Ultimately, the key to creating effective contrast and shading is to observe the tree carefully and to use a range of techniques to capture its unique texture, form, and character.
Adding Atmospheric Perspective to Create Distance
Adding atmospheric perspective to create distance is a crucial technique in drawing a pine tree, as it helps to create a sense of depth and dimensionality. Atmospheric perspective refers to the way objects appear to fade into the background as they recede into the distance, due to the scattering of light by the Earth's atmosphere. To add atmospheric perspective to your pine tree drawing, start by creating a subtle gradient of color and contrast between the foreground and background. Warm colors and high contrast tend to advance, while cool colors and low contrast recede. Use a range of blues and purples to create a sense of depth and distance in the background, while reserving warmer colors like greens and browns for the foreground. Additionally, pay attention to the level of detail and texture in your drawing, as objects in the distance tend to appear softer and less defined. By incorporating these techniques, you can create a sense of distance and depth in your pine tree drawing, drawing the viewer's eye into the scene.
Incorporating Background Elements to Enhance the Scene
Incorporating background elements is a crucial step in adding depth and dimension to your pine tree drawing. A well-crafted background can transport the viewer into the scene, making the tree feel more lifelike and immersive. To start, consider the environment in which your pine tree exists. Is it standing alone in a snowy forest, or is it part of a lush, green landscape? Think about the colors, textures, and shapes that would complement your tree. For a snowy scene, you might include gentle hills, snow-covered rocks, or a frozen lake in the distance. In a warmer setting, you could add rolling hills, wildflowers, or a meandering stream. When drawing the background, use soft, gentle lines to suggest the shapes and forms, rather than hard, defined edges. This will help create a sense of depth and atmosphere. You can also experiment with different techniques, such as hatching or cross-hatching, to add texture and dimension to the background. Remember, the background should enhance the tree, not overpower it, so keep the focus on the pine tree while still creating a rich and engaging environment. By incorporating background elements, you'll be able to create a more dynamic and immersive drawing that draws the viewer in and invites them to explore the world of your pine tree.