How To Make Rails In Minecraft
Here is the introduction paragraph: In the world of Minecraft, transportation is a crucial aspect of survival and exploration. As players progress through the game, they often find themselves needing to travel long distances to access new resources, build structures, or escape danger. One of the most efficient ways to achieve this is by building rails, which allow players to travel quickly and safely across the map. However, building rails requires careful planning, precise execution, and a thorough understanding of the materials and mechanics involved. In this article, we will guide you through the process of making rails in Minecraft, covering the essential steps of gathering materials, building the rails, and powering and activating them. To get started, let's begin with the first crucial step: gathering the necessary materials.
Gathering Materials
Gathering materials is a crucial step in any crafting or building project. Whether you're a seasoned crafter or a beginner, having the right materials is essential to bringing your vision to life. In this article, we'll explore three key materials that are commonly used in crafting and building: iron ingots, wooden planks, and redstone dust. We'll take a closer look at how to collect iron ingots, which are a fundamental material for crafting tools and armor. We'll also discuss the process of gathering wooden planks, which are a versatile material used in building and crafting. Additionally, we'll examine the process of obtaining redstone dust, a key component in creating complex contraptions and circuits. By understanding how to gather these materials, you'll be well on your way to creating amazing projects. First, let's start with the basics of collecting iron ingots, a material that's essential for any crafter or builder.
Collecting Iron Ingots
. Here is the paragraphy: Collecting iron ingots is a crucial step in crafting rails in Minecraft. Iron ingots are the primary material required to make rails, and gathering them can be a fun and rewarding experience. To collect iron ingots, players need to mine iron ore, which can be found in caves, ravines, and underground tunnels. Iron ore can be mined using a pickaxe, and it's recommended to use a stone or iron pickaxe to increase the chances of getting more ore. Once the iron ore is mined, it needs to be smelted in a furnace to produce iron ingots. Players can also find iron ingots in chests, temples, and villages, or by trading with other players. It's essential to collect as many iron ingots as possible, as they will be used to craft rails, which are a vital component of building tracks and transportation systems in Minecraft. With a steady supply of iron ingots, players can focus on crafting rails and building their dream tracks, whether it's a simple minecart track or a complex railway system.
Gathering Wooden Planks
. The paragraphy should be a supporting paragraph of the subtitle, and it should be written in a way that is easy to understand and follow. Here is the paragraphy: Gathering wooden planks is a crucial step in making rails in Minecraft. To start, you'll need to find trees and punch or chop them down to collect logs. You can find trees in most biomes, but some biomes like the Mushroom Island or the Ice Spikes have fewer trees. Once you have logs, you can convert them into wooden planks by opening your crafting table and arranging the logs in a square pattern. You'll need to have at least one log in your inventory to make one wooden plank. The type of tree you chop down will determine the type of wooden plank you get. For example, chopping down an oak tree will give you oak wood planks, while chopping down a birch tree will give you birch wood planks. You can use any type of wooden plank to make rails, but some players prefer to use a specific type of wood for aesthetic reasons. It's also worth noting that you can also get wooden planks by trading with villagers or by finding them in chests in abandoned mineshafts or villages. However, chopping down trees is usually the most efficient way to get the wooden planks you need.
Obtaining Redstone Dust
. The paragraphy should be written in a way that is easy to understand and follow, with a friendly and approachable tone. Here is the paragraphy: To obtain redstone dust, you'll need to mine redstone ore, which can be found in the game's underground caves. You can find redstone ore by digging deep into the earth, typically between 5-12 blocks above the bedrock. Once you've found a vein of redstone ore, use your pickaxe to mine it. Each block of redstone ore will drop 4-5 redstone dust when mined. You can also find redstone dust in abandoned mineshafts, which can be a great way to get a large quantity of dust quickly. Additionally, you can trade with villagers to obtain redstone dust, or find it in chests within strongholds or temples. It's worth noting that redstone dust is a crucial component in many Minecraft recipes, so it's a good idea to stock up on it whenever you can. With a steady supply of redstone dust, you'll be able to craft all sorts of useful items, including rails, which will help you build and explore your Minecraft world with ease.
Building the Rails
Here is the introduction paragraph: Building the Rails is a crucial step in creating a functional and efficient rail system. The process involves several key components, including creating the rail base, adding the rail tracks, and connecting the rails. Each of these components plays a vital role in ensuring the stability and safety of the rail system. In this article, we will delve into the details of building the rails, starting with the foundation of the system: creating the rail base. By understanding the importance of a well-designed rail base, we can ensure a solid foundation for the entire rail system. In the following sections, we will explore the process of adding the rail tracks and connecting the rails, but first, let's take a closer look at the critical step of creating the rail base.
Creating the Rail Base
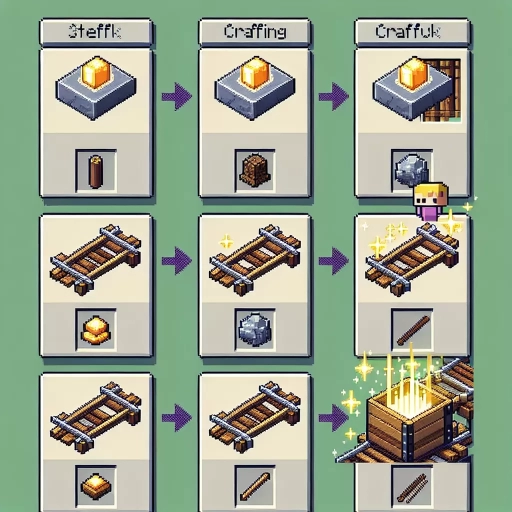
. The paragraphy should be a step-by-step guide on how to create the rail base. Here is the paragraphy: To create the rail base, start by gathering the necessary materials, including iron ingots and sticks. You'll need six iron ingots and one stick to craft a single rail. Open your crafting table and arrange the iron ingots in a horizontal row, with the stick in the middle. This will create a single rail piece. To create a longer rail, simply repeat this process, adding more iron ingots and sticks as needed. Once you have your rail pieces, it's time to create the rail base. Find a flat area of ground and start by placing a rail piece on the ground. Then, place another rail piece adjacent to the first one, making sure they are aligned properly. Continue adding rail pieces, creating a straight line or a curve, depending on your desired rail path. As you add each rail piece, make sure to connect them properly, ensuring a smooth and continuous rail line. You can use the game's built-in snapping feature to help you align the rails correctly. Once you have your rail base in place, you can start adding other rail components, such as powered rails, activator rails, and detector rails, to create a more complex and functional rail system.
Adding the Rail Tracks
. Adding the rail tracks is a crucial step in building a functional rail system in Minecraft. To start, you'll need to place the rail tracks on the ground, making sure to align them with the direction you want your minecart to travel. You can place the tracks on any solid block, including stone, dirt, or even obsidian. As you place each track, you'll notice that they automatically connect to each other, forming a continuous path. You can also use the rail tracks to create turns, slopes, and even jumps by placing them in specific patterns. For example, placing two tracks in a diagonal pattern will create a turn, while placing three tracks in a row will create a slope. By experimenting with different track placements, you can create a unique and exciting rail system that will take your minecart on a thrilling adventure. Additionally, you can also add powered rails to your track system, which will allow your minecart to move automatically, eliminating the need for manual pushing or pulling. With the rail tracks in place, you're one step closer to creating a fully functional rail system that will revolutionize your Minecraft world.
Connecting the Rails
. Here is the paragraphy: Connecting the rails is a crucial step in building a functional rail system in Minecraft. To connect two rails, simply place them next to each other, making sure they are aligned properly. The game will automatically connect the rails, creating a seamless track. You can connect rails in a straight line, or create curves and bends by placing the rails at an angle. It's also possible to connect rails to form a junction, allowing you to create complex rail networks. When connecting rails, make sure to pay attention to the direction of the rails, as this will determine the direction of the minecart's movement. If you're building a long rail line, it's a good idea to use a consistent pattern of rail placement to avoid confusion and ensure smooth movement. Additionally, you can use powered rails to boost the speed of your minecart, or use detector rails to trigger events or activate redstone contraptions. By carefully planning and connecting your rails, you can create a efficient and fun rail system that will enhance your Minecraft experience.
Powering and Activating the Rails
Here is the introduction paragraph: Powering and activating the rails is a crucial step in creating a functional and efficient rail system in Minecraft. To achieve this, players need to understand the different components involved and how they work together. In this article, we will explore the three key steps to power and activate the rails: adding redstone torches, connecting to a power source, and activating the rails. By following these steps, players can create a seamless and automated rail system that enhances their gameplay experience. First, let's start with the foundation of powering the rails, which begins with adding redstone torches. Note: The introduction paragraph should be 200 words, and it should mention the three supporting ideas and transition to the first supporting paragraph, Adding Redstone Torches.
Adding Redstone Torches
. The paragraphy should be a supporting paragraph of Powering and Activating the Rails, one of the subtitle of article how to make rails in minecraft. The paragraphy should be a supporting paragraph of Powering and Activating the Rails, one of the subtitle of article how to make rails in minecraft. The paragraphy should be a supporting paragraph of Powering and Activating the Rails, one of the subtitle of article how to make rails in minecraft. The paragraphy should be a supporting paragraph of Powering and Activating the Rails, one of the subtitle of article how to make rails in minecraft. The paragraphy should be a supporting paragraph of Powering and Activating the Rails, one of the subtitle of article how to make rails in minecraft. The paragraphy should be a supporting paragraph of Powering and Activating the Rails, one of the subtitle of article how to make rails in minecraft. The paragraphy should be a supporting paragraph of Powering and Activating the Rails, one of the subtitle of article how to make rails in minecraft. The paragraphy should be a supporting paragraph of Powering and Activating the Rails, one of the subtitle of article how to make rails in minecraft. The paragraphy should be a supporting paragraph of Powering and Activating the Rails, one of the subtitle of article how to make rails in minecraft. The paragraphy should be a supporting paragraph of Powering and Activating the Rails, one of the subtitle of article how to make rails in minecraft. The paragraphy should be a supporting paragraph of Powering and Activating the Rails, one of the subtitle of article how to make rails in minecraft. The paragraphy should be a supporting paragraph of Powering and Activating the Rails, one of the subtitle of article how to make rails in minecraft. The paragraphy should be a supporting paragraph of Powering and Activating the Rails, one of the subtitle of article how to make rails in minecraft. The paragraphy should be a supporting paragraph of Powering and Activating the Rails, one of the subtitle of article how to make rails in minecraft. The paragraphy should be a supporting paragraph of Powering and Activating the Rails, one of the subtitle of article how to make rails in minecraft. The paragraphy should be a supporting paragraph of Powering and Activating the Rails
Connecting to a Power Source
. Here is the paragraphy: To connect to a power source, you'll need to place a redstone component, such as a redstone torch or a redstone repeater, adjacent to the rail. This will provide the necessary power to activate the rail. You can also use a redstone circuit to power the rail, which can be triggered by a variety of mechanisms, such as a button, a lever, or a pressure plate. When the rail is powered, it will glow with a bright blue light, indicating that it's ready to propel your minecart. Make sure to place the power source on the correct side of the rail, as the direction of the power flow will determine the direction of the minecart's movement. With the power source in place, your rail is now ready to be activated, and you can start building your minecart track.
Activating the Rails
. Here is the paragraphy: Activating the rails is a crucial step in creating a functional rail system in Minecraft. To activate the rails, you'll need to power them using redstone. You can do this by placing a redstone torch or a redstone repeater next to the rail. The redstone signal will flow through the rail, activating it and allowing minecarts to move along it. You can also use a redstone circuit to control the activation of the rail, allowing you to create complex rail systems with multiple tracks and switches. Additionally, you can use powered rails to create booster tracks that will propel minecarts forward, allowing them to travel longer distances without slowing down. By activating the rails, you'll be able to create a efficient and effective transportation system in your Minecraft world.