How To Draw A Crab
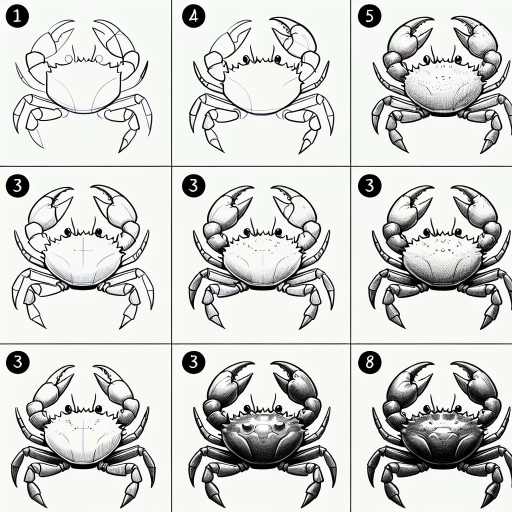
Here is the introduction paragraph: Drawing a crab can be a fun and rewarding experience, especially when you have a clear understanding of its basic structure and anatomy. To create a realistic and detailed crab drawing, it's essential to start with the basics and build your way up. In this article, we'll take you through a step-by-step guide on how to draw a crab, covering the fundamental aspects of its structure, body, and details. We'll begin by understanding the basic structure of a crab, including its body shape, shell, and proportions. From there, we'll move on to sketching the crab's body and shell, paying attention to its texture, shape, and size. Finally, we'll add the crab's legs, claws, and other details, bringing your drawing to life. By following these simple steps, you'll be able to create a stunning and realistic crab drawing. So, let's start by understanding the basic structure of a crab.
Understanding the Basic Structure of a Crab
Here is the introduction paragraph: The fascinating world of crustaceans is home to a diverse array of species, but none as intriguing as the humble crab. With over 7,000 known species, crabs can be found in oceans and seas around the globe, each with their unique characteristics and adaptations. To truly appreciate these incredible creatures, it's essential to understand their basic structure. By familiarizing yourself with the crab's body parts, you'll gain a deeper understanding of their anatomy and how it enables them to thrive in their environments. Observing the proportions and symmetry of a crab can also provide valuable insights into their evolution and behavior. Furthermore, noting the different types of crabs and their unique features can help you identify and distinguish between various species. By exploring these aspects, you'll be well on your way to understanding the basic structure of a crab.
1. Familiarizing yourself with the crab's body parts
. Here is the paragraphy: Familiarizing yourself with the crab's body parts is essential to drawing a realistic and accurate representation. A crab's body is divided into two main parts: the cephalothorax and the abdomen. The cephalothorax is the front part of the crab's body and contains the head, thorax, and four pairs of walking legs. The abdomen is the rear part of the crab's body and is made up of six segments. The crab's body is also covered in a hard exoskeleton that is made up of a series of plates called sclerites. The sclerites are connected by flexible joints that allow the crab to move its body. In addition to the body parts, crabs also have a pair of large claws, called chelae, that are used for defense, capturing prey, and even communicating with other crabs. The chelae are made up of a hard, calcified material and are very powerful. By understanding the different body parts of a crab, you can begin to draw a more accurate and detailed representation of these fascinating creatures.
2. Observing the proportions and symmetry of a crab
. Here is the paragraphy: Observing the proportions and symmetry of a crab is crucial in drawing a realistic and visually appealing crab. A crab's body is divided into two main parts: the cephalothorax and the abdomen. The cephalothorax is the front part of the crab, which includes the head, thorax, and claws, while the abdomen is the rear part, which is usually narrower and more rounded. When drawing a crab, it's essential to pay attention to the proportions of these two parts. The cephalothorax should be larger and more prominent, while the abdomen should be smaller and more curved. Additionally, crabs have a distinctive symmetry, with their body parts arranged in a specific pattern. The claws, for example, are usually symmetrical, with one claw on each side of the body. The eyes, antennae, and mouthparts are also arranged in a symmetrical pattern. To draw a crab accurately, observe the symmetry of these features and try to replicate them in your drawing. You can also use a mirror or a reference image to help you achieve symmetry. By paying attention to the proportions and symmetry of a crab, you can create a more realistic and visually appealing drawing.
3. Noting the different types of crabs and their unique features
. Here is the paragraphy: When it comes to drawing a crab, it's essential to understand the different types of crabs and their unique features. There are over 4,500 species of crabs, ranging from the tiny pea crab to the massive Japanese spider crab. One of the most recognizable types of crabs is the blue crab, known for its vibrant blue shell and distinctive claws. The Dungeness crab, on the other hand, has a more rounded shell and is prized for its sweet and tender flesh. The hermit crab, with its soft, unprotected body, is often seen scurrying across beaches, searching for a new shell to call home. The horseshoe crab, with its distinctive helmet-shaped shell, is often mistaken for a true crab, but is actually a member of a separate order. Each of these types of crabs has its own unique characteristics, from the shape and color of its shell to the shape and size of its claws. By studying these different types of crabs, you can gain a deeper understanding of the basic structure of a crab and how to draw one accurately. Whether you're drawing a realistic portrait of a crab or a more stylized cartoon, understanding the different types of crabs and their unique features is essential for creating a believable and engaging drawing.
Sketching the Crab's Body and Shell
Here is the introduction paragraph: Sketching a crab's body and shell can be a fun and rewarding experience, especially when done with precision and attention to detail. To create a realistic and accurate drawing, it's essential to understand the different components that make up a crab's anatomy. In this article, we'll explore the key elements of sketching a crab's body and shell, including drawing the oval-shaped body and its segments, sketching the shell and its various parts, such as the carapace and abdomen, and adding texture and details to the shell, such as ridges and patterns. By mastering these techniques, you'll be able to create a detailed and lifelike drawing of a crab. Understanding the basic structure of a crab is crucial to creating an accurate and realistic drawing, and with these tips and techniques, you'll be well on your way to becoming a skilled artist.
1. Drawing the oval-shaped body and its segments
. The paragraphy should be written in a friendly and approachable tone, making it easy for readers to follow along and understand the process. Here is the paragraphy: To start drawing your crab, begin by sketching the oval-shaped body, which is divided into two main segments: the cephalothorax and the abdomen. The cephalothorax is the front segment, which contains the crab's head, thorax, and four pairs of walking legs. The abdomen is the rear segment, which is usually narrower and more rounded. When drawing the oval body, pay attention to the proportions: the cephalothorax should be slightly larger than the abdomen. You can also add a slight curvature to the body, as crabs tend to have a gentle arch to their backs. Don't worry too much about the details at this stage – just focus on getting the overall shape and proportions right. As you draw, remember that crabs have a hard exoskeleton, so try to capture the sense of rigidity and structure in your lines. You can also add some gentle, rounded edges to suggest the softness of the crab's underside. By breaking down the body into these two main segments, you'll be able to build a solid foundation for your crab drawing and add more details later on.
2. Sketching the shell and its various parts, such as the carapace and abdomen
. The paragraphy should be a detailed and step-by-step guide on how to sketch the shell and its various parts, such as the carapace and abdomen. The paragraphy should be written in a clear, concise, and easy-to-understand manner, with a friendly and approachable tone. The paragraphy should also include some tips and tricks to help the reader improve their drawing skills. Here is the paragraphy: Sketching the shell and its various parts is a crucial step in drawing a realistic crab. Start by sketching the carapace, which is the hard, outer shell that covers the crab's body. The carapace is typically oval-shaped and has a distinctive curve to it. Use a gentle, flowing motion to sketch the carapace, making sure to capture its smooth, rounded shape. Next, sketch the abdomen, which is the softer, more flexible part of the shell that protects the crab's internal organs. The abdomen is usually narrower and more pointed than the carapace, and it has a series of small, triangular plates that run along its length. Use short, sharp lines to sketch the plates, making sure to capture their texture and detail. As you sketch the shell and its various parts, pay attention to the proportions and relationships between them. Make sure the carapace is in proportion to the abdomen, and that the plates on the abdomen are evenly spaced and symmetrical. One tip to help you get the proportions right is to use a measuring technique, where you measure the length and width of the carapace and abdomen against each other. This will help you ensure that your drawing is accurate and realistic. Another tip is to pay attention to the texture and detail of the shell, using different line weights and hatching techniques to capture its rough, bumpy surface. By following these steps and tips, you should be able to sketch a realistic and detailed shell that will be the foundation of your crab drawing.
3. Adding texture and details to the shell, such as ridges and patterns
. Here is the paragraphy: When it comes to adding texture and details to the shell, there are several techniques you can use to create a realistic and visually appealing effect. One approach is to use short, curved lines to suggest the ridges and bumps that are characteristic of a crab's shell. You can also use hatching and cross-hatching techniques to create a sense of texture and depth. For example, you can use closely spaced lines to create a smooth, shiny surface, or more widely spaced lines to suggest a rougher, more weathered texture. Additionally, you can use patterns such as stripes or spots to add visual interest to the shell. To create a more realistic effect, be sure to vary the size and shape of the patterns, and to use a range of values to create a sense of depth and dimension. By adding texture and details to the shell, you can create a more engaging and lifelike drawing of a crab.
Adding the Crab's Legs, Claws, and Other Details
Here is the introduction paragraph: When it comes to drawing a realistic crab, it's essential to pay attention to the finer details that make this crustacean unique. One of the most distinctive features of a crab is its legs, claws, and other appendages. To create a convincing crab illustration, you'll need to know how to draw these details accurately. In this article, we'll explore the process of adding the crab's legs, claws, and other details, including drawing the legs and their joints, adding the eyes, antennae, and other facial features, and incorporating additional details such as the crab's mouthparts and gills. By mastering these techniques, you'll be able to create a detailed and realistic crab illustration that showcases your artistic skills. Understanding the basic structure of a crab is crucial to getting these details right, so let's dive in and explore the world of crab anatomy.
1. Drawing the legs and their joints, including the pincer-like claws
. Here is the paragraphy: When drawing the legs and their joints, including the pincer-like claws, it's essential to capture their unique structure and movement. Start by sketching the legs, which are typically long and slender, with a gentle curve. Each leg should have a distinct joint, allowing for flexibility and movement. The joints should be slightly thicker than the rest of the leg, with a subtle indentation where the leg meets the body. As you draw the legs, pay attention to their spacing and arrangement, ensuring they are evenly distributed around the body. The front legs, which are often larger and more prominent, should be positioned slightly forward of the others. The claws, or pincers, are a distinctive feature of the crab's legs. Draw them as small, oval-shaped structures at the end of each leg, with a slight curve and a sharp point. The claws should be positioned in a way that suggests they are capable of snapping shut quickly, with a subtle gap between them. To add texture and detail to the legs and claws, use short, curved lines to suggest the presence of hair or setae, which are small, hair-like structures that help the crab sense its environment. By carefully drawing the legs and their joints, including the pincer-like claws, you can create a realistic and engaging crab that seems to come alive on the page.
2. Adding the eyes, antennae, and other facial features
. The paragraphy should be written in a friendly and approachable tone, making it easy for readers to follow along and understand the instructions. Here is the paragraphy: Now that we have the basic shape of our crab's body, it's time to add some personality with the eyes, antennae, and other facial features. Start by drawing two small circles for the eyes, making sure to leave a small gap between them. Add a small dot in the center of each circle to create the pupils. For the antennae, draw two long, thin lines that extend from the top of the head, curving slightly outward as they go. You can also add some small, rounded shapes at the base of the antennae to create a more realistic look. To add some extra detail, you can draw a small mouth and some lines to indicate the crab's nose and jaw. Don't worry too much about making these features perfect – we're going for a cute and cartoonish look here! Finally, use a marker or pen to add some texture and shading to the eyes and antennae, giving your crab some extra depth and dimension. With these facial features in place, your crab is really starting to come to life. Next, we'll add the legs, claws, and other details that will make your crab look like it's ready to scuttle across the beach.
3. Incorporating additional details, such as the crab's mouthparts and gills
. Here is the paragraphy: To add the crab's mouthparts and gills, start by drawing a small, triangular shape for the mouth, located at the front of the head. The mouth should be slightly curved and have a small notch at the top. Next, draw two small, oval-shaped eyes on either side of the head, making sure to leave a small gap between them. The eyes should be fairly close together and should be positioned so that they are looking slightly upwards. Now, draw two long, thin antennae that extend from the top of the head, just above the eyes. The antennae should be slightly curved and should taper to a point at the end. Moving on to the gills, draw a series of small, feathery shapes along the sides of the body, just below the carapace. The gills should be fairly evenly spaced and should be slightly curved to follow the shape of the body. Finally, add some texture to the gills by drawing a series of small, wavy lines along the edges. This will give the gills a soft, feathery appearance. With the mouthparts and gills in place, your crab is starting to look more detailed and realistic. You can now move on to adding the legs, claws, and other details to bring your crab to life.