How To Install Ssd Drive
Upgrading your computer with a solid-state drive (SSD) can significantly improve its performance, speed, and overall efficiency. Installing an SSD drive is a relatively straightforward process that can be completed with a few simple steps. However, before you begin, it's essential to prepare your system and ensure a smooth transition. In this article, we will guide you through the process of installing an SSD drive, from preparation to configuration. We will start by discussing the necessary steps to take before installing your SSD drive, including backing up your data, checking compatibility, and purchasing the right equipment. Then, we will walk you through the step-by-step installation process, covering everything from shutting down your computer to connecting the SSD drive. Finally, we will provide tips on how to configure your SSD drive after installation, including setting it as the primary drive and optimizing its performance. By following these steps, you can ensure a successful SSD installation and start enjoying the benefits of faster loading times and improved overall performance. So, let's get started with the first step: Preparation Before Installing SSD Drive.
Preparation Before Installing SSD Drive
Upgrading to a solid-state drive (SSD) can significantly enhance your computer's performance, but it's essential to take the necessary steps before installing the new drive. Preparation is key to ensuring a smooth transition and minimizing potential risks. Before installing an SSD drive, it's crucial to backup your data, choose the right SSD drive for your needs, and prepare the necessary tools. By doing so, you can avoid data loss, ensure compatibility, and make the installation process more efficient. In this article, we'll explore these essential steps in more detail, starting with the importance of backing up your data. (Note: The answer should be 200 words, and the last sentence should be "In this article, we'll explore these essential steps in more detail, starting with the importance of backing up your data.")
Backup Your Data
Before installing an SSD drive, it's essential to backup your data to prevent any potential loss. This step is crucial because the installation process may require you to erase all data on your existing hard drive. Backing up your data ensures that you can restore your files, documents, and programs in case something goes wrong during the installation process. You can use an external hard drive, cloud storage, or a backup software to create a copy of your important files. It's recommended to backup your data regularly, not just before installing an SSD drive, to ensure that your files are safe and up-to-date. Additionally, backing up your data can also help you to transfer your files to the new SSD drive, making the transition smoother and more efficient. By taking the time to backup your data, you can ensure a successful and stress-free SSD installation experience.
Choose the Right SSD Drive
When choosing the right SSD drive, consider several factors to ensure you get the best performance and compatibility for your needs. First, determine the type of SSD you need: SATA, PCIe, or M.2. SATA SSDs are the most common and compatible with most systems, while PCIe SSDs offer faster speeds and are ideal for high-performance applications. M.2 SSDs are compact and designed for newer systems with M.2 slots. Next, consider the capacity: 256GB, 512GB, 1TB, or larger. A higher capacity SSD provides more storage space, but may not be necessary for smaller systems or those with limited storage needs. Additionally, check the read and write speeds: look for SSDs with high sequential read and write speeds, such as 500MB/s and 450MB/s, respectively. Other important factors include the controller, DRAM cache, and endurance rating. A good controller, such as the Samsung 970 EVO or WD Black SN750, ensures efficient data transfer and management. A sufficient DRAM cache, typically 512MB or 1GB, helps improve performance. Finally, consider the endurance rating, measured in terabytes written (TBW), which indicates the SSD's lifespan. A higher TBW rating ensures the SSD can handle more data writes over its lifetime. By considering these factors, you can choose the right SSD drive that meets your performance, capacity, and budget needs.
Prepare the Necessary Tools
Before installing an SSD drive, it is essential to prepare the necessary tools to ensure a smooth and successful installation process. The tools required may vary depending on the type of SSD drive and the computer system being used. However, some common tools that are typically needed include a screwdriver, preferably a Torx or Phillips head, to remove the screws that hold the computer case or SSD drive bay in place. A plastic spudger or similar tool may also be required to gently pry open the case or remove any clips that hold the SSD drive in place. Additionally, an SSD mounting bracket or adapter may be necessary to secure the SSD drive to the computer case or motherboard. It is also recommended to have some cable ties or zip ties on hand to manage any cables and keep them organized. Furthermore, it is crucial to have a can of compressed air to clean out any dust or debris from the computer case and SSD drive before installation. Having all the necessary tools ready and within reach will save time and reduce the risk of damaging any components during the installation process.
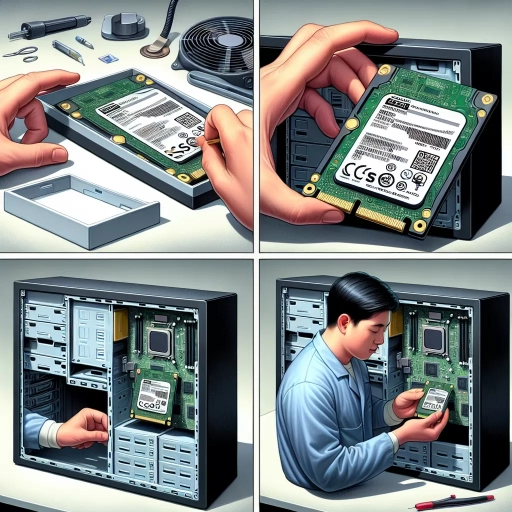
Step-by-Step Installation Process
Here is the introduction paragraph: Installing a solid-state drive (SSD) in your computer can be a straightforward process if you follow the right steps. With an SSD, you can significantly improve your computer's performance, speed, and overall efficiency. In this article, we will guide you through the step-by-step installation process of an SSD, covering the essential steps to ensure a successful installation. To begin, you will need to shut down your computer and ground yourself to prevent any damage to the internal components. Next, you will need to locate the SSD drive bay and install the drive, followed by connecting the SSD drive to the motherboard. By following these steps, you can ensure a smooth and successful installation of your new SSD. So, let's get started by shutting down your computer and grounding yourself.
Shut Down Your Computer and Ground Yourself
When you're done with the installation process, shut down your computer and ground yourself to prevent any static electricity damage to your new SSD. Static electricity can be a major threat to your computer's components, and it's essential to take precautions to avoid any damage. To ground yourself, touch a metal object or a grounded surface, such as a tap or a door handle, to discharge any static electricity from your body. This simple step can help ensure that your new SSD is installed safely and securely. Once you've grounded yourself, you can proceed to plug in your SSD and turn on your computer, and your new drive should be recognized by your system.
Locate the SSD Drive Bay and Install the Drive
Locate the SSD Drive Bay and Install the Drive. The SSD drive bay is usually located at the bottom of the laptop or on the side, depending on the model. To locate it, refer to your laptop's user manual or search online for specific instructions. Once you've found the drive bay, remove the screws that hold it in place using a screwdriver. Gently pull the drive bay out of the laptop and set it aside. Next, take the SSD drive and align it with the drive bay, making sure the connectors match up. Gently push the SSD drive into the drive bay until it clicks into place. Replace the screws you removed earlier to secure the drive bay in place. Make sure they are tightened firmly but do not overtighten. Finally, reconnect the power and data cables to the SSD drive, making sure they are securely connected. Your SSD drive is now installed and ready to use.
Connect the SSD Drive to the Motherboard
To connect the SSD drive to the motherboard, start by locating the SATA ports on the motherboard. These ports are usually labeled as SATA 1, SATA 2, and so on. Next, identify the SATA cable that came with the SSD drive. One end of the SATA cable should be connected to the SATA port on the motherboard, while the other end should be connected to the SATA port on the SSD drive. Make sure to securely connect the SATA cable to both the motherboard and the SSD drive to ensure a stable connection. Additionally, if your motherboard supports SATA III, make sure to use a SATA III cable to take full advantage of the faster speeds. If your SSD drive also has a power connector, connect the SATA power cable to the power connector on the SSD drive and the other end to a free SATA power connector on the motherboard or power supply unit. Finally, double-check that all connections are secure and not loose to prevent any data loss or damage to the SSD drive.
Configuring Your SSD Drive After Installation
Configuring your SSD drive after installation is a crucial step to ensure optimal performance and longevity. After installing your SSD drive, there are several key steps to take to get the most out of your new hardware. First, you'll need to enter the BIOS settings and set the SSD drive as the boot drive, which will allow your computer to recognize and utilize the drive as the primary source of data. Next, you'll need to install the operating system on the SSD drive, which will provide a significant boost to your computer's overall speed and responsiveness. Finally, you'll want to transfer your data to the SSD drive, which will help to free up space on your old hard drive and ensure that your most important files are stored on the faster, more reliable SSD drive. By following these steps, you can unlock the full potential of your SSD drive and enjoy a faster, more efficient computing experience. To get started, let's take a closer look at the first step: entering the BIOS settings and setting the SSD drive as the boot drive.
Enter the BIOS Settings and Set the SSD Drive as the Boot Drive
To enter the BIOS settings and set the SSD drive as the boot drive, start by restarting your computer and immediately pressing the key to access the BIOS settings, which is usually F2, F12, or Del, depending on your motherboard model. Once you're in the BIOS settings, navigate to the Boot tab and look for the Boot Order or Boot Priority section. Here, you'll see a list of available boot devices, including your SSD drive, hard drive, and any other connected devices. Use the arrow keys to move the SSD drive to the top of the list, making it the first boot device. Save your changes and exit the BIOS settings. Your computer will now boot from the SSD drive, taking advantage of its faster loading times and improved performance. It's essential to note that the exact steps may vary slightly depending on your motherboard model and BIOS version, so be sure to consult your motherboard manual or online documentation if you're unsure. Additionally, if you're using a UEFI BIOS, you may need to enable UEFI mode and disable Legacy mode to ensure the SSD drive is recognized as a boot device. By setting the SSD drive as the boot drive, you'll be able to take full advantage of its capabilities and enjoy a faster, more responsive computing experience.
Install the Operating System on the SSD Drive
When installing an operating system on an SSD drive, it's essential to ensure that the installation process is done correctly to maximize the drive's performance and lifespan. First, connect the SSD drive to the motherboard using a SATA cable, and then enter the BIOS settings to set the SSD as the primary boot device. Next, insert the installation media, such as a USB drive or CD/DVD, and restart the computer. The installation process will begin, and you'll be prompted to select the language, time zone, and other preferences. When it's time to choose the installation location, select the SSD drive as the destination. It's crucial to ensure that the SSD drive is selected as the primary drive, and not the secondary drive, to avoid any potential issues. Once the installation is complete, the operating system will be installed on the SSD drive, and you can begin configuring the drive for optimal performance.
Transfer Your Data to the SSD Drive
When you've successfully installed your SSD drive, the next step is to transfer your data to the new drive. This process is crucial in ensuring that your computer runs smoothly and efficiently. To start, you'll need to connect your SSD drive to your computer and ensure it's recognized by your operating system. Once connected, you'll need to transfer your operating system, programs, and data to the SSD drive. You can do this by using the cloning software that came with your SSD drive or by using a third-party cloning tool. Cloning your data will ensure that all your files, settings, and programs are transferred to the SSD drive, making it easy to switch to the new drive. Alternatively, you can perform a fresh install of your operating system and programs on the SSD drive, and then transfer your data manually. This method can be more time-consuming, but it allows you to start with a clean slate and avoid transferring any unnecessary files or programs. Regardless of the method you choose, it's essential to ensure that all your data is transferred correctly to the SSD drive to avoid any data loss or corruption. Once the transfer process is complete, you can disconnect your old hard drive and start using your SSD drive as your primary drive.