How To Draw A Sea Turtle
Here is the introduction paragraph: Drawing a sea turtle can be a fun and rewarding experience, especially when you have a clear understanding of its anatomy and the right techniques to bring it to life on paper. To create a realistic and detailed drawing of a sea turtle, it's essential to start with the basics, understanding the animal's anatomy and how its body is structured. This will help you to accurately sketch the turtle's body and shell, and add the necessary details to make your drawing look authentic. In this article, we will guide you through the process of drawing a sea turtle, starting with understanding the basic anatomy of the animal, then moving on to sketching its body and shell, and finally adding the details that will bring your drawing to life. By following these steps, you'll be able to create a beautiful and realistic drawing of a sea turtle. Let's start by understanding the basic anatomy of a sea turtle.
Understanding the Basic Anatomy of a Sea Turtle
Understanding the basic anatomy of a sea turtle is essential for appreciating these incredible creatures and their remarkable adaptations. To gain a deeper understanding of sea turtles, it's crucial to familiarize yourself with their unique body structure, which is comprised of several distinct components. One of the most recognizable features of a sea turtle is its shell, which provides protection and support. Additionally, their flippers and limbs play a vital role in their ability to swim and maneuver in the water. The head and neck of a sea turtle are also noteworthy, as they are capable of withdrawing into the shell for added protection. By examining each of these components in more detail, we can gain a greater appreciation for the intricate anatomy of sea turtles. Let's start by taking a closer look at the shell structure, which is the most distinctive feature of these amazing animals.
Familiarizing with the Shell Structure
The shell of a sea turtle is a remarkable structure that provides protection, support, and buoyancy. It is composed of two main parts: the carapace (dorsal) and the plastron (ventral). The carapace is the dorsal (top) part of the shell, which is made up of scutes (individual plates) that are derived from ribs and vertebrae. The scutes are covered in a hard, keratinized layer that provides additional protection. The plastron, on the other hand, is the ventral (bottom) part of the shell, which is made up of nine bones that are fused together. The plastron is typically more flexible than the carapace and allows for movement of the turtle's limbs and internal organs. The shell is also covered in a layer of skin, which helps to reduce drag and improve swimming efficiency. Understanding the structure of the shell is essential for drawing a realistic sea turtle, as it provides the foundation for the turtle's overall shape and proportions. By familiarizing yourself with the shell's components and how they fit together, you can create a more accurate and detailed drawing of a sea turtle.
Recognizing the Flippers and Limbs
Recognizing the flippers and limbs of a sea turtle is crucial in drawing an accurate and realistic representation of these amazing creatures. Sea turtles have two pairs of flippers, which are actually modified limbs that they use to swim and maneuver through the water. The front flippers are larger and more muscular than the hind flippers, and are used for propulsion and steering. The hind flippers, on the other hand, are smaller and more delicate, and are used for balance and stability. When drawing a sea turtle, it's essential to capture the unique shape and proportions of the flippers, as well as their relationship to the rest of the body. The flippers should be positioned in a way that suggests movement and fluidity, with the front flippers slightly angled and the hind flippers tucked in close to the body. By paying attention to these details, you can create a drawing that not only looks realistic but also conveys the sense of movement and energy that is characteristic of sea turtles. Additionally, it's worth noting that sea turtles also have vestigial limbs, which are small, non-functional limbs that are remnants of their land-dwelling ancestors. These vestigial limbs are usually hidden from view, but can be visible in certain poses or angles, and can add an extra layer of realism to your drawing.
Observing the Head and Neck
Observing the head and neck of a sea turtle is a crucial step in understanding its basic anatomy. The head is relatively small compared to the body, with a rounded shape and a short, blunt snout. The eyes are positioned on the sides of the head, and the nostrils are located on top of the snout. The neck is long and slender, allowing the turtle to withdraw its head into the shell for protection. The neck is also very flexible, enabling the turtle to move its head from side to side and up and down. When drawing a sea turtle, it's essential to capture the proportions of the head and neck accurately, as they play a significant role in the overall appearance of the animal. Pay attention to the shape and size of the head, the position of the eyes and nostrils, and the length and flexibility of the neck. By observing and rendering these details correctly, you'll be able to create a realistic and engaging drawing of a sea turtle.
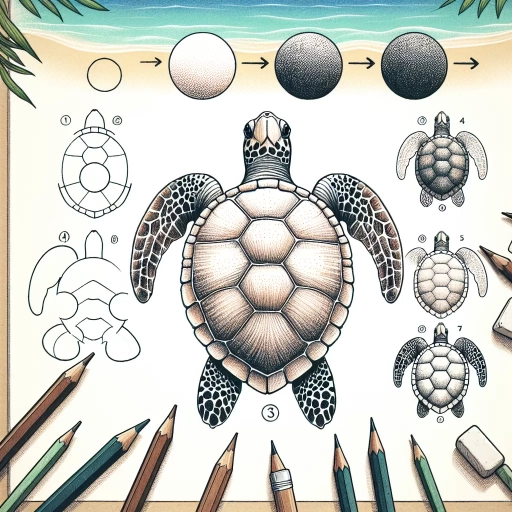
Sketching the Sea Turtle's Body and Shell
Sketching the Sea Turtle's Body and Shell is a crucial step in creating a realistic and detailed drawing of these magnificent creatures. To achieve this, it's essential to understand the anatomy of the sea turtle's body and shell. The shell, which is made up of the carapace and plastron, provides protection and support for the turtle's internal organs. In this article, we will explore the key elements of sketching the sea turtle's body and shell, including drawing the carapace and plastron, adding the scutes and scales, and shaping the flippers and tail. By mastering these techniques, you'll be able to create a stunning and accurate representation of a sea turtle. Let's start by examining the foundation of the shell, the carapace and plastron, and learn how to draw these essential components.
Drawing the Carapace and Plastron
To draw the carapace and plastron of a sea turtle, start by sketching the overall shape of the shell. The carapace is the dorsal, or top, part of the shell, and it is typically dome-shaped. The plastron is the ventral, or bottom, part of the shell, and it is usually flat. Begin by drawing a large oval for the carapace, making sure it is slightly flattened at the top and bottom. The plastron can be drawn as a smaller oval, connected to the carapace by a curved line. Next, add the scutes, which are the individual plates that make up the shell. The scutes on the carapace are typically hexagonal in shape, and they are arranged in a specific pattern. Start by drawing a row of scutes along the center of the carapace, and then add additional rows on either side. The scutes on the plastron are usually smaller and more irregularly shaped. Finally, add some texture to the shell by drawing short, curved lines that follow the shape of the scutes. This will give your sea turtle's shell a more realistic, bumpy appearance.
Adding the Scutes and Scales
To add the scutes and scales to your sea turtle drawing, start by sketching the scutes on the carapace, or the dorsal surface of the shell. The scutes are the individual plates that cover the shell, and they are arranged in a specific pattern. Typically, there are 13 scutes on a sea turtle's carapace, with five vertebral scutes running along the center of the shell and eight costal scutes on either side. Each scute should be slightly curved and overlap the one below it, giving the shell a layered appearance. Next, add the scales to the plastron, or the ventral surface of the shell. The scales on the plastron are usually smaller and more rounded than those on the carapace. You can also add some texture to the scales to give them a more realistic appearance. Finally, add some scutes to the flippers and tail, if desired. These scutes are usually smaller and more rounded than those on the carapace. By adding the scutes and scales to your sea turtle drawing, you can give it a more detailed and realistic appearance.
Shaping the Flippers and Tail
The flippers and tail of a sea turtle are crucial features that require attention to detail and proportion. To shape the flippers, start by drawing two oval shapes on either side of the body, making sure they are slightly tilted and angled downwards. The front flippers should be slightly larger than the hind flippers, and both should be rounded at the tips. The edges of the flippers should be smooth and curved, with a slight indentation at the base where they meet the body. For the tail, draw a long, curved shape that tapers to a point at the end. The tail should be slightly flattened at the base and rounded at the tip, with a subtle curve that follows the natural shape of the turtle's body. Pay attention to the proportions of the flippers and tail in relation to the body, ensuring that they are in balance and harmony with the rest of the turtle's anatomy. By carefully shaping the flippers and tail, you can add depth, dimension, and realism to your sea turtle drawing.
Adding Details and Finalizing the Drawing
Here is the introduction paragraph: When it comes to creating a realistic and detailed drawing of a turtle, there are several key elements to focus on. Adding details and finalizing the drawing is a crucial step in bringing your artwork to life. This involves adding texture and patterns to the shell, refining the overall shape and proportions, and carefully drawing the eyes, nostrils, and mouth. By paying attention to these details, you can create a drawing that is not only visually appealing but also accurate and lifelike. In this article, we will explore the importance of adding details and finalizing the drawing, starting with the essential features of the turtle's face - the eyes, nostrils, and mouth. Here is the 200 words supporting paragraph: The eyes, nostrils, and mouth are the most distinctive features of a turtle's face, and drawing them accurately is essential for creating a realistic and engaging portrait. The eyes should be drawn as two small circles, with the top of the circle slightly tilted towards the nose. The nostrils should be drawn as two small dots, positioned on either side of the mouth. The mouth should be drawn as a small, curved line that follows the shape of the jaw. When drawing these features, it's essential to pay attention to their proportions and placement on the face. The eyes should be positioned about one-third of the way down from the top of the head, while the nostrils and mouth should be positioned about halfway down from the eyes. By carefully drawing these features, you can create a turtle face that is both realistic and expressive. With the eyes, nostrils, and mouth in place, you can then move on to adding texture and patterns to the shell, refining the overall shape and proportions of the turtle's body.
Drawing the Eyes, Nostrils, and Mouth
When drawing the eyes, nostrils, and mouth of a sea turtle, it's essential to capture their unique features. Start by drawing the eyes, which are typically large and expressive. Use a gentle curve to create the shape of the eye, making sure to leave enough space between them to accommodate the nostrils. The eyes should be positioned on either side of the head, about one-third of the way down from the top. Add a small circle for the pupil, and a curved line above it to indicate the eyelid. For the nostrils, draw two small oval shapes on top of the head, making sure they're aligned with the eyes. The nostrils should be fairly close together, with a small gap in between. Moving on to the mouth, draw a small, curved line that follows the shape of the jaw. The mouth should be positioned below the nostrils, and should be fairly small compared to the rest of the head. Add a few gentle curves to indicate the shape of the lips, and a small line to suggest the tongue. When drawing these features, remember to keep them in proportion to the rest of the head and body. Pay attention to the subtle curves and shapes that make up the sea turtle's face, and don't be afraid to add your own personal touches to bring the drawing to life. By carefully rendering the eyes, nostrils, and mouth, you'll be able to capture the unique personality and charm of your sea turtle subject.
Adding Texture and Patterns to the Shell
Adding texture and patterns to the shell is a crucial step in creating a realistic sea turtle drawing. To start, use a range of pencils, from 2H to 6B, to create a mottled, scaly texture on the shell. Begin by applying gentle, curved strokes to the shell, following the natural contours of the turtle's body. Vary the pressure and direction of your strokes to achieve a sense of depth and dimension. Next, add a series of concentric circles to the shell, using a fine-tip pen or a sharp pencil. These circles should be evenly spaced and slightly overlapping, giving the shell a sense of layering and texture. To add further detail, use a small brush or a fine-tip pen to create a series of short, curved lines that radiate from the center of each circle. These lines should be irregular and varied in length, giving the shell a sense of organic, natural growth. Finally, use a range of shading techniques, including hatching and cross-hatching, to add depth and dimension to the shell. By carefully building up layers of texture and pattern, you can create a shell that looks realistic and engaging.
Refining the Overall Shape and Proportions
Refining the overall shape and proportions of your sea turtle drawing is a crucial step in creating a realistic and visually appealing piece of art. To start, take a step back and evaluate the overall shape of your turtle, paying attention to the proportions of the shell, head, flippers, and body. Make sure the shell is roughly the same width as the body and that the head is in proportion to the rest of the turtle. Check that the flippers are the correct size and shape, and that they are positioned correctly in relation to the body. If necessary, make adjustments to the shape and proportions of your turtle to ensure that it looks balanced and harmonious. Next, refine the shape of the shell, adding more detail and texture to give it a more realistic appearance. Pay attention to the shape and size of the scutes, or individual plates, that make up the shell, and make sure they are evenly spaced and proportionate to the rest of the shell. You can also add more detail to the head and flippers, such as the shape of the eyes and the texture of the skin. By refining the overall shape and proportions of your sea turtle drawing, you can create a more realistic and engaging piece of art that captures the beauty and wonder of these amazing creatures.