How To Draw A Unicorn For Kids
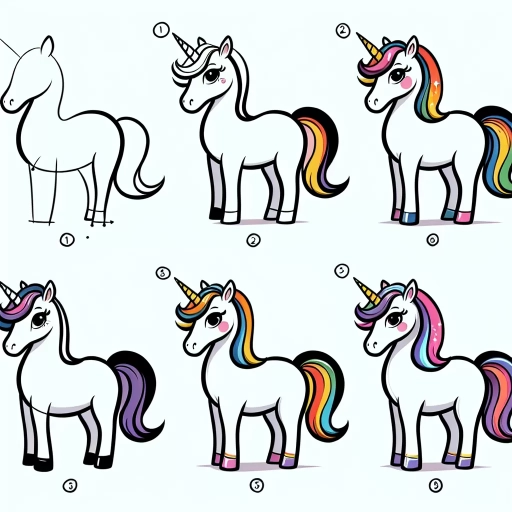
Here is the introduction paragraph: Welcome to the magical world of drawing! In this article, we will take you on a fun-filled journey to learn how to draw a beautiful unicorn. Drawing a unicorn can seem like a daunting task, but don't worry, we've got you covered. To create a stunning unicorn, we will break down the process into three easy-to-follow steps. First, we will start by understanding the basics of drawing a unicorn, including the shapes and proportions that make up its body. Next, we will dive into designing the unicorn's body and features, such as its majestic mane and sparkling eyes. Finally, we will add the finishing touches, including details like a flowing tail and a sprinkle of magic dust. By following these steps, you'll be well on your way to creating a unicorn that's truly one-of-a-kind. So, let's get started by understanding the basics of drawing a unicorn.
Understanding the Basics of Drawing a Unicorn
Drawing a unicorn can seem like a daunting task, especially for those who are new to drawing. However, with a little practice and patience, anyone can learn to draw a beautiful and majestic unicorn. To get started, it's essential to understand the basics of drawing a unicorn, which involves learning the basic shapes and forms that make up the unicorn's body. This includes understanding the proportions and measurements of the unicorn's head, body, and legs, as well as choosing the right drawing tools and materials to bring your unicorn to life. By mastering these fundamental skills, you'll be well on your way to creating a stunning unicorn drawing. In this article, we'll explore the basics of drawing a unicorn, starting with the foundation of any good drawing: learning the basic shapes and forms.
Learning the Basic Shapes and Forms
Learning the basic shapes and forms is a fundamental step in drawing a unicorn, or any other subject for that matter. It's essential to understand that every object, no matter how complex, can be broken down into simple shapes and forms. By mastering these basic shapes, kids can develop their drawing skills and create more accurate and detailed drawings. The basic shapes include circles, ovals, squares, rectangles, triangles, and lines. These shapes can be combined and modified to create more complex forms, such as cylinders, cones, and spheres. For example, a unicorn's body can be represented by a combination of ovals and rectangles, while its horn can be drawn using a triangle and a cylinder. By learning to recognize and draw these basic shapes, kids can build a strong foundation in drawing and improve their overall artistic skills. Additionally, understanding basic shapes and forms can also help kids to better observe and study the world around them, developing their critical thinking and problem-solving skills. As they practice drawing and combining these shapes, kids will become more confident in their ability to draw and create, and will be well on their way to drawing a beautiful and magical unicorn.
Understanding Proportion and Measurement
Understanding proportion and measurement is a crucial aspect of drawing, especially when it comes to creating a realistic and visually appealing unicorn. Proportion refers to the relationship between the size and scale of different parts of the unicorn's body, while measurement involves accurately depicting the dimensions and distances between these parts. To achieve a well-proportioned unicorn, start by dividing the paper into sections or using a grid to help guide your drawing. Measure the length and width of the unicorn's body, head, neck, and legs, using simple ratios and proportions to ensure accuracy. For example, the body should be roughly 1.5 to 2 times the length of the head, while the legs should be about one-third the length of the body. Pay attention to the proportions of the unicorn's features, such as the size and shape of the eyes, ears, and horn, in relation to the rest of the head and body. By carefully measuring and proportioning each part of the unicorn, you can create a drawing that is both realistic and charming.
Choosing the Right Drawing Tools and Materials
Choosing the right drawing tools and materials is essential for creating a beautiful and magical unicorn. For kids, it's best to start with simple and easy-to-use tools that can help them express their creativity. A set of washable markers or colored pencils is perfect for young artists, as they are vibrant, easy to blend, and won't make a mess. A pencil case or a container with a variety of colored pencils, markers, and crayons can provide endless possibilities for creativity. Additionally, a sketchbook or a drawing pad with a smooth surface can help kids create smooth lines and even textures. For more advanced artists, a set of high-quality paints, such as watercolors or acrylics, can add an extra layer of depth and dimension to their unicorn drawing. Don't forget to have a eraser and a sharpener on hand to help correct mistakes and keep pencils sharp. With the right tools and materials, kids can let their imagination run wild and create a unicorn that is truly one-of-a-kind.
Designing the Unicorn's Body and Features
When designing a unicorn, it's essential to consider the overall aesthetic and features that make this mythical creature so captivating. A well-designed unicorn should have a harmonious balance of elegance, strength, and magic. To achieve this, we'll explore three key aspects of designing a unicorn: sketching the head and facial features, creating the body and limbs, and adding the horn and mane. By focusing on these elements, you'll be able to bring your unicorn to life and make it a truly unique and enchanting creature. Let's start by exploring the first step in designing a unicorn: sketching the head and facial features.
Sketching the Unicorn's Head and Facial Features
When sketching the unicorn's head and facial features, start by drawing a large oval for the head, making sure it's tilted slightly to give the unicorn a gentle and majestic appearance. Add a smaller oval for the muzzle, connected to the head by a curved line. The muzzle should be rounded and soft, with a slight indentation at the top to create a subtle nose. For the eyes, draw two almond-shaped circles, making sure to leave enough space between them to create a sense of depth and dimension. Add a small curved line above each eye to create the eyelid, and a tiny circle for the pupil. The eyes should be large and expressive, with a gentle sparkle to convey the unicorn's kind and magical nature. Next, draw a small, curved line for the mouth, making sure it's slightly upturned to give the unicorn a friendly and approachable smile. Add a few short, curved lines around the mouth to create a soft, rounded jawline. Finally, draw a long, flowing mane that flows from the top of the head, using soft, curved lines to create a sense of movement and flow. The mane should be thick and luscious, with a few loose strands framing the face to add a touch of whimsy and charm. By following these simple steps, you can create a beautiful and enchanting unicorn head that's sure to delight kids of all ages.
Creating the Unicorn's Body and Limbs
When creating the unicorn's body and limbs, start by drawing a large oval for the body, making sure it's tall rather than wide. The oval should be slightly tilted, with the top end leaning towards the left side of the paper. This will help create a sense of movement and balance for the unicorn. Next, draw a smaller oval for the neck, connecting it to the top of the body. The neck should be slightly curved, giving the unicorn a gentle and elegant appearance. For the legs, draw four straight lines, two in front and two at the back, making sure they're evenly spaced and roughly the same length. The front legs should be slightly shorter than the back legs, giving the unicorn a sense of depth and dimension. For the hooves, draw small ovals at the end of each leg, making sure they're rounded and smooth. Finally, add some gentle curves to the body and legs to give the unicorn a soft and flowing appearance. Remember to keep your lines smooth and gentle, as this will help create a sense of magic and wonder in your unicorn drawing.
Adding the Unicorn's Horn and Mane
When adding the unicorn's horn and mane, it's essential to consider the overall aesthetic you want to achieve. The horn should be placed on the forehead, slightly above the eyes, and should be proportional to the size of the head. You can draw the horn as a long, spiraling shape, or as a shorter, more compact shape, depending on your preference. The mane, on the other hand, should be drawn as a flowing, wavy shape that follows the contours of the neck and back. You can add some texture and detail to the mane by drawing individual strands of hair, or by adding some loose, flowing strands that frame the face. To add some extra magic to your unicorn, you can also draw some sparkles or glitter around the horn and mane, using a small dotting tool or a white gel pen. This will give your unicorn a truly mythical and enchanting appearance.
Adding Details and Finishing Touches
Adding the final details to a drawing can make all the difference in bringing it to life. When it comes to adding details and finishing touches, there are several key elements to consider. First, adding color and texture to the subject can add depth and dimension, making it more visually appealing. Additionally, creating a background and environment can help to set the scene and provide context for the subject. Finally, finalizing the drawing with shading and highlights can help to create a sense of volume and realism. By incorporating these elements, artists can take their drawings to the next level and create a truly stunning piece of art. In this article, we will explore each of these elements in more detail, starting with the importance of adding color and texture to the unicorn.
Adding Color and Texture to the Unicorn
Adding color and texture to your unicorn drawing can bring it to life and make it even more magical. Start by choosing a range of colors that you think would suit your unicorn's personality, such as pastel shades for a soft and gentle look or bright and bold colors for a more playful and adventurous feel. You can use markers, colored pencils, or paints to add color to your drawing, and don't be afraid to experiment with different techniques, such as layering or blending colors, to create a unique and interesting effect. To add texture to your unicorn's mane and tail, you can use a variety of materials, such as glitter, stickers, or even yarn or string. You could also add some texture to your unicorn's body by drawing on some scales or a sparkly coat. Remember to have fun and be creative with your color and texture choices, and don't worry if your unicorn doesn't turn out exactly as you imagined – it's all part of the magic of drawing and creating.
Creating a Background and Environment
When creating a background and environment for your unicorn drawing, think about the kind of world you want your magical creature to inhabit. You could draw a beautiful, sunny meadow filled with wildflowers, or a dark and mysterious forest with towering trees. Consider what kind of colors and textures will help bring your background to life. For a meadow scene, you might use soft, green grass and colorful flowers, while a forest scene might feature rough, brown tree trunks and twinkling stars. Don't forget to add some depth to your background by including elements like hills, mountains, or a distant horizon. You could also include some fun details like a sparkling stream, a fluffy cloud, or a few hidden animals. Remember, the background and environment should help tell the story of your unicorn and add to its magic.
Finalizing the Drawing with Shading and Highlights
Finalizing the drawing with shading and highlights is a crucial step in bringing the unicorn to life. To start, use a range of pencils, from 2B to 6B, to create depth and dimension by shading in the areas where the light source is not directly hitting the unicorn's body. Begin with the darkest areas, such as the mane and tail, and work your way up to the lighter areas, like the face and legs. Use gentle, smooth strokes to blend the shading, making sure to vary the pressure to achieve different shades of gray. For the highlights, use a white or light-colored pencil to add a touch of sparkle to the unicorn's horn, eyes, and any other areas where the light would naturally catch. Be careful not to overdo it, as too much highlighting can make the drawing look unnatural. Finally, take a step back and evaluate the overall balance of shading and highlights, making any necessary adjustments to create a cohesive and visually appealing final product.