How To Tie A Double Windsor Knot
The art of tying a double Windsor knot is a timeless and essential skill that every individual should possess. Not only does it exude confidence and sophistication, but it also adds a touch of elegance to any outfit. However, mastering the double Windsor knot can be a daunting task, especially for those who are new to tying neckties. In this article, we will break down the process of tying a double Windsor knot into three manageable sections. First, we will start by mastering the basics of the double Windsor knot, understanding the fundamental principles and techniques that make up this iconic knot. From there, we will move on to step-by-step instructions for tying the double Windsor knot, providing a clear and concise guide for those looking to learn. Finally, we will refine and perfect the double Windsor knot, offering tips and tricks for achieving a flawless and polished finish. By the end of this article, you will be well on your way to becoming a double Windsor knot expert. So, let's begin by mastering the basics of the double Windsor knot.
Mastering the Basics of the Double Windsor Knot
The Double Windsor Knot, also known as the Full Windsor, is a timeless and versatile necktie knot that exudes confidence and sophistication. Mastering the basics of this iconic knot is essential for any individual looking to elevate their professional or formal attire. To achieve a perfectly tied Double Windsor Knot, it is crucial to understand its structure, choose the right collar style and shirt, and prepare the necessary tools and accessories. By grasping the intricacies of the knot's structure, individuals can ensure a balanced and symmetrical tie. Selecting the appropriate collar style and shirt is also vital, as it can make or break the overall aesthetic of the outfit. Furthermore, having the right tools and accessories at hand can streamline the tying process and prevent frustration. In this article, we will delve into the world of the Double Windsor Knot, starting with the foundation of its structure, to help you master this essential skill.
Understanding the Double Windsor Knot's Structure
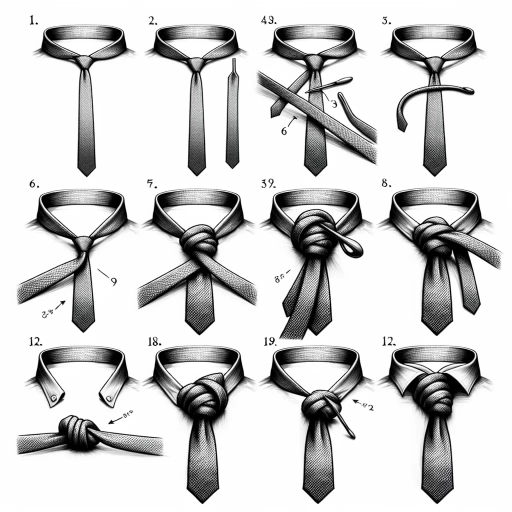
The Double Windsor Knot, also known as the Full Windsor, is a thick and triangular-shaped knot that is considered one of the most popular and versatile necktie knots. To understand its structure, it's essential to break down its components and the steps involved in tying it. The Double Windsor Knot consists of a wide and triangular-shaped base, a middle section with a series of wraps, and a narrow and tapered top. The knot is created by passing the wide end of the tie through the neck loop from underneath, then crossing it over the narrow end and passing it behind. The wide end is then brought up and through the neck loop again, creating the first wrap. The process is repeated, with the wide end passing behind the narrow end and then up and through the neck loop, creating the second wrap. This process is repeated once more, creating the third wrap, which forms the base of the knot. The middle section of the knot is created by passing the wide end behind the narrow end and then up and through the neck loop, creating a series of wraps that build upon each other. The narrow and tapered top of the knot is created by passing the wide end through the neck loop one last time and then pulling it gently to tighten the knot. By understanding the structure of the Double Windsor Knot, you can master the basics of tying it and create a knot that is both stylish and secure.
Choosing the Right Collar Style and Shirt
When it comes to pairing a shirt with a Double Windsor knot, the collar style plays a crucial role in creating a polished and put-together look. The Double Windsor knot is a thick and triangular-shaped knot, which makes it best suited for spread collars or cutaway collars. These types of collars provide a wide and open space for the knot to sit comfortably, allowing it to be the focal point of the outfit. Point collars, on the other hand, are not ideal for the Double Windsor knot as they can make the knot appear too bulky and overwhelming. Button-down collars are also not recommended as they can add a casual touch to the outfit, which may not be suitable for formal occasions. When choosing a shirt to pair with a Double Windsor knot, look for one with a stiff collar that can hold its shape and provide a clean and crisp base for the knot. A high-quality dress shirt with a well-made collar will elevate the overall look and make the Double Windsor knot shine. Ultimately, the key to pulling off a Double Windsor knot is to balance its volume with a well-chosen collar style and a high-quality shirt.
Preparing the Necessary Tools and Accessories
When it comes to mastering the double Windsor knot, having the right tools and accessories is essential. To start, you'll need a high-quality tie made from a smooth, silk-like material that will allow the knot to slide into place easily. A tie with a subtle pattern or texture can also help to add some visual interest to the finished knot. In addition to the tie, you'll also need a mirror to practice in front of, as well as a dimple maker or tie clip to add a touch of elegance to the finished knot. A tie bar or tie tack can also be useful for keeping the tie in place and preventing it from coming undone throughout the day. Finally, a bit of patience and practice is also essential, as tying the double Windsor knot can take some time to get the hang of. By having all of these tools and accessories at your disposal, you'll be well on your way to mastering the double Windsor knot and adding a touch of sophistication to your wardrobe.
Step-by-Step Instructions for Tying the Double Windsor Knot
The Double Windsor Knot is a classic and timeless choice for formal occasions, exuding confidence and sophistication. To master this iconic knot, it's essential to follow a step-by-step approach. In this article, we will guide you through the process of tying the Double Windsor Knot, breaking it down into manageable sections. We will start by exploring the initial steps of creating the foundation, where you will learn how to position the wide end and set the stage for the rest of the knot. From there, we will move on to passing the wide end through the neck loop and creating the first turn, which is crucial for establishing the knot's structure. Finally, we will cover the final stages of tightening the knot and adjusting the collar to achieve a flawless finish. By following these instructions, you will be able to tie the Double Windsor Knot with ease and precision. Starting with the Wide End and Creating the Foundation is the first crucial step in this process.
Starting with the Wide End and Creating the Foundation
When starting with the wide end, it's essential to create a solid foundation for the Double Windsor Knot. Begin by facing a mirror and standing up straight, with your tie hanging down about 12 inches below your neck. Cross the wide end over the narrow end, so that it forms an "X" shape. Take the wide end and pass it behind the narrow end, then bring it up and over the knot, so that it forms a loop. You should see the wide end resting on top of the narrow end, with the loop you just created sitting on top of the knot. This is the foundation of the Double Windsor Knot, and it's crucial to get it right. Take a moment to adjust the tie so that it's centered and the edges are even. You should see a symmetrical shape starting to form, with the wide end on top of the narrow end and the loop sitting on top of the knot. This foundation will provide the base for the rest of the knot, so make sure it's secure and even before moving on to the next step.
Passing the Wide End Through the Neck Loop and Creating the First Turn
To pass the wide end through the neck loop and create the first turn, begin by holding the wide end of the tie in your non-dominant hand, with the tie hanging down and the wide end facing away from you. Cross the wide end over the narrow end, so that it forms an "X" shape. Next, take the wide end and pass it behind the narrow end, then bring it up and through the neck loop from underneath. You should see the wide end emerge on the right side of the knot. Now, take the wide end and pass it behind the knot, then bring it up and through the loop again, so that it forms the first turn of the Double Windsor. As you pass the wide end through the loop, make sure to keep your hand inside the loop to guide it and maintain control. This will help you create a smooth, even turn that sets the foundation for the rest of the knot. With the first turn in place, you can begin to build the Double Windsor, working your way up to the final knot.
Tightening the Knot and Adjusting the Collar
Tightening the knot and adjusting the collar are the final steps in tying a Double Windsor knot. To tighten the knot, gently pull on both ends of the tie, making sure it's centered and the edges are even. You can also adjust the knot by tugging on the wide end of the tie, which will help to tighten or loosen the knot as needed. Once the knot is tightened, adjust the collar of your shirt to ensure it's sitting comfortably and the knot is visible. You can also make any necessary adjustments to the tie's length and positioning to achieve a symmetrical and balanced look. By tightening the knot and adjusting the collar, you'll be able to achieve a secure and polished finish to your Double Windsor knot.
Refining and Perfecting the Double Windsor Knot
The art of tying a Double Windsor Knot is a timeless classic that exudes elegance and sophistication. However, mastering this iconic knot requires more than just a basic understanding of its mechanics. To truly refine and perfect the Double Windsor Knot, one must pay attention to three crucial aspects: adjusting the knot's symmetry and centering, ensuring a comfortable and secure fit, and adding a personal touch with knot variations. By focusing on these key elements, individuals can elevate their knot-tying skills and create a truly exceptional Double Windsor Knot. In this article, we will delve into the intricacies of refining and perfecting the Double Windsor Knot, starting with the importance of adjusting the knot's symmetry and centering. By making subtle adjustments to the knot's alignment, individuals can achieve a more balanced and visually appealing finish, setting the foundation for a truly exceptional Double Windsor Knot.
Adjusting the Knot's Symmetry and Centering
Adjusting the knot's symmetry and centering is a crucial step in refining and perfecting the Double Windsor Knot. To achieve a symmetrical knot, gently tug on both sides of the knot to ensure they are even and balanced. If one side is slightly longer than the other, adjust the knot accordingly by pulling on the longer side. Next, focus on centering the knot by adjusting the edges of the knot so that they are aligned with the center of the shirt. To do this, use your fingers to nudge the edges of the knot towards the center, making sure they are even and symmetrical. It's essential to be patient and gentle when making these adjustments, as the knot can easily become misshapen if pulled too tightly. By taking the time to adjust the knot's symmetry and centering, you'll be able to achieve a polished and professional finish that elevates your overall appearance. Additionally, adjusting the knot's symmetry and centering will also help to create a more comfortable and secure knot, as it will sit more evenly under the collar. With a little practice and patience, you'll be able to master the art of adjusting the knot's symmetry and centering, and your Double Windsor Knot will look and feel its best.
Ensuring a Comfortable and Secure Fit
Ensuring a comfortable and secure fit is crucial when tying a Double Windsor Knot. To achieve this, start by adjusting the knot to sit snugly under your collar, making sure it's not too tight or too loose. The ideal position is when the knot is centered and the edges are aligned with the collar's edges. Next, gently tug on both sides of the knot to ensure it's even and symmetrical. You should feel a slight resistance, but not too much tension. If the knot feels too tight, you can loosen it by pulling on the wide end of the tie. Conversely, if it feels too loose, you can tighten it by pulling on the narrow end. Additionally, make sure the knot is not twisted or asymmetrical, as this can affect the overall appearance and comfort of the tie. By taking the time to adjust and refine the fit, you'll be able to achieve a comfortable and secure Double Windsor Knot that will last throughout the day.
Adding a Personal Touch with Knot Variations
Adding a personal touch to the Double Windsor Knot can elevate it from a classic to a truly unique and stylish accessory. One way to achieve this is by experimenting with different knot variations. By subtly adjusting the tension, twist, and placement of the knot, you can create a distinctive look that reflects your personality. For instance, you can try a slightly asymmetrical knot, where one side is slightly tighter than the other, or a knot with a more pronounced dimple in the center. You can also experiment with different knot textures, such as a more compact and dense knot or a looser, more relaxed one. Additionally, you can play with the knot's position on the shirt, placing it slightly off-center or higher up on the collar. By incorporating these variations, you can add a touch of personality to the classic Double Windsor Knot and make it truly your own. This level of customization allows you to express your individuality and showcase your unique sense of style, making the Double Windsor Knot a truly versatile and adaptable accessory.