How To Draw Disney Characters
Here is the introduction paragraph: Drawing Disney characters is a fun and creative activity that can bring joy to both children and adults alike. With their iconic designs and lovable personalities, it's no wonder why Disney characters have become a staple in many people's lives. However, drawing these beloved characters can seem like a daunting task, especially for those who are new to drawing. But fear not, with a few simple tips and tricks, you can learn how to draw Disney characters like a pro. To get started, it's essential to understand the basics of Disney character drawing, including the fundamental shapes and proportions that make up their designs. By breaking down these characters into simple shapes, you can create a solid foundation for your drawings. Additionally, adding details and personality to your drawings can help bring your Disney characters to life. In this article, we'll explore these concepts in more detail, starting with the basics of Disney character drawing.
Understanding the Basics of Disney Character Drawing
Understanding the basics of Disney character drawing requires a combination of technical skills and artistic flair. To create authentic and engaging Disney-inspired artwork, it's essential to grasp the fundamental principles of character design, including proportions, line art, and shading. Familiarizing yourself with the unique proportions of Disney characters is crucial, as it sets the foundation for creating believable and recognizable characters. Mastering the fundamentals of line art and shading enables artists to add depth, texture, and emotion to their drawings. Developing your observation skills is also vital, as it allows you to accurately capture the subtleties of Disney characters' facial expressions, body language, and movements. By understanding these key elements, artists can unlock the secrets of Disney character drawing and bring their favorite characters to life. To start, let's dive into the world of Disney character proportions and explore the essential guidelines for creating authentic and proportionate characters.
Familiarizing Yourself with Disney Character Proportions
Familiarizing yourself with Disney character proportions is a crucial step in mastering the art of drawing Disney characters. To start, it's essential to understand that Disney characters have distinct body proportions that set them apart from realistic human proportions. Disney characters typically have larger heads, smaller bodies, and longer limbs compared to realistic human proportions. For example, Mickey Mouse's head is roughly one-third the size of his entire body, while his ears are almost as large as his head. Similarly, Disney princesses like Snow White and Cinderella have smaller waists and larger busts compared to realistic human proportions. To draw Disney characters accurately, it's vital to study and memorize these proportions. Start by observing the characters' overall shape and proportions, paying attention to the size and placement of their features, such as eyes, nose, mouth, and ears. Practice drawing the characters from different angles and poses to get a feel for their proportions and how they move. You can also use reference images and study the work of Disney animators and artists to gain a deeper understanding of the characters' proportions and how to draw them accurately. By familiarizing yourself with Disney character proportions, you'll be able to create more authentic and recognizable Disney characters in your drawings.
Mastering the Fundamentals of Line Art and Shading
Mastering the fundamentals of line art and shading is a crucial step in drawing Disney characters. Line art refers to the use of lines to create the overall shape and structure of a character, while shading adds depth and dimension to the drawing. To master line art, start by practicing basic shapes and lines, such as circles, squares, and triangles. Use a variety of line weights and styles to create texture and interest. For example, use thick lines for bold features like eyebrows and thin lines for delicate details like eyelashes. Shading can be achieved through various techniques, including hatching, cross-hatching, and stippling. Hatching involves creating parallel lines that follow the contours of the character, while cross-hatching involves layering lines at different angles to create depth and texture. Stippling involves creating patterns of small dots to create shading and texture. To add shading to your line art, start by identifying the light source and the areas of the character that would be in shadow. Use a range of values, from light to dark, to create a sense of depth and dimension. Practice, practice, practice is key to mastering line art and shading, so be sure to set aside time to hone your skills. With patience and dedication, you'll be able to create beautiful, detailed Disney characters that come to life on the page.
Developing Your Observation Skills for Accurate Drawing
Developing your observation skills is crucial for accurate drawing, especially when it comes to drawing Disney characters. To improve your observation skills, start by studying the character's overall shape and proportions. Look at the character's posture, facial expression, and body language. Notice the way the character's features are arranged and how they relate to each other. Pay attention to the character's texture, pattern, and details, such as the shape of their eyes, nose, and mouth. Observe how the character's features change when they move or express different emotions. Practice drawing the character from different angles and perspectives to get a better understanding of their three-dimensional form. Additionally, study the character's anatomy and how it relates to their movements and actions. By developing your observation skills, you'll be able to capture the character's essence and personality in your drawings, making them more accurate and engaging.
Breaking Down Disney Characters into Simple Shapes
When it comes to drawing Disney characters, many artists may feel intimidated by the complexity of their designs. However, by breaking down these characters into simple shapes, artists can create more accurate and recognizable renditions. This technique involves identifying the basic geometric shapes that make up a character's body, such as circles, squares, and triangles, and using these shapes to construct the character's overall form. By doing so, artists can simplify the drawing process and focus on capturing the character's essence. In this article, we will explore how to break down Disney characters into simple shapes, starting with the basics of constructing character bodies using basic geometric shapes. We will also delve into identifying and drawing facial features with simple shapes, and creating dynamic poses with simple shape combinations. By mastering these techniques, artists can unlock the secrets of drawing beloved Disney characters with ease and confidence. Let's begin by exploring how to use basic geometric shapes to construct character bodies.
Using Basic Geometric Shapes to Construct Character Bodies
Using basic geometric shapes to construct character bodies is a fundamental technique in drawing Disney characters. By breaking down the body into simple shapes, artists can create a more accurate and proportionate figure. Start by using a large oval or circle for the head, making sure to place it at the top of the paper. Next, draw a larger oval or rectangle for the body, ensuring it is in proportion to the head. The body shape should be slightly tilted, with the top end leaning towards the head. For the arms and legs, use long, curved rectangles or cylinders, making sure to capture the gentle curves and contours of the character's limbs. The hands and feet can be represented by smaller ovals or circles, while the fingers and toes can be drawn as small, tapered rectangles. By combining these basic shapes, artists can create a solid foundation for their character's body, allowing them to add details and personality later on. This technique is especially useful for beginners, as it helps to establish a sense of proportion and balance in the character's design. By mastering the use of basic geometric shapes, artists can create a wide range of Disney characters, from the elegant and refined to the playful and comedic.
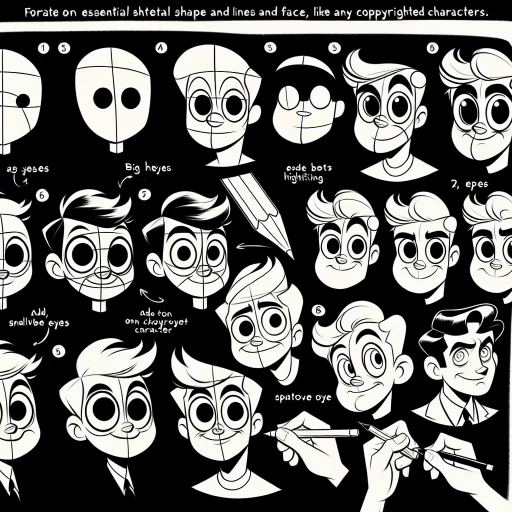
Identifying and Drawing Facial Features with Simple Shapes
Drawing Disney characters can be a fun and creative activity, but it can also be intimidating, especially when it comes to drawing facial features. However, by breaking down facial features into simple shapes, you can create a more accurate and proportionate face. To start, identify the overall shape of the face, which is usually an oval or a circle. Then, locate the center of the face and draw a vertical line down the middle to help you place the features symmetrically. The eyes are typically almond-shaped and are placed about one-third of the way down from the top of the face. The nose is usually a small triangle or oval shape, and the mouth is a curved line that follows the natural shape of the face. By using simple shapes to draw the facial features, you can create a more cartoonish and stylized look that is reminiscent of Disney characters. For example, Mickey Mouse's eyes are two perfect circles, and his nose is a small triangle. By simplifying the facial features, you can create a more recognizable and iconic character. Additionally, using simple shapes can also help you to draw the facial features in proportion to each other, which is important for creating a believable and cohesive character design. By practicing drawing facial features with simple shapes, you can develop your skills and become more confident in your ability to draw Disney characters.
Creating Dynamic Poses with Simple Shape Combinations
Creating dynamic poses with simple shape combinations is a fundamental skill for drawing Disney characters. By breaking down the character's body into basic shapes, such as spheres, cylinders, and rectangles, you can create a wide range of poses and movements. Start by identifying the overall shape of the character's body, including the proportions and placement of the head, torso, arms, and legs. Then, use simple shapes to block in the major forms, paying attention to the relationships between the shapes and the overall flow of the pose. For example, a character's arm can be broken down into a cylinder for the upper arm, a sphere for the elbow, and a smaller cylinder for the forearm. By combining these shapes in different ways, you can create a variety of poses, from relaxed and casual to dynamic and energetic. Additionally, using simple shapes allows you to easily experiment with different poses and make adjustments as needed, without getting bogged down in details. This approach also helps to create a sense of movement and energy in your drawings, as the simple shapes can be used to suggest the character's weight, balance, and momentum. By mastering the art of creating dynamic poses with simple shape combinations, you can bring your Disney characters to life and add a new level of excitement and energy to your drawings.
Adding Details and Personality to Your Disney Drawings
When it comes to creating Disney-inspired drawings, it's the little details that can make all the difference. Adding textures, patterns, and accessories can help bring your characters to life, while capturing their expressions and emotions through facial details can add a touch of personality. Exaggerating their features can also make them more cartoonish and engaging. By incorporating these elements, you can create drawings that are not only visually appealing but also full of character. In this article, we'll explore how to add these details to your Disney drawings, starting with the importance of incorporating textures, patterns, and accessories for depth.
Incorporating Textures, Patterns, and Accessories for Depth
Incorporating textures, patterns, and accessories can add depth and visual interest to your Disney drawings. To start, consider the textures of the characters' clothing and surroundings. For example, you can add a soft, fluffy texture to a character's fur or a rough, scaly texture to a villain's skin. You can also add patterns to clothing and accessories, such as stripes, polka dots, or florals, to give your characters more personality. Accessories like hats, jewelry, and bags can also add a pop of color and interest to your drawings. When adding textures, patterns, and accessories, be mindful of the character's personality and style. For example, a princess might wear delicate, sparkly accessories, while a villain might wear dark, ominous clothing with sharp textures. By incorporating these elements, you can create more dynamic and engaging Disney drawings that capture the essence of your favorite characters.
Capturing Expressions and Emotions through Facial Details
Capturing expressions and emotions through facial details is a crucial aspect of drawing Disney characters. The face is the most expressive feature of any character, and it's essential to get it right to convey the desired emotions and personality traits. To capture expressions and emotions, focus on the eyes, eyebrows, nose, and mouth. The eyes are the windows to the soul, and they can convey a wide range of emotions, from happiness and excitement to sadness and fear. The eyebrows can also add a lot of expression to a character's face, and can be used to convey emotions such as surprise, anger, or skepticism. The nose and mouth can also be used to add expression and personality to a character's face, and can be used to convey emotions such as happiness, sadness, or determination. When drawing facial details, it's essential to pay attention to the subtleties of expression and emotion, and to use reference images to get a better understanding of how the face works. By capturing expressions and emotions through facial details, you can add depth and personality to your Disney drawings, and bring your characters to life.
Exaggerating Features for a More Cartoonish and Engaging Look
When it comes to creating a more cartoonish and engaging look for your Disney drawings, exaggerating features is a key technique to master. By amplifying certain characteristics, you can add visual interest, personality, and humor to your characters. Start by identifying the distinctive features of the character you're drawing, such as Mickey Mouse's oversized ears or Goofy's long, curved snout. Then, take these features and blow them up to comical proportions. For example, you could make Mickey's ears even bigger and more rounded, or Goofy's snout even longer and more curved. This will help to create a more caricatured and cartoonish appearance. Additionally, consider exaggerating the character's facial expressions and body language to add more personality and emotion to your drawing. By pushing the boundaries of realism and embracing a more stylized approach, you can create a more engaging and memorable Disney character.