How To Tuck In Shirt
Tucking in your shirt is a simple yet essential skill that can elevate your overall appearance and make you look more put together. However, it's not as easy as it seems, and many people struggle with it. In this article, we will provide you with a comprehensive guide on how to tuck in your shirt like a pro. We will start by exploring the art of tucking in your shirt, discussing the importance of mastering this skill and providing tips on how to do it correctly. Then, we will move on to a step-by-step guide that will walk you through the process of tucking in your shirt, from preparing your shirt to adjusting the fit. Finally, we will address common issues that people face when tucking in their shirts and provide troubleshooting solutions. By the end of this article, you will be well on your way to mastering the art of tucking in your shirt.
Mastering the Art of Tucking in Your Shirt
Mastering the art of tucking in your shirt is a simple yet effective way to elevate your style and make a great impression. To achieve this, it's essential to understand the basics of shirt tucking, including the different techniques and styles that suit various body types and occasions. Additionally, choosing the right shirt for tucking is crucial, as some fabrics and designs are more suitable for this purpose than others. Before you start tucking, it's also important to prepare your shirt by ensuring it's clean, ironed, and free of wrinkles. By following these steps, you'll be well on your way to mastering the art of tucking in your shirt. In this article, we'll delve into the world of shirt tucking, starting with the basics. Let's begin by understanding the basics of shirt tucking.
Understanding the Basics of Shirt Tucking
Understanding the basics of shirt tucking is essential to master the art of tucking in your shirt. To start, it's crucial to choose the right type of shirt that is designed for tucking, typically made of a smooth, breathable fabric such as cotton or linen. The shirt should also have a fitted silhouette and a defined waistline to create a clean line when tucked in. Next, consider the type of pants or skirt you will be wearing, as this will affect how you tuck in your shirt. For example, if you're wearing high-waisted pants or a pencil skirt, you may want to tuck your shirt in more tightly to create a streamlined look. On the other hand, if you're wearing low-rise pants or a flowy skirt, you may want to leave your shirt untucked or tuck it in loosely to create a more relaxed look. Additionally, pay attention to the length of your shirt, as a longer shirt may require more tucking and adjusting to achieve a smooth, wrinkle-free look. By understanding these basics, you can set yourself up for success and master the art of tucking in your shirt with confidence.
Choosing the Right Shirt for Tucking
When it comes to mastering the art of tucking in your shirt, choosing the right shirt is crucial. Not all shirts are created equal, and some are more suitable for tucking than others. To ensure a smooth and polished look, opt for a shirt with a slim fit and a tailored silhouette. Avoid baggy or loose-fitting shirts, as they can add bulk and make the tucking process more challenging. Consider a dress shirt with a point collar or a spread collar, as these styles tend to sit flat against the body and create a clean line. Additionally, look for shirts made from high-quality, breathable fabrics such as cotton or linen, which will drape smoothly and resist wrinkles. A shirt with a bit of stretch is also a good option, as it will provide a comfortable fit and make it easier to tuck in. Ultimately, the right shirt will make all the difference in achieving a neat and professional look, so take the time to choose one that fits well and is designed for tucking.
Preparing Your Shirt for Tucking
Preparing your shirt for tucking is a crucial step in achieving a neat and polished look. To start, ensure your shirt is clean and ironed, as wrinkles and creases can make it difficult to achieve a smooth tuck. Next, choose the right type of shirt for tucking - a dress shirt or a button-down with a slim fit is ideal. Avoid shirts with too much fabric or a loose fit, as they can be bulky and hard to tuck. If your shirt has a stiff collar, consider softening it with a collar stay or a light spray of starch to make it more pliable. Additionally, make sure your shirt is the right length for your body - a shirt that is too long can be overwhelming, while one that is too short can look sloppy. Finally, take a moment to smooth out any wrinkles or creases in the front of the shirt, paying particular attention to the area around the buttons and the hem. By taking the time to prepare your shirt, you'll be able to achieve a crisp, smooth tuck that will elevate your entire outfit.
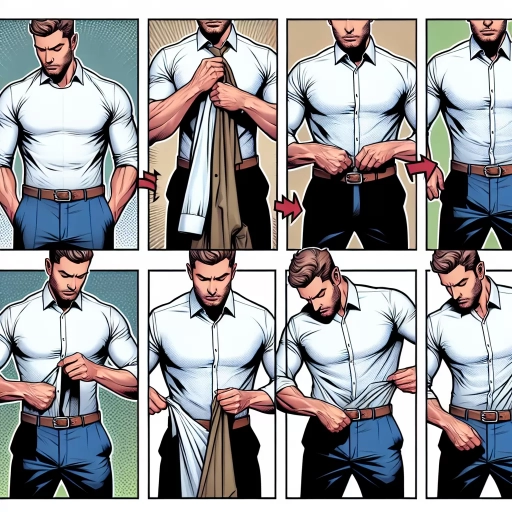
Step-by-Step Guide to Tucking in Your Shirt
Tucking in your shirt can be a daunting task, especially if you're new to dressing professionally or want to elevate your everyday style. However, with a few simple steps, you can master the art of tucking in your shirt and look polished and put-together. To start, you'll want to focus on tucking in the front of your shirt, making sure it's smooth and even. From there, you'll move on to tucking in the back of your shirt, ensuring a seamless fit. Finally, you'll want to adjust the fit to achieve a polished look that's tailored to your body. By following these steps, you'll be able to tuck in your shirt with confidence and style. So, let's start with the first step: tucking in the front of your shirt.
Tucking in the Front of Your Shirt
Tucking in the front of your shirt is a simple yet effective way to create a more polished and put-together look. To do this, start by standing up straight and smoothing out any wrinkles in your shirt. Next, locate the bottom hem of your shirt and fold it up towards your waistband, making sure to keep the edges aligned and the fabric smooth. As you fold, use your fingers to tuck the hem into your pants, working from the center outwards. Make sure to keep the fabric tight and smooth, avoiding any bunching or wrinkles. Once you've tucked in the front of your shirt, adjust the fit as needed to ensure it's comfortable and even. You can also use a belt to help keep your shirt in place and add a touch of style to your outfit. By tucking in the front of your shirt, you can create a more streamlined and professional look that's perfect for work, formal events, or any occasion where you want to make a good impression.
Tucking in the Back of Your Shirt
Tucking in the back of your shirt is a crucial step in achieving a neat and polished look. To do this, start by standing up straight and smoothing out any wrinkles on the back of your shirt. Locate the bottom hem of the shirt and identify the center point. Take the center point and tuck it into your pants, making sure it is even and symmetrical. Use your fingers to adjust the fabric and ensure it is lying flat against your back. You can also use a bit of tension to pull the fabric taut, which will help create a crisp, smooth line. As you tuck in the back of your shirt, make sure to keep the front of the shirt smooth and flat, avoiding any bunching or wrinkles. Finally, give the back of your shirt a quick tug to ensure it is securely in place and adjust as needed. By following these simple steps, you can achieve a professional and put-together look that is perfect for work, formal events, or any occasion where you want to make a good impression.
Adjusting the Fit for a Polished Look
Adjusting the fit for a polished look is a crucial step in tucking in your shirt. Once you have tucked in your shirt, take a step back and assess the fit. Make sure the shirt is not too tight or too loose, as this can affect the overall appearance. If the shirt is too tight, it may accentuate any midsection bulges, while a shirt that is too loose can look sloppy. To achieve a polished look, aim for a fit that is snug but not constricting. You can adjust the fit by tugging gently on the hem of the shirt or by adjusting the waistband of your pants. Additionally, consider the length of the shirt. A shirt that is too long can overwhelm the outfit, while a shirt that is too short can look unbalanced. Aim for a length that hits just above the belt line, creating a clean and streamlined look. By adjusting the fit and length of your shirt, you can create a polished and put-together appearance that is perfect for any occasion.
Troubleshooting Common Shirt Tucking Issues
Troubleshooting common shirt tucking issues can be a frustrating experience, especially when you're in a hurry to get dressed and start your day. However, with a few simple techniques and adjustments, you can resolve these issues and achieve a smooth, polished look. One of the most common problems people face is excess fabric at the waist, which can make the shirt look baggy and unflattering. Another issue is preventing the shirt from coming untucked, which can be especially problematic for those with active lifestyles. Additionally, fixing a lopsided or asymmetrical tuck can be a challenge, requiring some finesse and attention to detail. In this article, we'll explore these common shirt tucking issues and provide practical solutions to help you overcome them. First, let's start by addressing the issue of excess fabric at the waist, which can be resolved with a few simple adjustments to your tucking technique.
Dealing with Excess Fabric at the Waist
Dealing with excess fabric at the waist can be a frustrating issue when trying to achieve a smooth, tucked-in look. One common solution is to use a belt to cinch the waist and create a more defined silhouette. However, this may not always be effective, especially if the excess fabric is significant. In such cases, it may be necessary to consider alterations or adjustments to the shirt itself. For example, taking in the sides of the shirt or shortening the length can help eliminate excess fabric and create a more streamlined appearance. Additionally, using a shirt with a more fitted design or a tailored fit can also help minimize excess fabric at the waist. It's also worth noting that the type of fabric used can also play a role in excess fabric at the waist. Thicker or heavier fabrics may be more prone to bunching or wrinkling, while lighter fabrics may be more forgiving. By understanding the root cause of the issue and exploring different solutions, individuals can find a way to effectively deal with excess fabric at the waist and achieve a polished, tucked-in look.
Preventing Shirt from Coming Untucked
Preventing a shirt from coming untucked can be achieved through a combination of proper tucking techniques, strategic styling, and clever product solutions. To start, ensure a smooth, wrinkle-free tuck by using a mirror to guide your hands as you tuck the shirt into your pants. Make sure the shirt is evenly aligned with the waistband and that the fabric is not bunched up or twisted. For added security, try the "military tuck," where you tuck the shirt into your pants and then fold the excess fabric back over the waistband, creating a secure and streamlined look. Additionally, consider using shirt stays or tuck tabs, which are small devices that attach to the shirt and pants to keep the shirt in place. These can be especially useful for individuals with larger stomachs or those who experience frequent shirt untucking. Furthermore, wearing a belt can also help keep the shirt tucked in by providing an extra layer of support and definition around the waist. By incorporating these techniques and products into your daily routine, you can enjoy a confidently tucked-in shirt all day long.
Fixing a Lopsided or Asymmetrical Tuck
When fixing a lopsided or asymmetrical tuck, start by identifying the source of the issue. Check if the shirt is properly aligned with the pants or skirt, and if the tuck is even on both sides. If the problem persists, try adjusting the tuck by gently pulling the shirt down on the shorter side to match the longer side. You can also try tucking the shirt in a bit more on the shorter side to balance it out. Another approach is to use a technique called "anchoring," where you tuck a small portion of the shirt into the waistband on the shorter side, creating a temporary anchor to help even out the tuck. Additionally, consider using a shirt with a bit of stretch or a slim-fit design, as these can help reduce the likelihood of a lopsided tuck. If the issue is due to a poorly fitting shirt, consider getting it tailored or altered to fit your body better. By making these adjustments, you should be able to achieve a more symmetrical and polished look.