How To Draw A Table
Drawing a table may seem like a simple task, but it requires attention to detail and a solid understanding of its basic structure. To create a realistic and visually appealing table drawing, you need to start with the fundamentals. In this article, we will guide you through the process of drawing a table, from understanding the basics to adding details and refining your drawing. First, we will explore the basics of drawing a table, including its shape, proportions, and key features. Next, we will show you how to sketch the table's basic structure, including the legs, top, and any other essential components. Finally, we will provide tips on adding details and refining your table drawing to make it look more realistic and polished. By following these steps, you will be able to create a high-quality table drawing that showcases your artistic skills. So, let's start by understanding the basics of drawing a table.
Understanding the Basics of Drawing a Table
Drawing a table may seem like a simple task, but it requires attention to detail and a solid understanding of the basics. To create a realistic and accurate drawing of a table, it's essential to start with the fundamentals. This includes defining the table's shape and size, choosing the right drawing tools and materials, and setting up the drawing space and reference points. By mastering these elements, you'll be able to create a drawing that captures the essence of the table. In this article, we'll explore each of these key components in depth, starting with the foundation of any successful drawing: defining the table's shape and size.
Defining the Table's Shape and Size
When defining the table's shape and size, it's essential to consider the overall aesthetic and functionality you want to achieve. Start by determining the table's purpose, as this will influence its dimensions and shape. For example, a dining table will require a larger surface area and a more rectangular shape to accommodate multiple people, whereas a coffee table may be smaller and more rounded to fit into a cozy living room. Consider the space where the table will be placed and the flow of traffic around it. Measure the room and the surrounding furniture to ensure the table will fit comfortably and leave enough space for movement. Think about the style and design of the table, such as modern, traditional, or minimalist, as this will also impact its shape and size. A modern table might have clean lines and a sleek, low profile, while a traditional table might have ornate details and a more substantial presence. Once you have a clear idea of the table's purpose, space, and style, you can begin to sketch out its shape and size, using proportions and measurements to create a balanced and functional design.
Choosing the Right Drawing Tools and Materials
Choosing the right drawing tools and materials is essential for creating a precise and detailed drawing of a table. To start, you'll need a pencil with a fine point, such as a 0.5mm or 0.7mm mechanical pencil, which will allow you to create sharp lines and precise details. A sharpener is also necessary to keep your pencil sharp and ready to use. In addition to a pencil, a ruler or straightedge is crucial for drawing straight lines and measuring the proportions of your table. A set of drawing guides or a drawing board with a grid can also be helpful in achieving accurate proportions and measurements. When it comes to paper, choose a high-quality, smooth paper that is designed specifically for drawing, such as cartridge paper or Bristol board. Avoid using regular printer paper, as it can be too thin and may not provide the best results. Finally, consider using a eraser, such as a kneaded eraser or a white vinegar eraser, to correct any mistakes and create a clean and precise drawing. By choosing the right tools and materials, you'll be able to create a detailed and accurate drawing of a table that meets your needs and expectations.
Setting Up the Drawing Space and Reference Points
Setting up the drawing space and reference points is a crucial step in drawing a table accurately. To begin, start by creating a large rectangle that represents the overall dimensions of the table. This rectangle will serve as the foundation for your drawing and help you establish the proportions of the table. Next, divide the rectangle into sections using horizontal and vertical lines, which will act as reference points for the table's legs, aprons, and top. These lines should be spaced evenly apart and should correspond to the actual measurements of the table. For example, if the table has four legs, you would divide the rectangle into four sections along the bottom edge, with each section representing the space between each leg. Similarly, you would divide the rectangle into sections along the top edge to represent the aprons and the table top. By establishing these reference points, you will be able to accurately draw the individual components of the table, such as the legs, aprons, and table top, and ensure that they are in proportion to each other. Additionally, you can use these reference points to add details such as the table's hardware, such as screws or bolts, and any decorative elements, such as carvings or moldings. By taking the time to set up the drawing space and reference points, you will be able to create a detailed and accurate drawing of the table, which will serve as a solid foundation for your design.
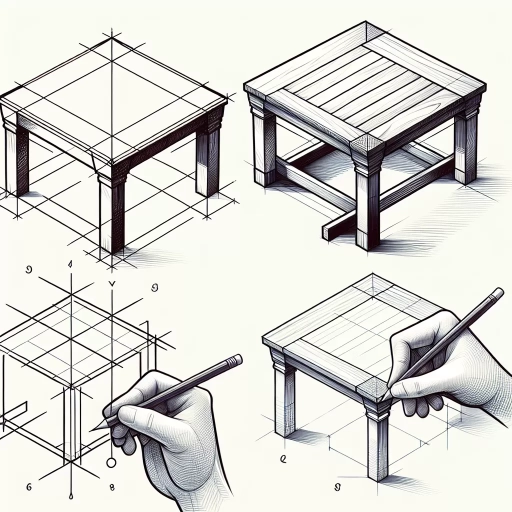
Sketching the Table's Basic Structure
When sketching the basic structure of a table, it's essential to start with the fundamentals. A well-designed table should have a sturdy base, a functional top, and a cohesive overall aesthetic. To achieve this, it's crucial to break down the sketching process into manageable components. In this article, we'll explore the key elements of sketching a table's basic structure, including creating the table top and shelf, adding the legs and support system, and defining the table's edges and corners. By mastering these fundamental aspects, you'll be able to create a solid foundation for your table design. Let's begin by examining the first crucial step: creating the table top and shelf.
Creating the Table Top and Shelf
To create the table top and shelf, start by sketching a rectangular shape for the top surface, ensuring it is slightly larger than the base of the table. The dimensions of the top surface will depend on the desired size and shape of the table, but a general rule of thumb is to make it about 1-2 inches larger on all sides than the base. Next, add a slight overhang to the top surface, typically around 1/4 inch, to create a lip that will help prevent items from sliding off. For the shelf, sketch a similar rectangular shape, but slightly smaller than the top surface, and positioned about 1/3 of the way down from the top. The shelf should be parallel to the top surface and have a slight lip to prevent items from falling off. Consider adding a slight curve or rounded edge to the shelf to give it a more organic and visually appealing shape. When sketching the table top and shelf, pay attention to the proportions and balance of the design, ensuring that the shapes and lines work harmoniously together to create a cohesive and functional piece of furniture.
Adding the Legs and Support System
The legs and support system of the table are crucial elements that provide stability and balance to the overall structure. To add the legs, start by drawing four vertical lines, one at each corner of the table, making sure they are evenly spaced and of equal length. The width of the legs can vary depending on the design, but a good starting point is to make them about one-quarter of the width of the table. Next, add a horizontal line at the bottom of each leg to create the foot, which should be slightly wider than the leg itself. This will help prevent the table from tipping over. For the support system, you can add aprons, which are horizontal beams that connect the legs and provide additional stability. Draw two aprons, one near the top of the legs and one near the bottom, making sure they are parallel to each other and evenly spaced. You can also add stretchers, which are diagonal beams that connect the legs and provide additional support. Draw two stretchers, one connecting the front legs and one connecting the back legs, making sure they are evenly spaced and parallel to each other. Finally, add any additional details, such as brackets or screws, to complete the legs and support system.
Defining the Table's Edges and Corners
To define the table's edges and corners, start by identifying the overall shape and proportions of the table. Determine the length, width, and height of the table, as well as the thickness of the edges and the style of the corners. For a rectangular table, the edges will be straight and the corners will be right angles, while a round table will have curved edges and no corners. Consider the type of table you are drawing, such as a dining table, coffee table, or desk, as this will influence the design of the edges and corners. For example, a dining table may have a decorative edge or molding, while a coffee table may have a simple, clean edge. Use a ruler or straightedge to draw the edges of the table, making sure they are straight and even. For curved edges, use a compass or a curved line tool to create a smooth, rounded shape. To define the corners, use a sharp pencil to create a clear, defined point where the edges meet. For rounded corners, use a gentle, curved line to soften the edge. Pay attention to the proportions and balance of the table's edges and corners, making sure they are in harmony with the overall design. By carefully defining the table's edges and corners, you can create a clear and accurate representation of the table's shape and structure.
Adding Details and Refining the Table Drawing
Adding details and refining the table drawing is a crucial step in creating a realistic and visually appealing piece of art. To achieve this, there are several techniques that can be employed. Firstly, incorporating texture and pattern can add depth and visual interest to the drawing. This can be done by adding different textures to the table's surface, such as wood grain or marble, and incorporating patterns like carvings or inlays. Additionally, adding hardware and decorative elements can enhance the overall aesthetic of the table. This can include details like table legs, drawer handles, and intricate carvings. Finally, shading and dimensioning the table can create a sense of volume and depth, making the drawing more engaging and realistic. By incorporating these techniques, artists can create a detailed and refined table drawing that showcases their skill and attention to detail. By starting with incorporating texture and pattern, artists can set the foundation for a beautiful and realistic piece of art.
Incorporating Texture and Pattern
Incorporating texture and pattern into your table drawing can add depth and visual interest to the piece. To start, consider the type of texture you want to convey. For example, a wooden table might have a rough, grainy texture, while a metal table might have a smooth, reflective surface. You can suggest texture through a variety of techniques, including hatching, cross-hatching, and stippling. Hatching involves creating a series of closely spaced parallel lines that follow the contours of the table, while cross-hatching involves layering hatching lines at different angles to create a more textured appearance. Stippling, on the other hand, involves creating a pattern of small dots to suggest texture. When it comes to pattern, you might consider adding details such as wood grain, metal mesh, or decorative inlays. To draw wood grain, for example, you can use a combination of hatching and cross-hatching to suggest the texture and pattern of the wood. To draw metal mesh, you can use a series of closely spaced lines to create a grid-like pattern. Decorative inlays can be drawn using a variety of techniques, including hatching, cross-hatching, and stippling. By incorporating texture and pattern into your table drawing, you can create a more detailed and realistic piece that engages the viewer's eye.
Adding Hardware and Decorative Elements
Adding hardware and decorative elements can elevate the overall aesthetic of your table drawing. Start by considering the type of hardware that would be suitable for your table design. For example, if you're drawing a modern table, you might opt for sleek and minimalist hardware such as simple knobs or handles. On the other hand, if you're drawing a traditional or antique-style table, you might choose more ornate hardware such as carved wooden knobs or intricate metal handles. Once you've decided on the type of hardware, you can add it to your drawing using a range of techniques, including hatching, cross-hatching, and stippling. To add decorative elements, consider the style and era of your table design. For example, if you're drawing a Victorian-style table, you might add intricate carvings, ornate moldings, or delicate filigree. If you're drawing a mid-century modern table, you might add simple and geometric patterns, such as chevrons or hexagons. You can use a range of techniques to add decorative elements, including drawing, painting, or even collage. Remember to balance your hardware and decorative elements with the overall design of your table, and don't be afraid to experiment and try out different combinations to achieve the look you want.
Shading and Dimensioning the Table
When it comes to adding depth and visual interest to your table drawing, shading and dimensioning are two essential techniques to master. Shading involves creating areas of light and dark to give your table a three-dimensional appearance, while dimensioning involves adding measurements to your drawing to provide a clear understanding of the table's size and proportions. To shade your table, start by identifying the light source and determining how it will affect the different surfaces of the table. Use a range of shading techniques, such as hatching, cross-hatching, and stippling, to create a sense of volume and texture. For example, you can use hatching to suggest the smooth surface of the table top, while cross-hatching can be used to create a more textured appearance on the legs and aprons. Dimensioning, on the other hand, involves adding measurements to your drawing to provide a clear understanding of the table's size and proportions. This can include adding dimensions to the length, width, and height of the table, as well as to any other relevant features, such as the thickness of the table top or the diameter of the legs. By combining shading and dimensioning techniques, you can create a detailed and accurate drawing of your table that showcases its unique characteristics and features.